
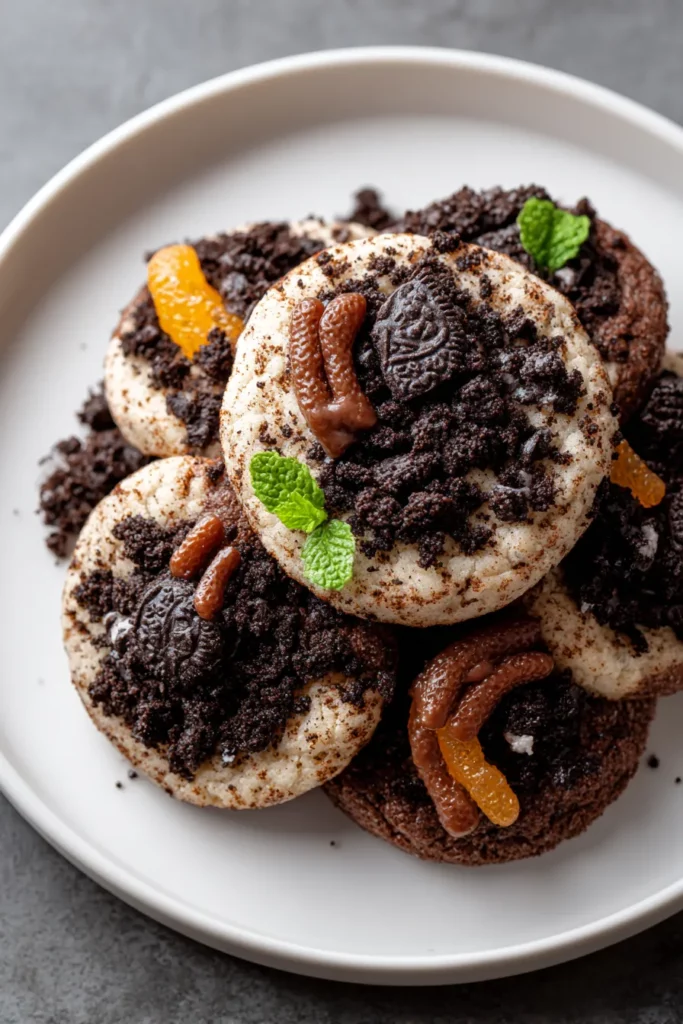
Get ready to dive into a playful blend of chocolatey goodness and whimsical fun with these Dirt Cake Cookies. These treats take your classic cookie game to a whole new level by hiding crushed chocolate sandwich cookies right in the dough and topping each finished cookie with a friendly gummy worm. The result is a chewy, soft-centered cookie dotted with crunchy bits of Oreo-like goodness and mini chocolate chips, crowned by that unexpected pop of fruity sweetness from the gummy critter perched on top. Every bite feels like a secret garden where sweetness and a touch of nostalgia meet—just the kind of dessert that sparks delight across all ages.
These cookies are more than just a novelty; they’re a conversation starter and a guaranteed hit at gatherings. From garden-themed birthday parties to family movie nights and even casual afternoon tea with friends, these Dirt Cake Cookies fit right in. The combination of rich, buttery dough with two kinds of sugar gives them a melt-in-your-mouth quality, while the crushed sandwich cookies add textural contrast. And let’s not forget those gummy worms—perfect for adding a playful twist and colorful flair. They’re uncomplicated enough for a baking beginner but creative enough to impress seasoned bakers looking for a fun, new project. With just 15 minutes of prep and around 12 minutes in the oven, you’ll have a batch of whimsical treats that look as fun as they taste—no complicated piping or decorating skills required!
Before we jump into the method, let’s get acquainted with the stars of this recipe. Each ingredient plays an essential role in creating that perfect balance of flavor, texture, and visual fun.
Provides a rich, creamy base for the cookie dough and helps achieve a tender, melt-in-your-mouth texture. Softening the butter properly is key to getting a light, fluffy cream when combined with sugars.
Adds sweetness and pairs with brown sugar to contribute to the cookies’ chewy edges. It also helps create a fine crumb and light structure when creamed with butter.
Brings moisture, depth of flavor, and a hint of caramel undertone. The molasses content helps keep cookies soft and chewy in the center.
Bind the ingredients together, add structure, and contribute to the cookies’ rich mouthfeel. Beating them one at a time ensures a smooth, uniform batter.
Offers aromatic warmth and rounds out the sweetness, elevating the overall flavor profile with its familiar, comforting notes.
Forms the backbone of the dough, providing structure. Proper measuring and gentle handling ensure your cookies remain tender rather than tough.
Acts as a leavening agent to give the cookies a light lift and achieve those slightly crisp edges we all love.
Works in tandem with baking soda to provide balanced rise and a soft, pillowy texture.
Enhances all the sweet flavors and helps balance the richness of butter and sugars, making each bite more pronounced.
Infuse the dough with crunchy chocolate flavor pockets. Using high-quality cookies here creates more pronounced cocoa notes and satisfies that crunch craving.
Distribute little bursts of creamy chocolate throughout the cookie, ensuring every mouthful is decadently studded with melty goodness.
Provide a playful, colorful finish and a fun textural contrast after baking. Choose various colors and sizes for extra whimsy.
Ready to transform these pantry staples into a batch of playful, garden-inspired cookies? Follow these steps carefully and don’t skip any of the little techniques that make all the difference in texture and taste.
1. Preheat your oven to 350°F (175°C). This ensures that the cookies bake evenly from the moment they hit the sheet.
2. In a large mixing bowl, cream together the softened butter, granulated sugar, and brown sugar until the mixture is light and fluffy. This step incorporates air into the dough for a tender crumb.
3. Add the eggs one at a time, beating well after each addition. This helps keep the batter smooth and emulsified. Stir in the vanilla extract until fully combined.
4. In a separate bowl, whisk together the all-purpose flour, baking soda, baking powder, and salt. This ensures an even distribution of leavening agents and prevents pockets of any single ingredient.
5. Gradually add the dry ingredients to the creamed mixture, mixing just until incorporated. Overmixing can develop gluten and make cookies tough, so stop as soon as you see no streaks of flour.
6. Gently fold in the crushed chocolate sandwich cookies and mini chocolate chips until they’re evenly distributed throughout the dough. Use a spatula to preserve the airiness of the batter.
7. Drop rounded tablespoons of dough onto ungreased baking sheets, leaving about two inches between each cookie to allow for spreading.
8. Bake the cookies in the preheated oven for 10–12 minutes, or until the edges are lightly golden. Keep an eye on them—overbaked cookies lose their chewy center.
9. Remove the cookies from the oven and let them rest on the baking sheets for 5 minutes. This brief cooling period allows the structure to set before handling.
10. Transfer the cookies to a wire rack to cool completely. Once cool, top each one with a gummy worm for decoration before serving.
When it comes to presenting these playful cookies, creativity is your best friend. Whether you’re hosting a themed party or simply enjoying a sweet treat at home, here are some fun ways to serve and enjoy your Dirt Cake Cookies.
Arrange cookies on a rustic wooden platter lined with parchment paper and sprinkle a little edible “dirt” (finely crushed sandwich cookies) around the base of each cookie for an immersive garden vibe.
Place a scoop of vanilla or cookies-and-cream ice cream between two Dirt Cake Cookies for an ooey-gooey dessert. Freeze for 10 minutes before serving to keep everything intact.
Pack individual cookies in clear cellophane bags tied with twine and a mini gardening tag. Guests will love the novelty and you’ll have ready-to-go favors with minimal effort.
Serve alongside small glasses of different milks—classic, chocolate, or even a strawberry flavor—and let guests mix and match. The creamy drinks highlight the cookie’s chocolatey richness and playful worm garnish.
Keeping your Dirt Cake Cookies fresh ensures each bite stays perfectly moist and flavorful. With just a few thoughtful steps, you can maintain that soft-chewy center and crisp edges even days after baking.
Store cooled cookies in a sealed container at room temperature. Layer them with sheets of parchment or wax paper to prevent sticking and maintain shape for up to one week.
If your kitchen is humid or you want to extend shelf life, refrigerate cookies in an airtight container. Let them come to room temperature before serving for the best texture.
Flash-freeze cooled cookies on a baking sheet for about an hour, then transfer to a freezer-safe bag or container. Freeze for up to three months. Thaw on the counter for 10–15 minutes or microwave briefly to serve.
For longer storage, tuck gummy worms separately in a small sealed bag. Add them back onto each cookie just before serving to keep their color and chewiness spot on.
There’s something undeniably magical about biting into one of these Dirt Cake Cookies—where a tender, buttery dough meets crunchy bits of crushed sandwich cookies, speckled with melty chocolate chips, and playfully topped with a gummy worm. Whether you’re aiming to surprise guests at a garden-themed party or simply craving a nostalgic, whimsical dessert at home, this recipe delivers on both flavor and fun. It’s beginner-friendly, requiring just basic pantry staples and simple mixing techniques, yet the visual appeal gives it a wow factor that’s sure to earn compliments from friends and family. With a combined prep and bake time of under 30 minutes, you’ll have a batch of these delightful cookies ready in no time, leaving you free to focus on enjoying the moment—perhaps sharing a laugh over the gummy worm “critters” in your dirt-filled treats!
Feel free to print this article and save it for later, tucking it into your recipe binder or pinning it to your kitchen bulletin board. You can also find a handy FAQ below to answer any common questions you might have. If you give this recipe a whirl, I’d love to hear how it went—share your comments, questions, or feedback! Whether you’re tweaking the mix-ins, experimenting with different gummy worm colors, or baking alongside little helpers, your experiences and insights make this recipe even more special. Happy baking!
With a rich chocolatey base and a playful topping of gummy worms, these Dirt Cake Cookies are a whimsical treat sure to bring smiles to any gathering!

I’m Sophia Montgomery, your guide and fellow food enthusiast on this delicious journey. As a home cook with a deep love for creating meals that bring people together, I started this blog to share my passion for simple, flavorful, and heartwarming dishes