
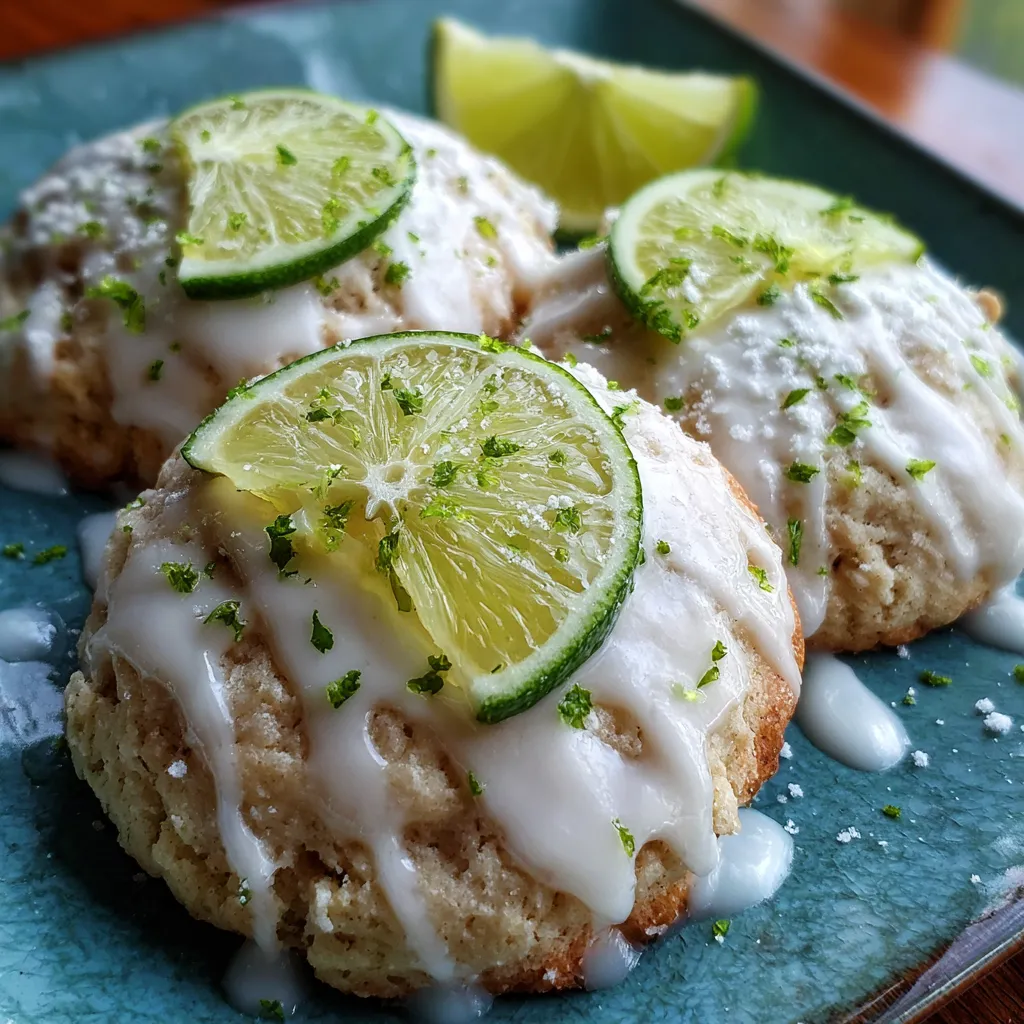
Get ready to brighten your snack time with Key Lime Cookies with Lime Glaze, bright lime cookies topped with a tangy lime glaze that lights up your snack time with zesty citrus notes. These soft, buttery cookies infused with tart key lime and topped with a glossy lime glaze that melts on the tongue will make your tastebuds dance. Perfect for summer gatherings or an afternoon treat, they're so easy you’ll wonder where they’ve been all your life.
Before you start, let’s take a look at the stars of the show—each ingredient plays a crucial role in creating that perfect buttery, tangy bite.
Baking these Key Lime Cookies with Lime Glaze is a breeze! You’ll start by mixing your dry and wet ingredients separately, then combining them to form a silky dough. After rolling and baking to tender perfection, you’ll whisk together a glossy glaze to drizzle or dip on each cooled cookie. Follow these steps closely for cookies that are soft in the center, slightly crisp at the edges, and bursting with zesty lime goodness.
1. Preheat the oven to 350°F and line a baking sheet with parchment paper to prevent sticking.
2. Whisk together the flour, baking powder, and salt in a bowl until evenly combined.
3. Cream the softened butter and granulated sugar in a separate bowl using a hand mixer or stand mixer until light and fluffy.
4. Beat in the egg, 1 tablespoon lime zest, 2 tablespoons fresh key lime juice, and vanilla extract until the mixture is smooth.
5. Gradually add the dry ingredients to the wet ingredients, mixing until just combined to avoid overworking the dough.
6. Scoop tablespoon-sized portions of dough and roll into balls; place them 2 inches apart on the prepared baking sheet and gently flatten each ball with the bottom of a glass.
7. Bake for 10 to 12 minutes, or until the edges are set but the centers remain soft—watch closely to prevent overbaking.
8. Allow the cookies to cool on the baking sheet for 5 minutes, then transfer to a wire rack to cool completely.
9. In a small bowl, whisk together the powdered sugar, 2 tablespoons key lime juice, and 1/2 teaspoon lime zest until smooth and pourable.
10. Dip the tops of cooled cookies into the glaze or drizzle it over them, then let the glaze set fully before serving.
These Key Lime Cookies with Lime Glaze are incredibly versatile when it comes to serving. Whether you’re hosting a backyard barbecue, packing lunchbox treats, or planning a festive dessert platter, these cookies fit right in. Here are a few fun ideas to take them to the next level:
Nailing these cookies every time is all about simple tweaks and paying attention to texture. Follow these friendly tips to bring out the brightest lime flavor and the most tender crumb:
Keeping these cookies fresh and zesty is easy when you follow the right storage methods. Here’s how to maintain their buttery texture and tangy flavor day after day:
Curious minds can’t wait—let’s answer some of the most common questions:
Yes, you can use regular limes instead of key limes. Use the same measurements—2 tablespoons of juice in the dough and an additional 2 tablespoons in the glaze—but note that regular limes may yield slightly less tart, more bitter flavor. To balance this, taste the dough before baking and add up to 1 teaspoon more lime zest if you’d like extra brightness.
You can prepare the dough up to 24 hours ahead of time. After scooping and rolling the dough into balls, arrange them on a baking sheet, cover tightly with plastic wrap, and refrigerate. For longer storage, freeze the dough balls on a lined sheet pan, then transfer them to an airtight freezer bag for up to one month. When ready to bake, let frozen dough thaw in the refrigerator for at least 2 hours before flattening and baking as directed.
Cookie spread depends on butter temperature and chilling. Ensure your butter is fully at room temperature so it creams properly with sugar; overly warm butter can cause excess spreading. If you prefer thicker cookies, chill the dough balls for 15–20 minutes before flattening. Always line your baking sheet with parchment and space dough balls 2 inches apart to allow even baking without overcrowding.
To intensify the natural green hue, increase the lime zest in the glaze by an additional 1/4 teaspoon and use freshly grated zest (avoid the white pith). You can also stir in a small amount of finely minced fresh mint leaves, then strain any solids before glazing. The mint’s chlorophyll lends color without altering the lime flavor significantly.
Bake the cookies at the stated temperature of 350°F and watch carefully during the 10–12 minute window. Remove them from the oven when the edges appear set and just beginning to turn golden, even if the centers look slightly underbaked. Let them rest on the hot baking sheet for 5 minutes, during which residual heat finishes cooking the centers while preserving tenderness.
You can whisk together the powdered sugar, key lime juice, and lime zest up to 6 hours before serving. Store the glaze in an airtight container at room temperature—give it a quick stir before using, as it may thicken slightly. If it becomes too thick, add a few drops of lime juice or water to reach the desired pourable consistency.
These Key Lime Cookies with Lime Glaze shine because they strike the perfect balance between buttery sweetness and tangy citrus zing—brightening any day with minimal effort. That glossy lime topping? Pure magic as it melts on your tongue. Whether you’re a beginner baker or a cookie connoisseur, this recipe delivers soft centers, crisp edges, and an irresistible pop of lime in every bite. Feel free to print this article and save it for later—you’ll want to revisit these cookies again and again! Don’t forget to leave a comment below if you try them or have any questions.
Soft, buttery cookies infused with tart key lime and topped with a glossy lime glaze that melts on the tongue. The tangy citrus aroma and tender crumb make each bite irresistibly refreshing.

I’m Sophia Montgomery, your guide and fellow food enthusiast on this delicious journey. As a home cook with a deep love for creating meals that bring people together, I started this blog to share my passion for simple, flavorful, and heartwarming dishes