

There’s something undeniably comforting about the first bite of a rich, creamy cheesecake layered with tender, cinnamon-spiced apples and crowned by a crunchy oat topping. As you slide a fork through the smooth filling, you encounter that delightful resistance of the crisp, buttery crust, which sets the stage for the sweet-tart apple medley above. Every forkful captures the harmony of textures—silky cheesecake, juicy fruit, and golden crumble—that makes this Apple Crisp Cheesecake an absolute showstopper. It’s the kind of dessert that transforms an ordinary afternoon into a cozy gathering, filling your home with cozy vibes and drawing loved ones to linger a little longer over conversation and indulgence.
Not only does this recipe deliver on taste and texture, it also brings a sense of pride to any home cook who tackles it. With an intermediate difficulty level, you’ll spend about 30 minutes preparing the layers, an hour baking to achieve that perfectly set cheesecake and golden top, and then at least four hours—or overnight—resting in the fridge to let flavors meld and the filling firm up. Satisfy your sweet tooth with this delightful Apple Crisp Cheesecake recipe that combines creamy, smooth cheesecake with a crunchy oat topping! Each bite is a heavenly blend of textures and tastes, making it a fall dessert favorite or a show-stopping finale at any dinner party.
KEY INGREDIENTS IN APPLE CRISP CHEESECAKE
Before you dive into baking, take a moment to gather high-quality ingredients that will make each layer shine. From the buttery base to the luscious filling, crisp apple layer, and crunchy topping, each component plays a vital role in creating this memorable dessert.
- Graham cracker crumbs
These finely ground crumbs form the sturdy foundation of the crust, providing a toasty, slightly sweet base that contrasts beautifully with the creamy filling above.
- Granulated sugar
Used in multiple layers, granulated sugar sweetens the crust, filling, and apples, ensuring balanced sweetness without overpowering the natural flavors.
- Unsalted butter
Melted butter binds the graham crumbs for the crust and enriches the crisp topping when softened, adding a luxurious, melt-in-your-mouth quality.
- Cream cheese
The heart of the cheesecake filling, softened cream cheese offers tangy richness and a velvety texture when whipped smooth.
- Vanilla extract
A splash of pure vanilla extract elevates the cheesecake with warm, aromatic notes that complement the fruit and spices.
- Eggs
Eggs lend structure and stability to the filling, helping it set just right while keeping the texture light and creamy.
- Sour cream
Stirred into the filling, sour cream adds a subtle tang and extra creaminess, balancing the sweetness and preventing cracks.
- Apples
Choose crisp varieties like Granny Smith for a bright, tart flavor and firm texture that holds up under baking.
- Ground cinnamon
Cinnamon infuses the apples and crisp topping with warm, spicy undertones that evoke cozy autumn afternoons.
- Ground nutmeg
A pinch of nutmeg deepens the spice profile in the apple layer, offering a hint of earthy warmth.
- All-purpose flour
Flour in the crisp topping helps bind oats and sugars together, creating that signature golden crumble.
- Rolled oats
Oats contribute hearty texture and a wholesome chew to the crisp, balancing out the buttery-sugar mixture.
- Packed brown sugar
Brown sugar lends moisture and caramel-like depth to the crumb topping, resulting in irresistible flavor.
HOW TO MAKE APPLE CRISP CHEESECAKE
Now that you have everything on hand, let’s walk through each step of building this dessert masterpiece, layer by layer, to ensure your cheesecake comes out smooth, flavorful, and perfectly set.
1. Preheat your oven to 350°F (175°C) and lightly grease a 9-inch springform pan. This ensures even baking temperatures and makes it easy to remove the cake later without sticking.
2. For the crust, in a medium bowl, combine the graham cracker crumbs and sugar until evenly mixed. Pour the melted butter over the crumbs and blend with a fork until the mixture is uniformly moistened. Press the crumb mixture firmly onto the bottom of the prepared pan, creating a compact, level base. Set aside to let it settle.
3. In a large bowl, beat the cream cheese, sugar, and vanilla extract with a mixer on medium speed until the mixture turns smooth and fluffy, about 2–3 minutes. Add the eggs one at a time, beating well after each addition to maintain a uniform texture. Finally, mix in the sour cream until fully incorporated, scraping down the sides to avoid lumps.
4. Pour the luscious cheesecake filling over the prepared crust and smooth the top with a spatula, ensuring an even surface. Set the pan aside while you prepare the apple layer.
5. In another large bowl, toss together the chopped apples, sugar, cinnamon, and nutmeg until each piece is evenly coated. Spread this spiced apple mixture evenly over the cheesecake filling, covering the surface completely.
6. For the crisp topping, mix flour, oats, brown sugar, and cinnamon in a medium bowl. Work in the softened butter using your fingers or a fork until the mixture forms coarse, crumb-like clusters. Sprinkle the crisp topping evenly over the apple layer to ensure every bite has that signature crunch.
7. Bake for 60–70 minutes, or until the cheesecake is set around the edges and the top turns a gorgeous golden brown. To check doneness, gently shake the pan—only the very center should jiggle slightly.
8. Allow the cheesecake to cool completely in the pan on a wire rack. This gradual cooldown helps prevent cracks and encourages a creamy texture. Once cooled, refrigerate for at least 4 hours or, ideally, overnight to let the flavors deepen and the filling firm up.
9. Remove the sides of the springform pan, slice, and serve chilled. Each slice reveals distinct layers of crumbly crust, silky cheesecake, tender apples, and crunchy topping—pure dessert bliss.
SERVING SUGGESTIONS FOR APPLE CRISP CHEESECAKE
After that buttery crust, creamy cheesecake, tender apple layer, and golden crumble have come together in your kitchen, it’s time to think about the grand reveal and how to present each slice at its absolute best. Whether you’re hosting a cozy family gathering or treating yourself to a solo indulgence, a few thoughtful garnishes and accompaniments can elevate every bite. Keep your serving station neat, offer a variety of textures and temperatures, and let guests customize their slices for extra fun.
- Serve slices with a generous dollop of vanilla bean ice cream on top, letting the cold cream gently melt over the warm crisp and tangy cheesecake, creating a luscious sauce.
- Drizzle homemade caramel sauce in a zigzag pattern across each plate. The buttery sweetness of the caramel complements the tart apples and creamy filling beautifully.
- Add a swirl of lightly whipped cream, dusted with cinnamon or nutmeg, for a simple yet elegant finish that highlights the spice notes in the apple topping.
- Offer individual cups of hot coffee or espresso, along with a sprinkle of cinnamon sugar on the side, for guests who enjoy a warm, aromatic contrast to the chilled cheesecake.
HOW TO STORE APPLE CRISP CHEESECAKE
Proper storage is key to maintaining the perfect textures and flavors you worked so hard to achieve. Whether you need to keep leftovers fresh for a day or plan to freeze slices for later enjoyment, following these guidelines will help preserve that creamy filling, crunchy topping, and tender apples.
- Place any remaining slices in an airtight container or wrap each piece individually in plastic wrap. Refrigerate for up to 4 days, ensuring the cake stays moist without absorbing fridge odors.
- To retain the crisp topping’s crunch, store cheesecake slices in the refrigerator without the toppings if possible, then add the crumble or garnishes just before serving.
- For longer storage, freeze individual slices by wrapping them tightly in plastic wrap followed by aluminum foil, or use a freezer-safe container. Freeze for up to 2 months, then thaw overnight in the fridge before enjoying.
- If you anticipate making this dessert for a later date, you can freeze the baked and cooled cheesecake without the apple and crisp layers. Add the fresh toppings after thawing to maintain maximum texture contrast.
CONCLUSION
Baking this Apple Crisp Cheesecake is more than just following a recipe; it’s an experience that brings together the comforting nostalgia of apple pie, the luxurious richness of cheesecake, and the irresistible crunch of a crisp topping. From gathering ingredients to slicing through that final chilled wedge, each step invites you to savor the aromas, colors, and textures that make this dessert so special. By embracing the intermediate difficulty level and setting aside enough time for baking and chilling, you’ll be rewarded with a perfectly layered masterpiece that wows both the eyes and the taste buds.
Feel free to print this article and save it for later use—whether you’re planning a festive gathering or simply craving a slice of something sweet and cozy. You can also check out the FAQ section below for answers to common questions about variations, troubleshooting, and tips to adapt this recipe to your kitchen. If you give this Apple Crisp Cheesecake a try, I’d love to hear your thoughts! Share your comments, questions, or feedback, especially if you experiment with different apple varieties or creative serving ideas. Happy baking, and here’s to many delicious moments ahead!
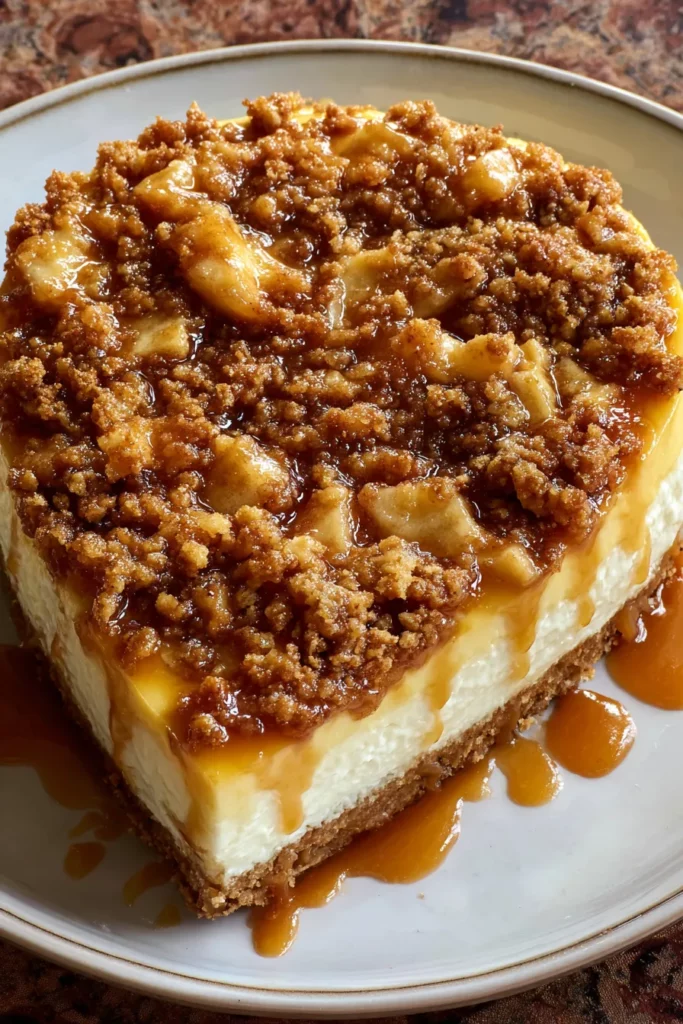

Apple Crisp Cheesecake
Description
This Apple Crisp Cheesecake offers a perfect balance of flavors: smooth cheesecake layered with cinnamon-spiced apples and a crunchy oat topping. Each bite is a heavenly blend of textures and tastes!
Ingredients
Instructions
-
Preheat your oven to 350°F (175°C) and lightly grease a 9-inch springform pan.
-
For the crust, in a medium bowl, combine the graham cracker crumbs and sugar. Pour the melted butter over the mixture and blend with a fork until evenly moistened. Press the crumb mixture firmly onto the bottom of the prepared pan. Set aside.
-
In a large bowl, beat the cream cheese, sugar, and vanilla extract with a mixer until smooth and fluffy. Add the eggs one at a time, beating well after each addition. Mix in the sour cream until well incorporated.
-
Pour the cheesecake filling over the prepared crust, smooth the top with a spatula, and set aside.
-
In a large bowl, toss together the chopped apples, sugar, cinnamon, and nutmeg until the apples are well coated. Spread the apple mixture evenly over the cheesecake filling.
-
For the crisp topping, mix flour, oats, brown sugar, and cinnamon in a medium bowl. Work in the softened butter using your fingers or a fork until the mixture becomes crumbly. Sprinkle the crisp topping over the apple layer.
-
Bake for 60–70 minutes or until the cheesecake is set and the top is golden brown.
-
Allow the cheesecake to cool completely in the pan on a wire rack. Refrigerate for at least 4 hours or overnight for best results.
-
Remove from the springform pan, slice, and serve chilled.
Note
- You can substitute the graham cracker crust with a gingersnap or oat cookie crust for a variation.
- Use a mix of apple varieties to achieve a more complex flavor profile.
- The cheesecake is even more delicious when topped with a dollop of whipped cream or a drizzle of caramel sauce.
- Ensure your cream cheese is at room temperature to avoid lumps in the filling.

