

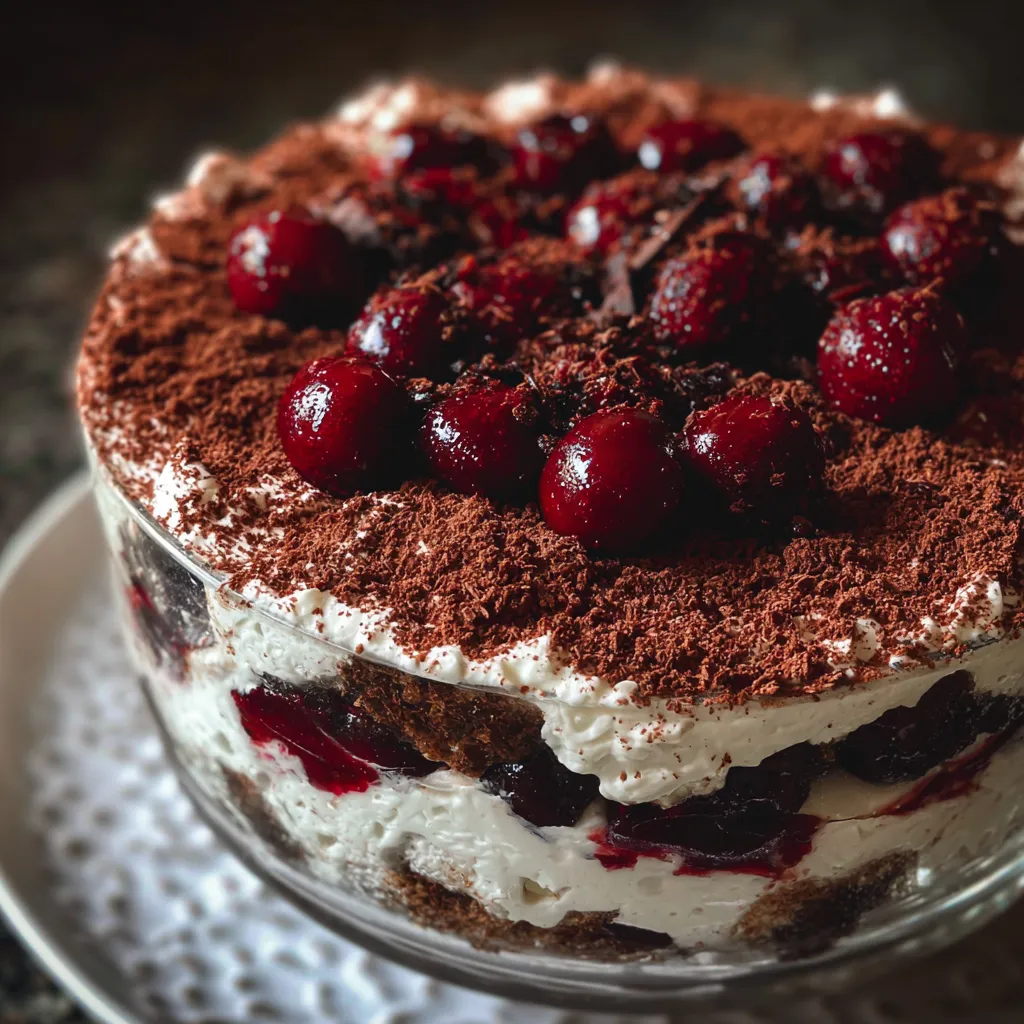
This Black Forest Trifle dazzles with layers of tender cocoa cake cubes, glossy ruby-red cherries, and clouds of vanilla-scented whipped cream, all showcased in a gleaming glass bowl and crowned with dark chocolate curls. Chunky chocolate sponge soaks up bright cherry syrup while tart and sweet fruit meld with silky cream, making each spoonful a perfect balance of bittersweet chocolate and fruity bursts. Ready to wow your guests or treat yourself? Dive in and let’s explore every step to trifle success!
Key Ingredients
Before we dive into the layering magic, let’s gather everything you need to build this stunning dessert:
- 1 cup (130 g) all-purpose flour: Provides structure for a tender cake base.
- 1 cup (200 g) granulated sugar: Sweetens the chocolate sponge for balanced flavor.
- 1/3 cup (35 g) unsweetened cocoa powder: Delivers rich, bittersweet chocolate notes.
- 1 tsp baking powder: Helps the cake rise for a light, airy texture.
- 1/2 tsp baking soda: Works with baking powder to ensure a tender crumb.
- 1/4 tsp fine salt: Enhances all the cake’s flavors.
- 1/2 cup (120 ml) whole milk, room temperature: Adds moisture for a soft crumb.
- 1/4 cup (60 ml) neutral oil: Keeps the cake moist and tender.
- 1 large egg, room temperature: Binds ingredients and adds richness.
- 1 1/2 tsp pure vanilla extract: Infuses warm, aromatic flavor.
- 1/2 cup (120 ml) hot coffee or hot water: Intensifies cocoa flavor and thins the batter.
- 2 1/2 cups (400–450 g) pitted dark sweet cherries or jarred morello cherries, drained: The star fruit layer, tart and juicy.
- 1/3 cup (70 g) granulated sugar: Sweetens the cherries to taste.
- 2 tbsp water: Helps fresh or frozen cherries cook down (omit if cherries are in syrup).
- 1 tbsp cornstarch: Thickens the cherry filling to a jam-like consistency.
- 2 tbsp kirsch: Traditional cherry brandy for depth (optional).
- 1 tsp lemon juice: Brightens the cherry layer.
- Pinch of salt: Balances the fruit’s sweetness.
- 4 oz (115 g) dark chocolate (60–70% cocoa), cold: For elegant shavings and curls.
- Extra whole cherries: Garnish to finish each serving.
- 2 cups (480 ml) heavy whipping cream, very cold: Base for billowy whipped cream.
- 1/3–1/2 cup (40–60 g) powdered sugar: Sweetens the whipped cream.
- 1 1/2 tsp pure vanilla extract: Adds a fragrant vanilla note.
- 1–2 tbsp kirsch: Optional boost of cherry flavor in the cream.
- 1/2 cup (120 ml) cherry juice or water: For soaking the cake cubes.
- 2–3 tbsp kirsch or extra cherry juice: Flavoring for the soaking syrup (or non-alcoholic alternative).
- 1–2 tbsp granulated sugar: To sweeten the syrup if using water or unsweetened juice.
How To Make Black Forest Trifle
Let’s bring those ingredients together in glorious layers! You’ll bake a moist chocolate cake, simmer a bright cherry filling, whip clouds of cream, and shave chocolate before assembling everything in a transparent bowl so the vibrant layers pop. Follow each step carefully and you’ll have a stunning centerpiece that’s as delicious as it looks.
1. Bake the chocolate cake
Preheat your oven to 350°F (175°C) and grease plus line an 8-inch (20 cm) round or square pan with parchment. In a large bowl, whisk together the flour, sugar, cocoa powder, baking powder, baking soda, and salt until evenly combined. In a separate jug, whisk the milk, oil, egg, and vanilla until smooth, then pour into the dry mix and stir until just combined—do not overmix. Carefully add the hot coffee (or water) and whisk until the batter is silky. Transfer to the prepared pan, smooth the top, and bake for 25–30 minutes until a toothpick comes out clean or with a few moist crumbs. Let the cake cool in the pan for 10 minutes, then turn out onto a rack, peel off the parchment, let cool completely, and cut into 1-inch cubes.
2. Make the cherry filling
Place the cherries in a saucepan with sugar and water (or cherry syrup if using jarred fruit). In a small bowl, stir the cornstarch with a few tablespoons of cherry liquid to form a smooth slurry. Gently simmer the cherries over medium heat, stirring, until they release juices. Whisk in the cornstarch slurry and cook, stirring constantly, until the filling is glossy and thick, about 1–3 minutes. Remove from heat, stir in lemon juice, salt, and kirsch, and taste—adjust sweetness if needed. Let the mixture cool completely, transferring to a shallow dish to speed chilling.
3. Prepare the soaking syrup (optional but recommended)
In a small bowl, combine cherry juice or water with sugar, stirring until dissolved. Stir in kirsch or extra cherry juice for a non-alcoholic version. Taste to ensure it’s pleasantly sweet and lightly boozy (if using alcohol).
4. Make the whipped cream
Chill your mixing bowl and beaters in the freezer for 10–15 minutes. Pour the cold heavy cream, powdered sugar, and vanilla into the bowl. Beat on medium speed until soft peaks form, then drizzle in kirsch (if using) and continue beating to medium-firm peaks—stop just before the cream looks grainy.
5. Prepare the chocolate shavings
Using a cold block of dark chocolate, create curls by warming the edge slightly with your hands or a hairdryer and dragging a vegetable peeler along the side. For fine shavings, use a microplane or knife. Refrigerate the shavings until you’re ready to garnish.
6. Assemble the trifle
Select a large glass trifle bowl or individual glass cups. Layer cake cubes evenly at the bottom (about 1½–2 inches thick). With a pastry brush or spoon, lightly drizzle soaking syrup over the cubes. Spoon a generous layer of cherry filling, sprinkle some chocolate shavings, and spread whipped cream smoothly with a spatula. Repeat the layers—cake, syrup, cherries, chocolate, cream—until the bowl is nearly full, finishing with a thick whipped-cream cap.
7. Decorate and chill
Generously sprinkle the top with extra chocolate shavings and curls, then arrange whole cherries in a circle or cluster. Refrigerate for at least 2–4 hours (or overnight) to let flavors meld and the cake soften. Keep chilled until serving.
Serving Suggestions
Once your Black Forest Trifle is perfectly chilled, here’s how to serve it for maximum wow factor:
- Scoop through all layers: Use a deep dessert spoon to capture cake, cherries, and cream in every bite.
- Chilled glasses: Serve in frosted or chilled coupe glasses for a gourmet presentation.
- Garnish elegantly: Top each serving with a fresh cherry and extra chocolate curl for instant drama.
- Pairings: Offer a side of lightly sweetened espresso or a dessert wine to complement the bittersweet chocolate and tart cherries.
Tips For Perfect Black Forest Trifle
Mastering a flawless trifle is easier than you think—here are some friendly pointers to elevate your layers:
- For a time saver, you can use store-bought chocolate cake, brownies, or chocolate Swiss roll instead of baking the cake.
- For a kid-friendly, non-alcoholic version, omit kirsch and use cherry juice or syrup only.
- The trifle is best eaten within 24 hours but will keep, covered and refrigerated, for up to 2 days.
- To prevent the whipped cream from weeping, you can stabilize it by beating in 1 tbsp instant vanilla pudding mix or 1 tsp unflavored gelatin (bloomed and cooled) per 2 cups of cream.
- Mixing sweet cherries with a handful of tart cherries (or a spoon of sour cherry jam) gives a more classic Black Forest flavor.
How To Store It
Keeping your trifle fresh and delicious is simple with the right approach. Whether you’re prepping ahead or saving leftovers, here’s how to maintain those beautiful layers and flavors:
- Refrigerate covered: Tightly wrap the trifle bowl with plastic wrap or snap on a lid to prevent odors and drying out.
- Use an airtight container: If portioning into individual cups, seal each with a lid to keep the cream firm.
- Consume within 2 days: For best texture and flavor, enjoy the trifle within 48 hours—after that the cake may become overly soft.
- Avoid freezing: Whipped cream and fruit fillings can become grainy or watery when thawed, so stick with refrigeration.
Frequently Asked Questions
Here are quick answers to common questions about making and storing your trifle:
- How far in advance can I assemble the trifle, and how should I store it?
You can assemble the trifle up to 24 hours in advance. Once assembled, cover the bowl tightly with plastic wrap or an airtight lid and refrigerate. The trifle needs at least 2–4 hours of chilling for the layers to meld and the cake to soften, but it’s even better if chilled overnight. Serve within 24 hours for best texture and flavor, though it will keep, covered and refrigerated, for up to 2 days.
- Can I make a non-alcoholic version of this Black Forest Trifle?
Yes. Simply omit the kirsch in the cherry filling, soaking syrup, and whipped cream. Replace kirsch with extra cherry juice or the light syrup from jarred cherries. Taste the cherry filling and syrup, adjusting sugar or juice until they’re sweet and balanced. Your trifle will still be rich and cherry-forward without the alcohol.
- What is the best way to stabilize whipped cream so it holds up in the trifle?
Chill your mixing bowl and beaters in the freezer for 10–15 minutes before whipping. Use very cold heavy cream and beat on medium speed until soft peaks form. To stabilize, you can fold in 1 tablespoon of instant vanilla pudding mix or 1 teaspoon of unflavored gelatin (bloomed and cooled) per 2 cups of cream. Continue beating to medium or medium-firm peaks, but stop as soon as the cream holds its shape and looks silky, not grainy.
- How do I prevent the cake cubes from becoming soggy before serving?
Use the optional soaking syrup sparingly. Brush or drizzle just enough syrup to lightly moisten the cake—about 1–2 teaspoons per cube. Let the syrup cool before applying, and avoid soaking the cubes until they lose all structure. Assemble the trifle shortly before serving whenever possible, or hold off on adding the syrup until just before you layer the cake and cherries.
- Can I use store-bought chocolate cake or other cake alternatives for convenience?
Absolutely. You can substitute a store-bought chocolate cake, chocolate brownies, or even a chocolate Swiss roll. Cut your chosen cake into 1-inch cubes as instructed. If it’s already moist or syrup-laden (as some rolls are), omit or reduce the soaking syrup. The key is uniform cubes that layer well and soak up just enough flavor without turning to mush.
- How should I prepare and store the cherry filling if I want to make it ahead?
Cook the cherry filling according to the recipe, then spread it in a shallow dish to cool quickly. Once at room temperature, cover and refrigerate for up to 2 days. Before layering, give it a gentle stir to restore its glossy consistency. If it thickens too much, stir in a teaspoon or two of water or cherry juice to loosen it back to a spoonable texture.
What Makes This Special
This Black Forest Trifle works because it balances textures and flavors—moist cocoa cake, vibrant cherry compote, and airy whipped cream all dance together under a cascade of chocolate curls. It’s playful, classic, and easy to assemble in layers that dazzle every eye. Go ahead and print this article to save your spot in the dessert hall of fame, then let me know in the comments how your trifle turned out or if you have any cherry-loving questions!

Black Forest Trifle
Description
Chunky chocolate sponge soaks up bright cherry syrup, while glossy ruby-red fruit melds with clouds of vanilla-scented whipped cream. Each spoonful offers bittersweet chocolate, tart cherry bursts and airy silk.
Ingredients
Instructions
-
Bake the chocolate cake:
-
1) Preheat your oven to 350°F (175°C). Grease and line an 8-inch (20 cm) square or round cake pan with parchment paper.
-
2) In a large bowl, whisk together the flour, sugar, cocoa powder, baking powder, baking soda, and salt until well combined and no lumps of cocoa remain.
-
3) In a separate bowl or large measuring jug, whisk together the milk, oil, egg, and vanilla until smooth.
-
4) Pour the wet ingredients into the dry ingredients and whisk until just combined; the batter will be thick.
-
5) Add the hot coffee (or hot water) and whisk carefully until the batter is smooth and fluid. Do not overmix.
-
6) Pour the batter into the prepared pan and smooth the top. Bake for 25–30 minutes, or until a toothpick inserted in the center comes out clean or with a few moist crumbs.
-
7) Let the cake cool in the pan for 10 minutes, then turn out onto a rack, peel off the parchment, and let cool completely. Once cool, cut into 1-inch cubes.
-
Make the cherry filling:
-
1) If using fresh or frozen cherries: add them to a saucepan with the sugar and water. If using jarred cherries in light syrup, add them with 2–3 tbsp of their syrup and reduce or omit additional sugar depending on sweetness.
-
2) In a small bowl, stir the cornstarch with 2–3 tbsp of the cherry liquid (or water) to create a smooth slurry.
-
3) Bring the cherries to a gentle simmer over medium heat, stirring occasionally, until they start to release juices (2–4 minutes).
-
4) Stir in the cornstarch slurry and cook, stirring constantly, until the liquid thickens and turns glossy, about 1–3 minutes. It should have the consistency of a loose pie filling; add a splash of water if it gets too thick.
-
5) Remove from heat and stir in the lemon juice, pinch of salt, and kirsch (if using). Taste and adjust sweetness or tartness if needed.
-
6) Let the cherry mixture cool completely to room temperature; for faster cooling, transfer to a shallow dish.
-
Prepare the soaking syrup (optional but recommended):
-
1) In a small bowl or measuring jug, combine the cherry juice or water with sugar (if using), stirring until the sugar dissolves.
-
2) Stir in the kirsch or other spirit, or extra cherry juice for a non-alcoholic version.
-
3) Taste; it should be pleasantly sweet and lightly boozy (if using alcohol), not overpowering.
-
Make the whipped cream:
-
1) Chill the mixing bowl and beaters in the freezer for 10–15 minutes for best results.
-
2) Pour the cold heavy cream into the chilled bowl. Add the powdered sugar and vanilla.
-
3) Using a hand mixer or stand mixer, beat on medium speed until soft peaks form.
-
4) If using, drizzle in the kirsch and continue beating on low–medium until medium or medium-firm peaks form. The cream should hold its shape but still look silky, not grainy.
-
5) Do not overbeat. If it starts to look slightly grainy, stop immediately.
-
Prepare the chocolate shavings:
-
1) Use a block or thick bar of cold dark chocolate.
-
2) For curls: warm the edge of the chocolate slightly with the warmth of your hands or a quick pass with a hairdryer, then drag a vegetable peeler along the long side to create curls.
-
3) For fine shavings: use a microplane or carefully scrape the surface with a knife or peeler.
-
4) Keep the shavings/curls refrigerated until needed so they don’t melt.
-
Assemble the trifle:
-
1) Choose a large glass trifle bowl or individual glass dessert cups to show the layers.
-
2) Place an even layer of chocolate cake cubes at the bottom of the bowl, about 1 1/2–2 inches thick.
-
3) Using a pastry brush or spoon, drizzle or brush some of the cherry soaking syrup over the cake cubes until they are lightly moistened but not soggy.
-
4) Spoon a generous layer of the cooled cherry mixture over the cake, spreading it to the edges so the layer is visible through the glass.
-
5) Sprinkle a handful of chocolate shavings over the cherries.
-
6) Add a layer of whipped cream, spreading gently with a spatula or the back of a spoon to create a smooth, even layer.
-
7) Repeat the layers: cake cubes, syrup, cherries, chocolate shavings, whipped cream, until you reach near the top of the bowl. Aim for at least 2 full sets of layers.
-
8) Finish with a thick, smooth layer of whipped cream on top.
-
Decorate and chill:
-
1) Generously sprinkle the top with chocolate shavings and curls.
-
2) Arrange whole cherries (with stems if possible) on top in a circle or cluster in the center.
-
3) Refrigerate the trifle for at least 2–4 hours, or overnight if possible. This allows flavors to meld and the cake to soften.
-
4) Keep chilled until ready to serve. Serve by scooping down through all layers with a large spoon.
Note
- For a time saver, you can use store-bought chocolate cake, brownies, or chocolate Swiss roll instead of baking the cake.
- For a kid-friendly, non-alcoholic version, omit kirsch and use cherry juice or syrup only.
- The trifle is best eaten within 24 hours but will keep, covered and refrigerated, for up to 2 days.
- To prevent the whipped cream from weeping, you can stabilize it by beating in 1 tbsp instant vanilla pudding mix or 1 tsp unflavored gelatin (bloomed and cooled) per 2 cups of cream.
- Mixing sweet cherries with a handful of tart cherries (or a spoon of sour cherry jam) gives a more classic Black Forest flavor.

