

Caramel apple slices are the ultimate fall indulgence reimagined for delightful bite-sized snacking. With every slice showcasing a symphony of textures—crisp, juicy apples, velvety caramel, and a playful crunch—you’ll find yourself smiling from the very first taste. This recipe brings together simple ingredients in a way that feels both festive and effortless. Whether you’re planning a cozy night in, hosting a spirited gathering, or simply craving a sweet pick-me-up, these treats deliver on every front. They’re perfect for little hands at a birthday party or as a shareable delight on a chilly afternoon. Best of all, this beginner-friendly dessert takes just 15 minutes of prep, an hour to confection, and a 15-minute chill time to set, totaling around 350 calories per serving. You don’t need a fancy kitchen gadget—just a few bowls, a baking sheet, and the spirit to get creative. Let’s dive into the magic of turning everyday apples into show-stopping slices that feel like a homemade carnival of flavor!
Crunchy, sweet, creamy, and salty all at once, these caramel apple slices are like a party in your mouth. You’ll find the mixture of mini chocolate chips, crushed pretzels, and optional peanuts riffing on sweet-and-salty perfection. And if you’re in the mood for something extra elegant, whisk white chocolate into a smooth drizzle that looks like abstract art on each slice. I love how the wooden skewers make dipping a breeze and keep your fingers mess-free, so you can really savor every layer of flavor without worrying about sticky hands. You’ll discover that each bite brings a brand-new combination—say, a bit more pretzel on one, a chocolatey twist on the next, or a salty crunch that highlights the caramel. As someone who adores testing different topping combos, I’ve tried crushed cookies, toasted coconut, and even mini M&Ms. Feel free to experiment, and let these caramel apple slices become your canvas for creativity! This treat not only satisfies your sweet tooth but also sparks joy in every step of the-making and every taste of the eating.
KEY INGREDIENTS IN CARAMEL APPLE SLICES
Gathering the right components is what transforms simple apples into a decadent dessert experience. Each ingredient plays an essential role—whether it’s providing the core crunch, the silky coating, or the playful finishing touches that make these slices unforgettable. Here’s what you’ll need:
- Apples
Crisp and juicy, apples act as a refreshing base that balances the sweetness of caramel. Using a firm variety helps the slices hold their shape under all that luscious coating.
- Caramel Dessert Sauce
This smooth, rich sauce brings a creamy, buttery layer that clings to every nook of the apple slice, creating that classic caramel-apple flavor in a convenient drizzle-ready form.
- Mini Chocolate Chips
Tiny bursts of semi-sweet chocolate add contrast in both flavor and texture. When sprinkled over warm caramel, they embed slightly, creating gooey pockets of cocoa goodness.
- Crushed Peanuts (optional)
For an extra layer of crunch and a hint of earthy saltiness, toasted peanuts are a fantastic option. They pair beautifully with caramel’s sweetness and highlight the apple’s natural tang.
- Crushed Pretzels
Pretzels introduce a playful saltiness and delicate crunch that cuts through the richness. Their irregular shapes give a rustic, handmade feel to each slice.
- White Chocolate Chips (optional)
Melted white chocolate drizzles add a touch of elegance and creamy sweetness. The contrast of color makes these bites look especially festive and Instagram-worthy.
- Wooden Skewers
Essential for easy dipping and handling, skewers keep your fingers clean and allow for even coating on every slice, making the assembly process smooth and fun.
HOW TO MAKE CARAMEL APPLE SLICES
Bringing together crisp apple slices and silky caramel is deceptively simple, but the magic lies in the details and the order of operations. Follow these steps closely to achieve perfect coating, crunchy texture, and show-stopping presentation.
1. Start by washing and drying your apples thoroughly. A clean, dry surface allows the caramel to cling properly without slipping off. Rinse under cool running water, then pat completely dry with a kitchen towel.
2. Slice each apple horizontally into 1/2-inch thick rounds. Use a sharp knife to achieve even thickness, then carefully remove the core and seeds from each slice, creating a neat little doughnut shape that’s perfect for dipping.
3. Insert a wooden skewer into the outer edge of each apple slice, pushing it in until it feels secure. This makes handling the slices easier, especially when you’re moving them between bowls and trays.
4. Pour the caramel dessert sauce into a microwave-safe bowl. Heat on medium power for 30–45 seconds, stirring once halfway through. The goal is a warm, fluid consistency that’s easy to drizzle but not boiling hot.
5. Holding onto the skewer, dip each apple slice into the warmed caramel, rotating to coat both sides evenly. Lift it out and let any excess sauce drip back into the bowl to avoid puddles on your baking sheet.
6. Place the dipped slices on a baking sheet lined with parchment paper. The nonstick surface ensures easy cleanup and prevents the caramel from fusing to the tray.
7. While the caramel is still tacky, sprinkle mini chocolate chips, crushed peanuts, and pretzels over the top, pressing gently so they adhere. Work quickly before the caramel cools and hardens.
8. If using white chocolate, melt the chips in a heatproof bowl over simmering water or in 15-second bursts in the microwave, stirring frequently. Stop when the chips are completely smooth.
9. Use a spoon to drizzle the melted white chocolate over the topped apple slices in a zigzag pattern. This adds visual appeal and another layer of creamy sweetness.
10. Transfer the baking sheet to the refrigerator for 10–15 minutes, allowing the caramel and all the toppings to set firmly. This ensures clean bites and vibrant textures.
11. Once set, serve the caramel apple slices on a decorative platter for parties, pack them into snack boxes for on-the-go treats, or simply enjoy them at home with your favorite hot drink.
SERVING SUGGESTIONS FOR CARAMEL APPLE SLICES
Presenting these delightful caramel apple slices in the best light is all about combining thoughtful plating with flavor pairings that highlight their unique textures. From casual gatherings to more formal events, these serving ideas will inspire you to make every bite memorable.
- Rustic Wooden Board Display
Arrange the slices in a fan shape on a large wooden cutting board. Garnish with a sprinkle of flaky sea salt and a handful of extra pretzels or peanuts in small bowls around the edges for easy self-service.
- Individual Dessert Cups
Layer a few apple slices upright in clear plastic cups with additional drizzles of caramel and white chocolate between layers. Top each cup with a single mint leaf or a dusting of cocoa powder for a refined look.
- Kids’ Snack Boxes
Pack two or three slices into lunchbox compartments alongside sliced strawberries or grapes. Use colorful parchment squares to keep slices separate and prevent sticking, making these treats a highlight of their snack time.
- Dessert Table Centerpiece
Elevate your fall or holiday spread by stacking the slices in a pyramid on a cake stand. Surround the base with seasonal accents like mini pumpkins, cinnamon sticks, or fresh apple slices to create a cohesive, eye-catching display.
HOW TO STORE CARAMEL APPLE SLICES
Storing these treats properly ensures they maintain their crisp apples, firm caramel, and intact toppings so you can enjoy them at their best over the next few days. With a few easy steps, you’ll prevent sogginess and keep everything ready to grab-and-go whenever a sweet craving strikes.
- Airtight Container in the Refrigerator
Place the slices in a single layer inside a sealed container. If stacking is necessary, separate layers with parchment paper. Stored this way, they’ll stay fresh for up to 3 days without losing crunch.
- Individual Wrapping
Wrap each slice loosely in wax paper or plastic wrap before placing them in a container. This method prevents slices from sticking together and makes portioned snacking effortless.
- Freezing for Longer Storage
Lay slices on a parchment-lined tray and flash-freeze for an hour. Transfer to freezer bags, removing as much air as possible. Thaw in the refrigerator for 30 minutes before serving to preserve textures.
- Re-crisping Technique
If slices soften slightly, pop them into a 300°F (150°C) oven for 3–5 minutes. Keep an eye on them to avoid melting the toppings. This quick heat blast revives the apple’s natural crunch.
CONCLUSION
These caramel apple slices encapsulate the joy of homemade desserts without the fuss of carving and coating whole apples. From the moment you gather your apples, skewers, and that luscious caramel sauce, you’re on your way to creating a crowd-pleasing treat that’s as fun to make as it is to eat. The combination of crisp fruit, sweet-and-salty toppings, and creamy drizzles is a game-changer for snack time, gatherings, or simply satisfying your sweet tooth without committing to a full-sized caramel apple. As a beginner-friendly recipe, it’s perfect for cooks of all levels—no special tools needed, just a baking sheet, parchment paper, and a little creativity. Feel free to print this article and save it in your recipe binder or pin it for future reference, and don’t forget you can find a FAQ below to answer any lingering questions about technique, ingredient swaps, or troubleshooting sticky caramel.
I hope this guide has sparked your excitement to whip up a batch of caramel apple slices at home. If you try this recipe or have any questions along the way—maybe you’re curious about using different fruit, adjusting sweetness levels, or exploring new toppings—please share your thoughts in the comments. Your feedback, personal twists, and stories of how these apple slices performed at your next party truly help build our cooking community. Feel free to ask for tips, let me know how they turned out, or simply drop a note about your favorite flavor combo. Happy dipping, drizzling, and crunching!
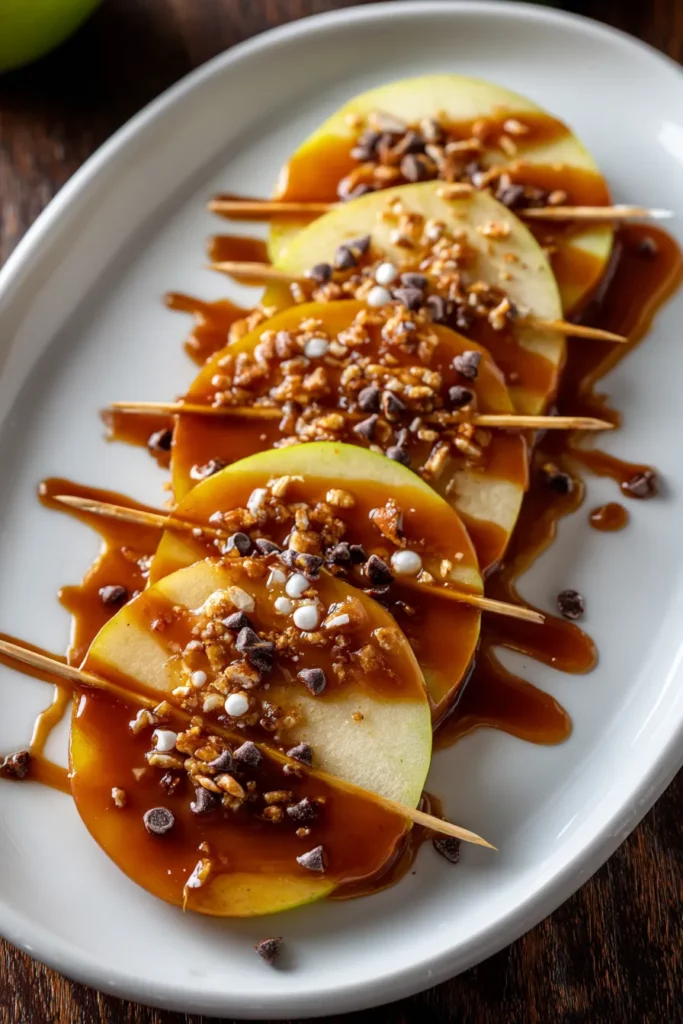

Caramel Apple Slices
Description
Experience the perfect blend of crisp apples and rich caramel, topped with mini chocolate chips and crunchy pretzels. It's a delightful treat for every occasion!
Ingredients
Instructions
-
Begin by washing and drying your apples thoroughly to remove any wax or pesticides.
-
Slice each apple into 1/2 inch thick slices, horizontally, and remove the seeds and core from each slice.
-
Insert a wooden skewer into each apple slice, making sure it is securely in place for easy handling.
-
Pour the caramel sauce into a microwave-safe bowl. Heat it in the microwave for about 30-45 seconds, or until it is warm and easier to drizzle.
-
Holding onto the skewer, dip each apple slice into the warm caramel sauce, ensuring it is well-coated on both sides. Allow any excess caramel to drip back into the bowl.
-
Place the caramel-coated apple slices onto a baking sheet lined with parchment paper.
-
Quickly sprinkle the mini chocolate chips, crushed peanuts, crushed pretzels, and any other desired toppings over the caramel-coated apple slices before the caramel hardens.
-
If using, melt the white chocolate chips in a small bowl over a pot of simmering water or in short intervals in the microwave, stirring frequently until smooth.
-
Drizzle the melted white chocolate over the apple slices with a spoon.
-
Once all slices are coated and topped, place the baking sheet in the refrigerator for about 10-15 minutes, or until the caramel and chocolate have set.
-
Serve the caramel apple slices as a sweet treat at parties, gatherings, or as a delightful snack.
Note
- These caramel apple slices are a great alternative to full caramel apples for easier eating and sharing.
- Feel free to experiment with different toppings such as crushed cookies, candies, or nuts to match your taste.
- Ensure the caramel sauce is not too hot when dipping the apple slices to prevent melting the apple and creating a mess.
- For an extra touch of flavor, sprinkle a pinch of sea salt over the caramel before adding other toppings.
- Store any leftover slices in an airtight container in the refrigerator for up to 3 days.

