

There’s something incredibly comforting about a bite-sized treat that manages to be flaky, buttery, garlicky, and cheesy all at once. Cheesy Garlic Butter Rollups are that guilty pleasure you didn’t know you needed until now. Each tender crescent dough triangle wraps around a luscious swirl of garlic-infused butter, then generously blankets itself in stretchy mozzarella and nutty Parmesan. It’s like a warm hug straight from the oven, soft on the inside and perfectly golden on the outside. Every rollup offers a little burst of flavor that dances on your taste buds, leaving you daydreaming about the next one.
I’ll never forget the first time I made these for a cozy Friday night in. My kitchen was filled with the gentle hum of indie music, and I had my sleeves rolled up—ready for a simple yet soul-soothing project. As I mixed the butter and garlic, I shared stories with my roommate about our college cooking mishaps. When the cheese started to bubble and the edges turned that irresistible amber color, we both knew we’d struck gold. These rollups became our official ritual: a crunchy-chewy snack that’s equally at home at a relaxed dinner party or a last-minute movie marathon. Seriously, they’re THAT good—and once you dive into that first gooey bite, there’s no turning back.
KEY INGREDIENTS IN CHEESY GARLIC BUTTER ROLLUPS
Before you fire up the oven, let’s take a moment to appreciate the rock stars of this recipe. Each ingredient plays a starring role, working together to create the perfect balance of flaky dough, garlicky richness, and gooey cheese.
- Refrigerated crescent roll dough
This handy dough comes pre-rolled into triangles, giving you a flaky, buttery foundation with minimal effort. It bakes up light and airy, providing the perfect vessel for all that delicious filling.
- Unsalted butter
When softened, butter becomes a silky canvas for garlic and herbs. It adds a rich, creamy mouthfeel and helps the cheese adhere to the dough, ensuring every bite is decadently moist.
- Garlic
Minced fresh, garlic infuses the butter with its pungent, aromatic flavor. It’s the soul of these rollups, offering savory depth and a hint of spicy warmth.
- Mozzarella cheese
Known for its gooey stretch and mild flavor, mozzarella melts beautifully to create that addictive, stringy texture. It’s the heart of the cheesy experience.
- Parmesan cheese
Finely grated Parmesan brings a sharp, nutty seasoning that cuts through the creaminess of the mozzarella. It adds a touch of savory complexity and a golden crust when baked.
- Dried Italian seasoning
This blend of herbs—typically oregano, basil, thyme, and rosemary—sprinkles in a layer of aromatic, Mediterranean flair, rounding out the flavor profile.
- Fresh parsley
Chopped and sprinkled at the end, parsley adds a bright, grassy note and a pop of color, balancing the richness of the rollups.
- Salt and pepper
Simple seasonings that amplify all the flavors. A pinch of salt enhances the cheesiness, while black pepper adds a subtle heat.
HOW TO MAKE CHEESY GARLIC BUTTER ROLLUPS
Let’s dive into the step-by-step magic of transforming simple ingredients into irresistible, cheesy rollups. Follow these detailed instructions and you’ll have golden-brown, flavor-packed bites in no time.
1. Preheat your oven to 375°F (190°C). Line a baking sheet with parchment paper to prevent sticking and make cleanup a breeze.
2. In a small bowl, combine the softened butter and minced garlic until you achieve a smooth garlic butter mixture. Keep stirring until every bit of butter is infused with garlicky goodness.
3. On a clean surface, roll out the refrigerated crescent roll dough and gently separate it into individual triangles. Handle the dough with care to maintain its flakiness.
4. Using a small spatula or back of a spoon, spread a thin, even layer of the garlic butter mixture over each triangle. Make sure to get right to the edges for maximum flavor.
5. Sprinkle an even layer of shredded mozzarella cheese across the garlic butter on each triangle, ensuring every bite will ooze with meltiness.
6. Follow up with grated Parmesan cheese, distributing it uniformly on top of the mozzarella for a crispy, savory crust.
7. Season each cheese-topped triangle with dried Italian seasoning, and a pinch of salt and freshly ground black pepper to enhance all those rich flavors.
8. Starting at the wide end of each triangle, carefully roll the dough inward toward the tip, forming a snug rollup that seals in all the fillings.
9. Place the rollups on the prepared baking sheet, positioning them tip side down and spaced evenly so they have room to puff and brown.
10. Bake in your preheated oven for 12–15 minutes, or until the rollups are golden brown and the cheese is bubbly and slightly caramelized.
11. When they look perfectly toasted, remove the baking sheet from the oven and let the rollups cool for about a minute—this helps them firm up just enough for easy handling.
12. Garnish each rollup with a sprinkle of fresh parsley before serving, adding a vibrant touch of color and bright flavor.
SERVING SUGGESTIONS FOR CHEESY GARLIC BUTTER ROLLUPS
These rollups aren’t just a snack—they’re a versatile star that can shine in many different dining scenarios. Whether you’re hosting a crowd or enjoying a quiet night in, here are some fun, flavorful ways to serve them:
- Classic Marinara Dip: Serve the rollups steaming hot alongside a bowl of warm, fragrant marinara sauce. The tangy tomato pairs perfectly with the buttery garlic and melty cheese, creating a timeless flavor duo.
- Fresh Salad Side: Balance the richness by pairing your rollups with a crisp green salad. Toss mixed greens with a light vinaigrette, shaved Parmesan, and cherry tomatoes to complement the savory bites.
- Soup Companion: These rollups make an excellent accompaniment to creamy soups like tomato bisque, broccoli cheddar, or potato leek. Use them as spoons to scoop and soak up every last drop of goodness.
- Party Platter: Arrange the rollups on a large board with an assortment of dips—think pesto, ranch, or chili-infused oil. Garnish the platter with fresh basil leaves and lemon wedges for a festive touch.
HOW TO STORE CHEESY GARLIC BUTTER ROLLUPS
Inevitably, you’ll want to save some of these cheesy wonders for later. Proper storage keeps their flavor and texture on point, so you can savor them any time:
- Room-Temperature Short-Term: If you plan to enjoy leftovers within a few hours, place the cooled rollups on a plate and loosely cover with foil or a clean kitchen towel. This prevents them from drying out while preserving a bit of crispiness.
- Refrigerator Storage: For up to three days, store the cooled rollups in an airtight container or resealable bag. Line the container with parchment paper to absorb excess moisture and maintain flakiness.
- Freezer Method: To keep them fresh for up to a month, flash-freeze the rollups on a baking sheet for an hour, then transfer to a freezer-safe bag with parchment layers. Defrost overnight in the fridge before reheating.
- Reheating Tips: Warm them in a preheated oven at 350°F (175°C) for 5–7 minutes, or until hot and slightly crisp. Avoid microwaving, which can make them soggy.
CONCLUSION
We’ve journeyed through every delicious detail of these Cheesy Garlic Butter Rollups, from the flaky crescent dough and garlicky butter blend to the melty mozzarella-Parmesan combo that’ll have you swooning. You now know the key ingredients, how to prepare each mouthwatering swirl, creative serving ideas, and even the best ways to preserve their freshness. This article is perfect for printing out and tucking into your recipe binder, or bookmarking for the next time you crave an easy, crowd-pleasing appetizer. And if you scroll down, you’ll find a handy FAQ section to troubleshoot any questions or cater to dietary tweaks.
I hope this recipe brings as much joy to your kitchen as it has to mine. Don’t be shy—drop a comment if you have questions, share your favorite cheese variations, or let me know how your rollups turned out. Your feedback, stories, and tweaks are what make cooking such a community adventure. Happy baking, and may your oven always be filled with golden, cheesy goodness!
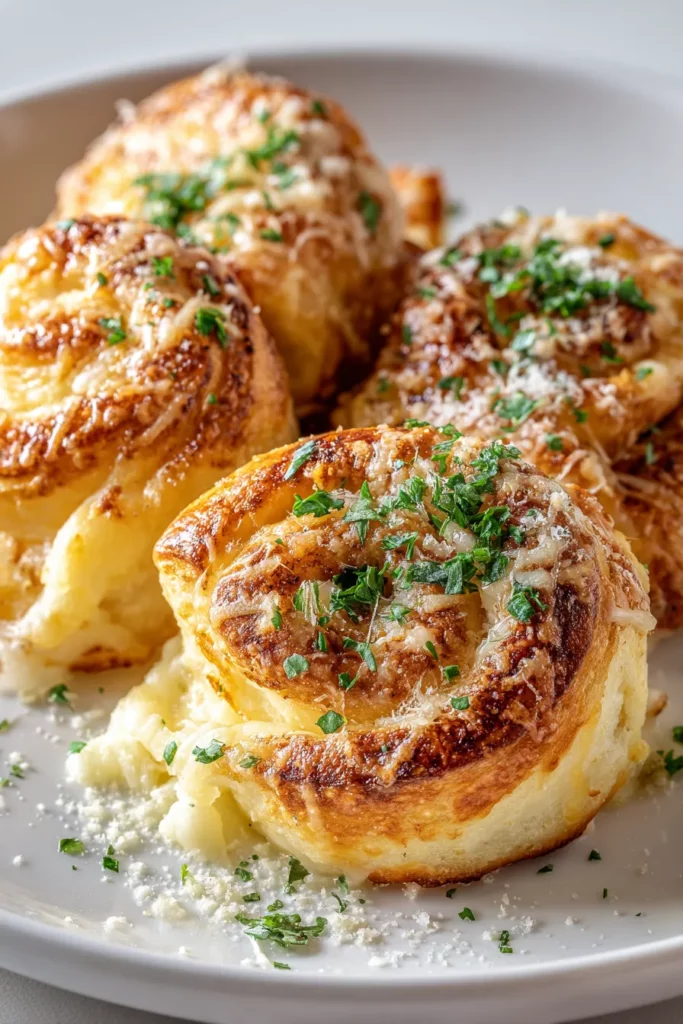

Cheesy Garlic Butter Rollups
Description
Flaky crescent dough hugs a luscious garlic butter blend, mozzarella and Parmesan for a golden, cheesy bite that’s irresistibly savory. Perfect for sharing at any gathering!
Ingredients
Instructions
-
Preheat your oven to 375°F (190°C). Line a baking sheet with parchment paper.
-
In a small bowl, combine the softened butter and minced garlic until well mixed.
-
Roll out the crescent roll dough and separate into individual triangles on a clean surface.
-
Spread a thin layer of the garlic butter mixture over each triangle of dough.
-
Evenly distribute the mozzarella cheese on top of the garlic butter layer of each triangle.
-
Sprinkle the grated Parmesan cheese evenly on top of the mozzarella layer.
-
Season each triangle with Italian seasoning, salt, and pepper to taste.
-
Starting at the wide end of the triangle, roll each piece of dough up towards the tip to form a rollup.
-
Place the rollups, tip side down, on the prepared baking sheet, ensuring they are spaced evenly apart.
-
Bake in the preheated oven for 12-15 minutes, or until golden brown.
-
Once baked, remove the rollups from the oven and let them cool for a minute.
-
Garnish with fresh parsley before serving.
Note
- These rollups can be served as an appetizer, snack, or even a delightful side dish.
- For an extra cheesy experience, add a bit more mozzarella before rolling up the dough.
- Experiment with different cheeses like cheddar or gouda for unique flavors.
- Pair the rollups with marinara sauce for a classic dipping experience.
- They are perfect for sharing at gatherings or parties and are sure to impress guests.

