

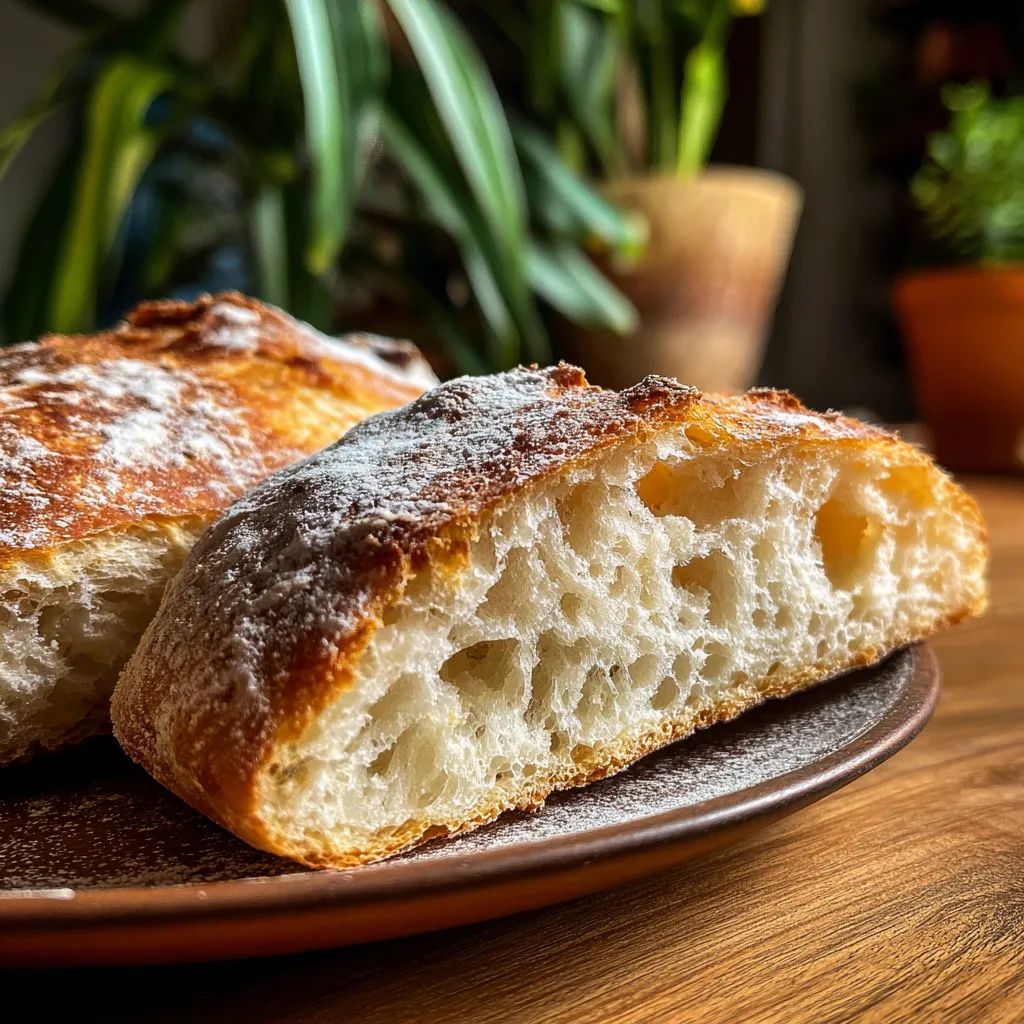
If you’ve ever longed to bake bakery-quality ciabatta at home without breaking a sweat, this crusty no-knead artisan ciabatta is your new best friend. All you need are flour, water, yeast, and a bit of patience—and you’ll be rewarded with a crackling golden crust and a cloud-like interior that’s perfect for sandwiches or dipping in olive oil.
Key Ingredients
These four pantry staples come together to create a showstopping loaf with minimal effort.
- 4 cups (500g) all-purpose flour: Provides the structure and body for the loaf, forming the foundation of the airy, open crumb.
- 1 1/2 teaspoons salt: Enhances flavor and strengthens the gluten network for a better chew and crust.
- 1/4 teaspoon instant yeast: Gently leavens the dough over time, creating those desirable bubbles.
- 2 cups (500ml) water, at room temperature: Hydrates the dough to a wet, sticky consistency that yields a light, airy texture.
How To Make Crusty No-Knead Artisan Ciabatta Bread
This foolproof method relies on time instead of elbow grease. You’ll mix a simple dough, let it ferment slowly to build flavor, perform a few gentle folds to develop strength, and then bake in a scorching-hot Dutch oven for that irresistible crust. Ready to dive in? Follow the detailed steps below.
1. In a large mixing bowl, combine the all-purpose flour, salt, and instant yeast. Whisk until the dry ingredients are evenly distributed to ensure consistent rising.
2. Gradually pour in the room-temperature water, stirring with a wooden spoon or spatula until a wet, sticky dough forms without any dry pockets.
3. Cover the bowl with plastic wrap or a clean kitchen towel and let the dough rest at room temperature for 12 to 18 hours, allowing flavor to develop and bubbles to form.
4. After fermentation, the dough will be visibly puffy with bubbles. Lightly flour your work surface and turn the dough out, then dust the top with a little flour to prevent sticking.
5. Gently stretch the dough into a rectangle, being careful not to deflate the air pockets. Fold the dough in thirds like a letter, turn 90 degrees, and fold again.
6. Place the folded dough seam-side down on a floured piece of parchment paper, dust the top with flour, cover with a kitchen towel, and let it rise for another 1 to 2 hours.
7. Preheat your oven to 450°F (230°C) and place a Dutch oven with its lid inside to heat for about 30 minutes, creating a steamy environment.
8. Carefully remove the hot Dutch oven. Using the parchment paper as a sling, lift the dough and place it inside, then cover with the lid.
9. Bake covered for 30 minutes, then remove the lid and bake uncovered for an additional 15–20 minutes until the crust turns deep golden brown and sounds hollow when tapped.
10. Transfer the bread to a wire rack and let it cool completely before slicing to set the crumb and maximize flavor.
Serving Suggestions
Once you’ve pulled that gorgeous loaf from the oven, the fun really begins. This versatile ciabatta shines in both simple and gourmet applications—just pick your favorite pairing and let the bread do the talking.
- Rustic Bruschetta: Slice the ciabatta into ½-inch pieces, toast under the broiler, then top with diced tomatoes, basil, garlic, olive oil, and a sprinkle of salt.
- Hearty Sandwiches: Split the loaf horizontally for a sturdy base that holds up to generous layers of meats, cheeses, and greens without getting soggy.
- Dipping Platter: Tear off chunks and serve alongside extra-virgin olive oil, aged balsamic, and a pinch of sea salt for a crowd-pleasing starter.
- Soup Companion: Cut into thick wedges to soak up creamy soups or hearty stews—its crisp outer shell and soft interior make every spoonful even cozier.
Tips For Perfect Crusty No-Knead Artisan Ciabatta Bread
Every home baker can nail this artisan ciabatta with a few insider tweaks. Whether you crave a tangier loaf or want to add mix-ins, these tips will have your kitchen smelling like a bakery. Embrace the slow fermentation and don’t skimp on the steam—your extra patience will reward you with that coveted open crumb and crackling crust.
- If you prefer a mildly tangy flavor, let the dough ferment closer to 18 hours.
- You can add herbs, spices, or even olives to the dough for a personalized touch.
- Store leftover bread wrapped in a kitchen towel to maintain its crusty texture; avoid plastic which can make it soggy.
- Experiment with different types of flour, such as bread flour or whole wheat, to change the flavor and texture.
How To Store It
Maintaining the perfect crust and fluffy interior doesn’t end when the oven timer dings. Proper storage will keep your ciabatta tasting fresh for days. Here’s how to preserve that signature crunch and avoid a soggy loaf.
- Room Temperature Wrap: Once completely cool, wrap the loaf in a clean kitchen towel and store at room temperature for up to 2 days, allowing the crust to breathe.
- Paper Bag: Place the ciabatta in a paper bag to protect the crust from softening while keeping the interior moist.
- Freezing: Slice the bread and freeze in a sealed bag for up to 3 months. Reheat slices in a hot oven to revive the crust.
- Avoid Plastic: Don’t wrap the freshly baked loaf in plastic wrap or bags—trapped moisture will soften the crust.
Frequently Asked Questions
Got questions? I’ve gathered the most common ciabatta queries below—let’s clear up any baking mysteries with friendly advice.
- Why does the recipe call for a 12 to 18 hour resting period?
A: The long ferment at room temperature allows the yeast to slowly develop flavor and create those large, irregular bubbles in the crumb. Resting closer to 18 hours yields a mildly tangy taste, while shorter times produce a milder loaf.
- Can I substitute active dry yeast for the instant yeast called for in this recipe?
A: Yes. Dissolve the active dry yeast in about 1/4 cup of the water (warmed to 100–110°F) and let it proof for 5–10 minutes until foamy. Then mix it with the remaining water and dry ingredients, adjusting the hydration so the dough stays wet and sticky.
- Why do we fold the dough instead of kneading it?
A: Folding gently builds gluten strength while preserving the delicate air bubbles formed during fermentation. This technique yields the open, airy crumb that’s characteristic of artisan ciabatta without the effort of traditional kneading.
- What if I don’t have a Dutch oven—how can I still achieve a crusty exterior?
A: Preheat a baking stone or heavy baking sheet on the oven rack. Place a metal pan on the floor of the oven and pour in hot water just before loading the loaf to create steam. Alternatively, mist the oven walls with water immediately after sliding in the dough.
- How can I tell when the ciabatta is fully baked?
A: The crust should be a deep golden brown all over, and the loaf will sound hollow when tapped on the bottom. An internal temperature of 200–210°F (93–99°C) measured with an instant-read thermometer also indicates it’s done.
- Is it possible to add ingredients like olives or herbs to this dough?
A: Absolutely. After the bulk fermentation and just before the first fold, gently pat the dough into a rough rectangle, sprinkle your mix-ins (chopped olives, herbs, spices), then fold as instructed to incorporate them without deflating the dough.
- What’s the best way to store leftover ciabatta to maintain its crust?
A: Once cool, wrap the loaf in a clean kitchen towel and store it at room temperature for up to 2 days. Avoid plastic, which traps moisture and softens the crust. For longer storage, freeze individual slices in a sealed bag and reheat in a hot oven.
What Makes This Special
There’s something magical about a loaf that comes together with zero kneading and minimal babysitting—just flour, water, yeast, and plenty of patience. The long ferment builds flavor, while the Dutch oven’s trapped steam gives you that signature crackling exterior. You’ll love how every slice boasts an airy crumb perfect for sandwiches, dipping, or a simple pat of butter. Bookmark or print this recipe so it’s always on hand for lazy weekends or impromptu dinner parties. If you give it a whirl, let me know how it turned out or if you have any questions, I’d love to hear from you!

Crusty No-Knead Artisan Ciabatta Bread
Description
Bite into a crackling crust and pillowy interior of this no-knead ciabatta, fermented for depth and baked in a steaming Dutch oven for irresistible aroma and flavor.
Ingredients
Instructions
-
In a large mixing bowl, combine the all-purpose flour, salt, and instant yeast. Whisk until well combined to ensure that the salt and yeast are evenly distributed throughout the flour.
-
Gradually add the water to the dry ingredients, stirring with a wooden spoon or spatula until a wet, sticky dough forms. Make sure there are no dry flour pockets; the dough should be shaggy and cohesive.
-
Cover the bowl with plastic wrap or a clean kitchen towel, and let it rest at room temperature for 12 to 18 hours. This long fermentation time allows for the development of flavor and helps create those desirable bubbles in the bread.
-
After the resting period, the dough should have risen significantly and show bubbles on the surface. Lightly flour your work surface and turn the dough out onto it. Sprinkle a little flour on top of the dough to prevent sticking.
-
Gently stretch the dough into a rectangle shape, being careful not to deflate it too much. Fold it in thirds, like a letter, then turn it 90 degrees and fold it again in thirds. This folding technique helps build strength in the gluten structure without kneading.
-
Place the folded dough seam-side down on a floured piece of parchment paper. Dust the top with a little more flour and cover it with a kitchen towel. Allow it to rise for another 1 to 2 hours until it has puffed up significantly.
-
Preheat your oven to 450°F (230°C) and place a Dutch oven (with the lid) inside to heat up for about 30 minutes. This will create steam in the oven, which helps form a crusty exterior.
-
Carefully remove the hot Dutch oven from the oven. Using the parchment paper as a sling, lift the dough and place it into the hot Dutch oven, cover it with the lid, and return it to the oven.
-
Bake covered for 30 minutes, then remove the lid and bake for an additional 15-20 minutes until the bread is golden brown and sounds hollow when tapped on the bottom.
-
Once baked, carefully transfer the bread to a wire rack to cool completely before slicing to allow the interior crumb to set.
Note
- If you prefer a mildly tangy flavor, let the dough ferment closer to 18 hours.
- You can add herbs, spices, or even olives to the dough for a personalized touch.
- Store leftover bread wrapped in a kitchen towel to maintain its crusty texture; avoid plastic which can make it soggy.
- Experiment with different types of flour, such as bread flour or whole wheat, to change the flavor and texture.

