

Mini No-Bake Lemon Cheesecake Tarts deliver a bright lemon tang and pillowy cream cheese nestled atop crisp graham cracker crusts, all without ever turning on the oven. These bite-sized delights are finished with a fresh mint leaf and a thin lemon slice, adding a vibrant pop of color and zesty flavor. Perfect for beginner bakers or anyone craving an easy dessert, they come together in just a few steps and make a stunning party bite. Ready to wow your guests?
Key Ingredients
Before diving into these mini tarts, let’s talk about the star players that make this no-bake cheesecake shine.
- 100 grams graham cracker crumbs: Provides a buttery, crunchy base for each tart crust.
- 2 tablespoons granulated sugar: Sweetens the crumbs and helps bind the crust together.
- 4 tablespoons unsalted butter, melted: Binds the graham crumbs into a sturdy foundation.
- 8 ounces cream cheese, softened: Creates the creamy, tangy heart of the cheesecake filling.
- 1/3 cup granulated sugar: Balances the lemon’s tartness with just the right level of sweetness.
- 2 tablespoons fresh lemon juice: Delivers bright citrus zing to lift the rich filling.
- 1 teaspoon lemon zest: Intensifies lemon aroma and adds a hint of texture.
- 1/2 cup heavy cream, cold: Whips into stiff peaks for a light, airy texture.
- 12 lemon slices: Garnish each tart with a fresh citrus wheel for a pop of color.
- 12 fresh mint leaves: Adds a refreshing finish and vibrant green contrast.
How To Make Mini No-Bake Lemon Cheesecake Tarts
Getting these tarts assembled is both quick and satisfying. You’ll press a crunchy crust, whip a luscious filling, and chill everything until perfectly set—all without firing up the oven. Follow these steps for a foolproof, creamy dessert that stays impressively firm.
1. In a bowl combine graham cracker crumbs, 2 tablespoons sugar, and melted butter until mixture holds together. Make sure the crumbs are fully coated and the sugar is evenly distributed so the crust sets firmly.
2. Press the crumb mixture evenly into the bottoms of 12 mini tart pans or a mini muffin tin to form crusts. Use your fingers or the bottom of a measuring cup to pack the crumbs tightly and create an even layer.
3. Chill the crusts in the refrigerator for at least 15 minutes while preparing the filling. This step helps the base solidify so it holds shape when you add the rich cheesecake filling.
4. In a separate bowl beat the softened cream cheese with 1/3 cup sugar, lemon juice, and lemon zest until smooth and creamy. Scrape down the sides occasionally to avoid lumps and ensure a perfectly smooth filling.
5. In a chilled bowl whip the heavy cream to stiff peaks and gently fold it into the cream cheese mixture. Always fold gently so you keep that airy texture.
6. Spoon or pipe the lemon cheesecake filling into each chilled crust, smoothing the tops. Fill right to the edge for a clean look, wiping any overflow with a spatula.
7. Refrigerate the filled tarts for at least 2 hours or until firm. Cover lightly or place in a covered container to prevent fridge odors from seeping in.
8. Just before serving, garnish each tart with a lemon slice and a mint leaf. Place the mint leaf on the lemon slice for best visual impact and serve cold.
Serving Suggestions
These mini tarts aren’t just adorable—they’re the perfect little bites to brighten any gathering. Their citrus zing and creamy texture pair beautifully with fresh fruits, sparkling drinks, and even savory hors d’oeuvres. Whether you’re hosting a garden party or craving a quick sweet fix, these lemon cheesecake tarts fit right in. Check out these serving ideas to take your presentation from cute to unforgettable in no time.
- Fruit-forward platter: Arrange tarts on a large platter with fresh berries like raspberries and blueberries to enhance the citrus notes.
- Elegant glassware: Serve each tart in individual coupe glasses alongside a dollop of extra whipped cream for a refined touch.
- Sparkling pairings: Offer a chilled glass of sparkling lemonade or prosecco to complement the tangy filling.
- Party favor boxes: Pack 2–3 tarts in small kraft boxes lined with parchment paper for guests to take home.
Tips For Perfect Mini No-Bake Lemon Cheesecake Tarts
I love how simple these tarts are, but a few insider tricks guarantee a flawless result every time. Starting with full-fat cream cheese and keeping your heavy cream ice-cold makes all the difference for stability and taste. Chill your mixing bowls and tools, pack your crust firmly, and don’t rush the chilling steps. Here are a few extra hints from my kitchen to keep your tarts dreamy and delicious:
- For best results use full-fat cream cheese and cold heavy cream.
- Make these tarts up to a day ahead and keep covered in the refrigerator.
- You can swap graham crackers for digestive biscuits if desired.
- If you prefer a sweeter filling, add an extra tablespoon of sugar.
How To Store It
Storing these tarts properly ensures that every bite stays luscious and fresh. Since there’s no baking involved, they keep beautifully in the fridge or even in the freezer for future indulgence. Follow these simple methods to maintain that creamy texture and crisp crust.
- Airtight container (refrigerator): Place tarts in a single layer in an airtight container, separating layers with parchment paper to prevent sticking.
- Plastic wrap (tart pans): If you leave them in the pans, cover tightly with plastic wrap across the top to guard against odors.
- Freezing assembled tarts: Flash-freeze the tarts on a baking sheet until solid, then wrap individually in plastic wrap and store in a freezer-safe bag for up to one month.
- Freezing crusts or filling separately: Prepare and freeze just the crusts or the cheesecake filling in an airtight bag; thaw in the fridge overnight and assemble when needed.
Frequently Asked Questions
Got questions? Here are quick answers to the most common queries about these mini no-bake lemon cheesecake tarts.
- How long does it take to prepare this recipe?
A: The active prep time is about 15 minutes—5 minutes to make the crust and press it into the pans, and 10 minutes to prepare and fill the cheesecake mixture. You also need at least 15 minutes to chill the crusts before filling and a minimum of 2 hours to refrigerate the filled tarts until firm, for a total time of around 2 hours and 30 minutes.
- Can I prepare these tarts ahead of time?
A: Yes. You can make the tarts up to 24 hours in advance. After filling and smoothing the tops, cover them tightly with plastic wrap or store them in an airtight container and keep refrigerated until serving.
- What’s the best way to ensure a firm crust?
A: Use fully melted unsalted butter and combine it thoroughly with the graham cracker crumbs and sugar. Press the mixture firmly and evenly into each tart pan, then chill in the refrigerator for at least 15 minutes before adding the filling to help it set up solidly.
- Can I substitute digestive biscuits for graham crackers?
A: Yes. Swap the graham cracker crumbs for an equal weight of finely crushed digestive biscuits. The texture will be very similar, though the flavor may be slightly less sweet and more biscuity.
- How do I achieve stiff peaks when whipping the heavy cream?
A: For best results, chill the heavy cream, mixing bowl, and beaters for at least 10 minutes before whipping. Start at medium speed until the cream thickens, then increase to high speed and whip until you see peaks that stand straight up without folding over when you lift the beaters.
- How can I adjust the sweetness or tanginess of the filling?
A: The recipe calls for 1/3 cup granulated sugar and 2 tablespoons lemon juice. If you prefer a sweeter filling, add an extra tablespoon of sugar. If you like more lemon zing, increase the lemon juice by up to 1 teaspoon and add a bit more zest for extra brightness.
- Can I use low-fat cream cheese or half-and-half instead of full-fat cream cheese and heavy cream?
A: For the creamiest texture and best stability, use full-fat cream cheese and cold heavy cream. Substituting low-fat or half-and-half may result in a looser filling that doesn’t hold its shape as well once chilled.
What Makes This Special
What really sets these Mini No-Bake Lemon Cheesecake Tarts apart is the ease of pull-it-together simplicity combined with bright citrus flavor and a melt-in-your-mouth texture. They’re perfect for beginner cooks who want to impress, party hosts who need quick yet elegant bites, or anyone craving a zesty treat without turning on the oven. Plus, they’re endlessly customizable—swap the crust, tweak the sugar, or go wild with toppings. Go ahead, print this recipe, tuck it in your binder, and save it for later. If you whip them up, drop a comment below or ask any questions—you know I’m here to chat!
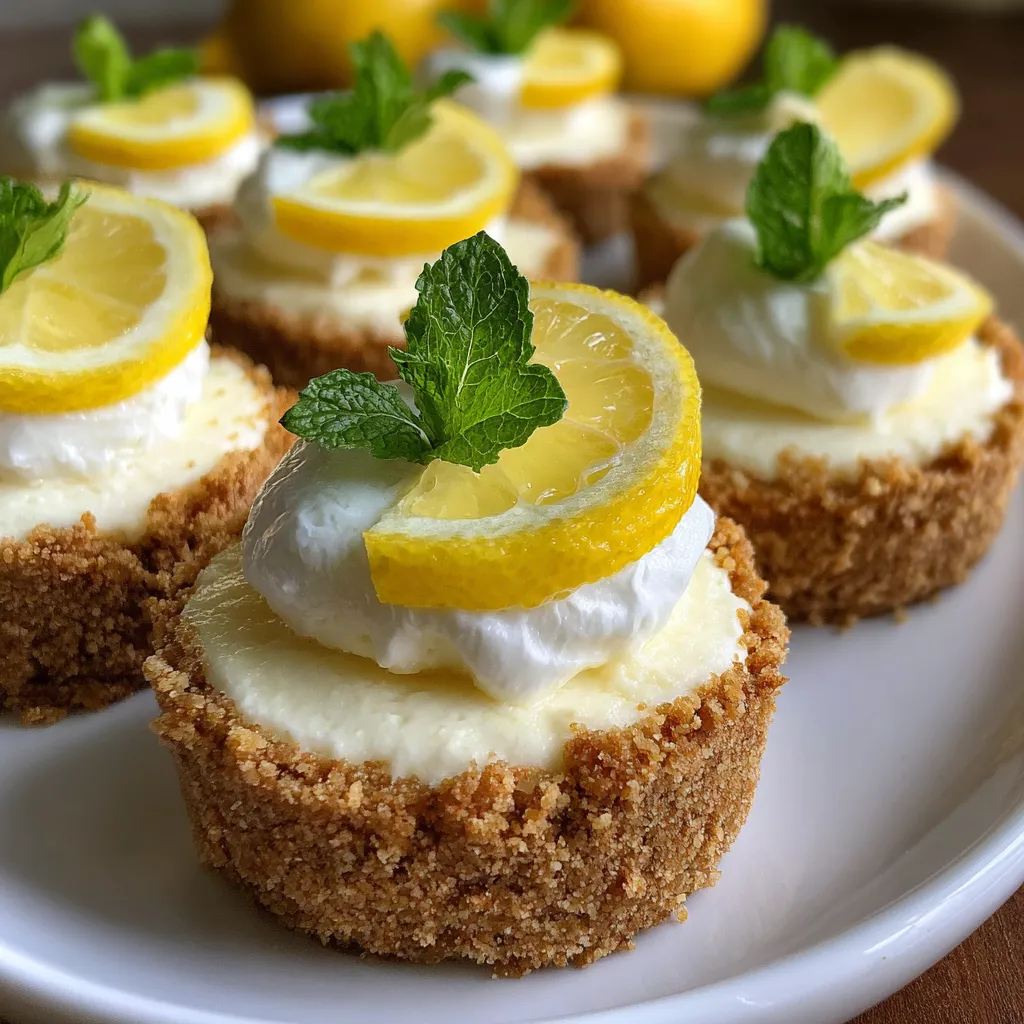

Mini No-Bake Lemon Cheesecake Tarts
Description
Tangy lemon filling and silky whipped cream cheese nestle atop crisp graham cracker crusts. Each mini tart bursts with citrus zing and creamy smoothness, while a lemon slice and mint leaf add a fresh pop.
Ingredients
Instructions
-
In a bowl combine graham cracker crumbs, 2 tablespoons sugar, and melted butter until mixture holds together.
-
Press the crumb mixture evenly into the bottoms of 12 mini tart pans or a mini muffin tin to form crusts.
-
Chill the crusts in the refrigerator for at least 15 minutes while preparing the filling.
-
In a separate bowl beat the softened cream cheese with 1/3 cup sugar, lemon juice, and lemon zest until smooth and creamy.
-
In a chilled bowl whip the heavy cream to stiff peaks and gently fold it into the cream cheese mixture.
-
Spoon or pipe the lemon cheesecake filling into each chilled crust, smoothing the tops.
-
Refrigerate the filled tarts for at least 2 hours or until firm.
-
Just before serving, garnish each tart with a lemon slice and a mint leaf.
Note
- For best results use full-fat cream cheese and cold heavy cream.
- Make these tarts up to a day ahead and keep covered in the refrigerator.
- You can swap graham crackers for digestive biscuits if desired.
- If you prefer a sweeter filling, add an extra tablespoon of sugar.

