

If you love the satisfying snap of pretzels paired with creamy peanut butter—and who doesn’t?—these No-Bake Peanut Butter Pretzel Clusters are here to steal the show. Crunchy pretzels meet velvety peanut butter dough, all draped in a silky chocolate drizzle, for a salty-sweet snack that comes together in minutes without ever heating up your oven. Whether you need an after-school treat, a party nibble, or just a quick hit of sugar and crunch, these clusters deliver big flavor with minimal effort.
Key Ingredients
Before you start, make sure you have these no-frills staples on hand. Each one plays a crucial role in building texture, sweetness, and that irresistible contrast of salty and sweet.
- 2 cups mini pretzels: Tiny twists that add a crisp, salty crunch to every bite.
- 1 cup creamy peanut butter: The smooth base that binds everything together and brings rich, nutty flavor.
- 2 tablespoons coconut oil: Helps create a silky, pourable peanut butter mixture for easy coating.
- 2 cups powdered sugar: Sweetens and thickens the dough so clusters hold their shape.
- 1 cup semi-sweet chocolate chips: Melted over the top for a glossy, chocolatey finish that sets firm in the freezer.
How To Make No-Bake Peanut Butter Pretzel Clusters
Crafting these clusters is as easy as melting, mixing, and freezing. You’ll transform pantry basics into irresistible bite-size snacks in just a few simple steps—no baking required! Follow each instruction carefully, using gentle folding, precise melting, and a quick chill in your freezer to ensure each cluster holds together beautifully.
1. Line a baking sheet with parchment paper and set aside.
2. In a microwave-safe bowl, combine peanut butter and coconut oil; microwave in 30-second intervals, stirring between each, until the mixture is completely smooth and pourable.
3. Add powdered sugar and stir vigorously until you achieve a thick, scoopable dough.
4. Gently fold the mini pretzels into the peanut butter mixture until each piece is evenly coated.
5. Use a spoon to drop bite-size clusters onto the prepared baking sheet, spacing them slightly apart.
6. Place the baking sheet in the freezer for 10 minutes to firm up the clusters.
7. Meanwhile, melt chocolate chips in a microwave-safe bowl in 20-second intervals, stirring after each, until the chocolate is fully melted and smooth.
8. Drizzle the melted chocolate over the chilled clusters using a spoon or piping bag, then return them to the freezer until the chocolate sets, about 5–10 minutes.
Serving Suggestions
These little clusters are versatile enough to jazz up any gathering or quiet night in. Serve them straight from the freezer or let them soften slightly at room temperature—either way, they’re a guaranteed crowd-pleaser.
- Spread them out on a rustic wooden board alongside assorted nuts and dried fruit for a charming snack platter.
- Place clusters in mini paper cups and arrange on a tiered stand at your next party for a sweet-and-salty treat station.
- Pair with a steaming cup of coffee or tea—the temperature contrast makes each bite even more satisfying.
- Gift them in a mason jar tied with twine for a homemade edible present that travels well.
Tips For Perfect No-Bake Peanut Butter Pretzel Clusters
Perfect clusters start with the right balance of peanut butter, sugar, and crunch. A little tweak here and there can make your batch shine. Use the pointers below to customize sweetness, texture, and flavor.
- Store clusters in an airtight container in the refrigerator for up to one week, or freeze for longer stash power.
- For a more pronounced crunch, swap out creamy peanut butter for crunchy peanut butter—just be ready to adjust powdered sugar as needed.
- Feel free to tweak the powdered sugar amount: add a little less for softer, more pliable dough or the full amount for firmer clusters.
- Stir in a pinch of cinnamon or a dash of vanilla extract to the peanut butter mixture for an extra layer of warm flavor.
How To Store It
Keeping these clusters fresh is a breeze thanks to their no-bake nature and sturdy structure. Whether you’re saving leftovers or prepping ahead for an event, follow these storage tips to maintain flavor and crunch.
- Refrigerator: Store in an airtight container for up to one week—perfect if you plan to munch on them over a few days.
- Freezer: Freeze in a sealed container or freezer bag for up to three months; let clusters sit at room temperature for 5–10 minutes before serving.
- Layering: If stacking clusters, place parchment paper sheets between layers to prevent sticking.
- Room Temperature: In cooler climates, clusters can sit at room temperature for a couple of hours—ideal for parties or gatherings.
Frequently Asked Questions
Here are the top questions we get about these clusters, answered in a flash:
- Q: How long does it take to prepare and finish the No-Bake Peanut Butter Pretzel Clusters?
The active prep time is about 10–12 minutes for melting, mixing, and scooping the clusters. You’ll then freeze them for 10 minutes, drizzle with chocolate (about 3–5 minutes), and freeze again until the chocolate sets (another 5–10 minutes). In total, plan for roughly 30–35 minutes from start to finish.
- Q: Can I use crunchy peanut butter instead of creamy, and how will it affect the clusters?
Yes—substituting crunchy peanut butter adds extra texture to the clusters. The process remains the same, but the dough may be a bit more rustic. Crunchy peanut butter can absorb slightly more powdered sugar, so you may need to adjust the amount of sugar to maintain a scoopable consistency.
- Q: How can I adjust the sweetness or consistency of the peanut butter mixture?
To reduce sweetness, start by halving the powdered sugar and then gradually add more until you reach your desired sweetness and thickness. For a firmer dough, use the full 2 cups; for a softer, more pliable mixture, decrease the sugar by up to ½ cup. Stir thoroughly after each adjustment to gauge texture.
- Q: What’s the best way to store these clusters, and how long will they keep?
Store clusters in an airtight container in the refrigerator for up to one week. For longer storage, freeze them in a sealed container or freezer bag for up to three months. Allow frozen clusters to sit at room temperature for 5–10 minutes before serving for optimal texture.
- Q: How do I get a smooth, even chocolate drizzle on the clusters?
After melting chocolate chips in 20-second intervals and stirring to full smoothness, transfer the melted chocolate to a small piping bag or a resealable plastic bag with one corner snipped off. Ensure clusters are fully firm before drizzling, then move your hand in a steady back-and-forth motion about 4–6 inches above the clusters for thin, even lines.
- Q: Are there any recommended flavor variations I can try?
For extra flavor, stir in a pinch of ground cinnamon or a teaspoon of vanilla extract into the peanut butter mixture before adding powdered sugar. You can also sprinkle a small pinch of sea salt or crushed pretzel pieces over the chocolate drizzle while it’s still wet to enhance sweet-and-salty contrast.
What Makes This Special
These No-Bake Peanut Butter Pretzel Clusters strike that perfect harmony of crunchy, salty pretzels, rich peanut butter dough, and a glossy chocolate top in every single bite. They come together in under 35 minutes—no oven required—so they’re ideal for beginner cooks, busy parents, or anyone who craves a fast, fuss-free treat. Go ahead, print this recipe and stick it on your fridge; you’ll want easy access when that salty-sweet craving strikes. And when you give them a whirl, drop a comment or ask a question—I’m here to help you nail those clusters!
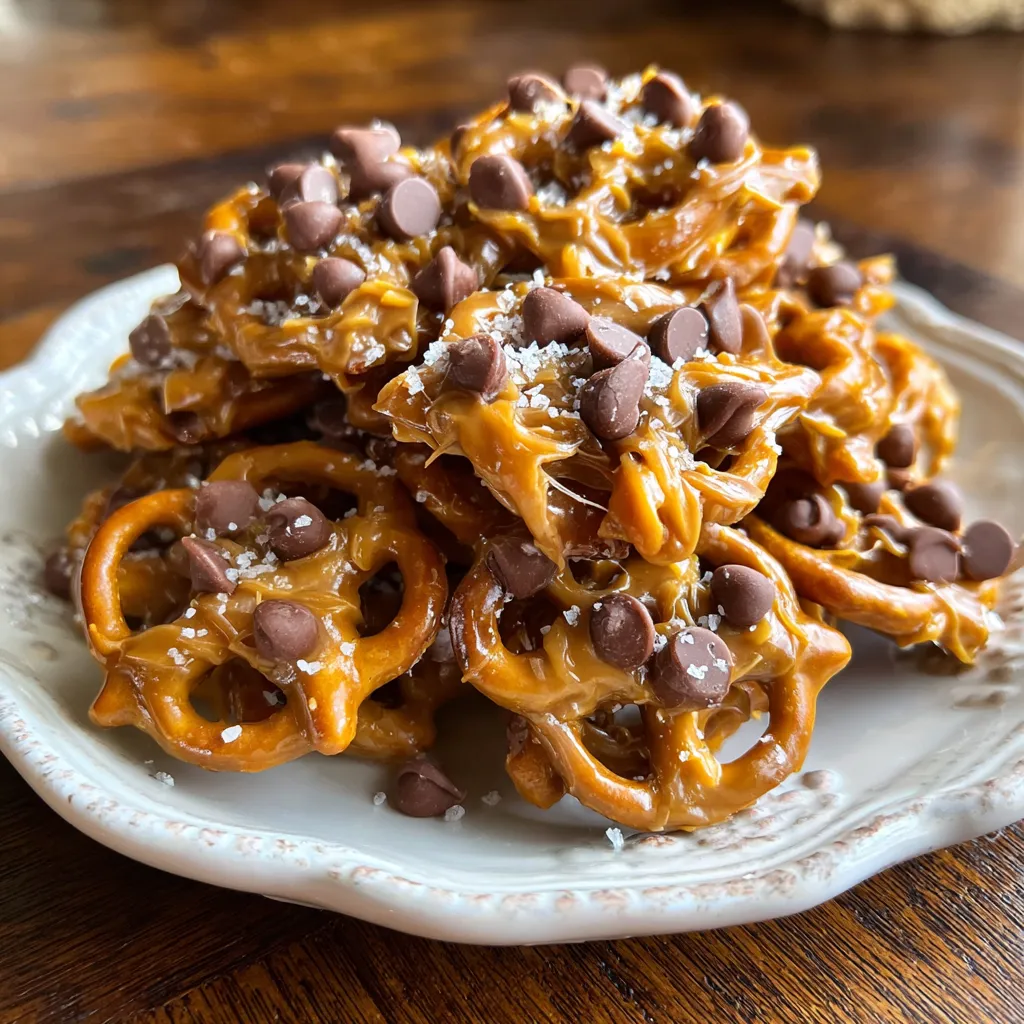

No-Bake Peanut Butter Pretzel Clusters
Description
Pretzel crunch collides with velvety peanut butter dough and silky chocolate in bite-sized clusters you can whip up in minutes. Freeze to set and enjoy a salty-sweet snack with a satisfying snap.
Ingredients
Instructions
-
Line a baking sheet with parchment paper and set aside.
-
In a microwave-safe bowl, combine peanut butter and coconut oil and microwave in 30-second intervals, stirring until smooth.
-
Add powdered sugar and stir until a thick dough forms.
-
Gently fold pretzels into the peanut butter mixture until evenly coated.
-
Use a spoon to drop bite-size clusters onto the prepared baking sheet.
-
Place clusters in the freezer for 10 minutes to firm up.
-
Melt chocolate chips in a microwave-safe bowl in 20-second intervals, stirring until smooth.
-
Drizzle melted chocolate over the clusters and return to the freezer until the chocolate sets.
Note
- Store clusters in an airtight container in the refrigerator for up to one week or in the freezer for longer storage.
- For a crunchier texture, use crunchy peanut butter instead of creamy.
- Feel free to adjust the amount of powdered sugar to achieve your preferred sweetness and consistency.
- Add a pinch of cinnamon or a dash of vanilla extract to the peanut butter mixture for extra flavor.

