

If your Halloween celebrations need a whimsical twist, these Nutter Butter Ghost Cookies are about to become your new favorite dessert. Combining the beloved crunch of peanut butter cookies with a silky white chocolate coating, these playful little ghosts have a way of disappearing off the platter in seconds. I still remember the first time I dipped a classic Nutter Butter into that glossy melt of white chocolate, watching it transform into a tiny specter crowned with chocolate chip eyes. There’s something utterly magical about this snack: it’s so simple, yet so charming, that both kids and adults can’t help but grin as they take their first bite. The crisp nibble of the cookie gives way to the creamy sweetness of the coating, and the treat is finished with a melt-in-your-mouth finish that feels like a festive whisper of fall fun. Sitting on a table decked out with flickering candles and plastic cobwebs, a tray of these cute and spooky ghost cookies instantly sets the Halloween mood. They’re not just adorable—they’re downright delicious.
In addition to being a star attraction on any Halloween dessert table, these ghost cookies shine because of how quick and fuss-free they are. There’s no baking involved—just a few simple steps of melting, dipping, and decorating, which means the total prep time is a breezy 15 minutes. After that, give them about 15 minutes to set, and you’ll have perfectly firm yet tender treats ready to serve. As someone who loves beginner-friendly recipes, these cookies fit right into my go-to list, especially when a last-minute party invitation pops up. I love how each ghost can be customized to show its own personality—maybe a surprised “O” mouth drawn with black icing, or a sprinkle of purple sugar for a witchy vibe. Feeling adventurous? Try adding mini marshmallow pieces at the top for extra dimension or swap in white candy melts if you want a smoother, shinier finish. With around 150 calories per cookie, they’re also just the right size to pop one—okay, maybe two!—between carving pumpkins and telling spooky stories around a candlelit table.
KEY INGREDIENTS IN NUTTER BUTTER GHOST COOKIES
Before you embark on your ghostly decorating spree, let’s gather the essentials. Each component plays its own starring role, from the crunchy cookie base to the smooth candy coating and the tiny details that bring these spectral faces to life.
- Nutter Butter cookies
These peanut butter sandwich cookies provide the perfect crunchy foundation. Their distinctive shape mimics a little ghost body, and the nutty flavor pairs beautifully with sweet white chocolate.
- White chocolate chips or white candy melts
These are melted to create a smooth, creamy coating that transforms each cookie into a ghostly canvas. The white color gives that spooky, ethereal look while adding rich sweetness.
- Coconut oil or vegetable shortening
A small amount of this helps thin the melted chocolate for an ultra-smooth dip and gives a shiny finish once set. It ensures the coating hardens with a glossy sheen rather than a dull film.
- Mini chocolate chips or black icing
These tiny embellishments serve as the ghost’s eyes (and optional mouths). Their dark contrast against the white coating really makes each little specter come to life.
- Mini marshmallows (optional)
Cut into small pieces, these add a playful “scary” expression or extra dimension at the top of each cookie. They’re perfect for kids to help decorate and customize their own ghosts.
HOW TO MAKE NUTTER BUTTER GHOST COOKIES
Transforming everyday cookies into festive ghost shapes is easier than you think. Just follow these simple, no-bake steps to whip up a batch in no time!
1. Prepare a baking sheet by lining it with parchment paper. This will prevent the cookies from sticking when cooling and make cleanup a breeze.
2. In a microwave-safe bowl, combine the white chocolate chips and coconut oil. Microwave on medium power in 30-second increments, stirring after each until completely melted and smooth.
3. Take each Nutter Butter cookie and dip it halfway into the melted white chocolate, allowing any excess chocolate to drip back into the bowl for neatness.
4. Carefully place the dipped cookie onto the prepared parchment-lined baking sheet, spacing them a couple of inches apart.
5. While the white chocolate is still wet, press two mini chocolate chips onto the dipped section for the ghost’s eyes. Hold them in place for a second so they adhere.
6. If using mini marshmallows, cut one marshmallow into small pieces and place one at the top of the cookie to give the ghost a “scary” expression, or for additional decoration.
7. Repeat the dipping and decorating process with the remaining cookies, working swiftly before the chocolate firms up.
8. Allow the cookies to set at room temperature or refrigerate them for 10–15 minutes until the chocolate hardens completely.
9. Once set, carefully remove the cookies from the parchment paper and store them in an airtight container until ready to serve.
SERVING SUGGESTIONS FOR NUTTER BUTTER GHOST COOKIES
As the ghosts set and you admire their charming features, it’s time to think about how to present these adorable treats in a way that maximizes both visual impact and flavor enjoyment. Serving these ghost cookies can be as much fun as making them. Whether you’re aiming for a centerpiece at a Halloween bash, a sweet surprise for classroom parties, or an after-dinner treat that winks at the spooky season, a few simple styling tricks can turn these little nibblers into star attractions. I love arranging mine on a bat-shaped platter dusted with edible glitter, but you might prefer a rustic wooden board lined with black lace doilies for a more dramatic vibe. Pairing the cookies with warm, aromatic beverages or contrasting textures elevates the experience. Don’t hesitate to mix in other seasonal bites—maybe some caramel popcorn clutched by tiny ghost tongs, or candied apple slices that carry a whisper of autumn spice. Depending on your crowd, offering the cookies alongside a small bowl of edible googly eyes or colored sprinkles invites a playful DIY moment. Let guests top their own ghostly pals for a memorable interactive twist. With just a bit of creativity, serving becomes part of the entertainment, and your guests will be talking about your hauntingly good taste long after the last ghost vanishes.
- Festive platter display: Arrange the ghost cookies on a decorative platter lined with black parchment paper or Halloween-themed doilies to create a spooky background. Cluster them in rings or scattered formations, then tuck mini pumpkins or candy corn around the edges for pops of autumnal color.
- Pair with a warm beverage: Serve alongside mugs of spiced hot chocolate or mulled apple cider in small cups. The warmth of the drink balances the sweet, cool bite of the white chocolate, making each ghost cookie feel extra cozy.
- Create a dessert board: Mix these ghosts with other Halloween goodies—think caramel popcorn, candy apples, and chocolate-covered pretzels—on a large wooden board. Use small dishes of sprinkles or edible glitter so guests can customize their picks.
- Package as individual favors: Place each cookie in a clear cellophane bag tied with orange or black ribbon. Add a tiny name tag or a spooky sticker to make them perfect classroom treats or party favors that last beyond the night.
HOW TO STORE NUTTER BUTTER GHOST COOKIES
When the last of the ghost cookies has been shaped and admired, you might find yourself with a few leftover specters seeking a cozy spot to stay fresh. Proper storage not only maintains the crispness of the Nutter Butter base but also preserves the glossy sheen of the white chocolate coating. Since these treats combine a crunchy cookie with a creamy candy shell, the key is to prevent moisture from softening the crunch while avoiding temperature swings that can cause blooming or cracking. Whether you plan to serve them later in the evening or want to make them a day ahead for a party, you’ll appreciate how a few simple storage techniques can lock in both flavor and texture. In my kitchen, I’ve experimented with everything from airtight containers to gentle refrigeration, learning how to layer cookies with parchment to avoid sticking, and even discovering that a cool, dry pantry corner can be just as effective as the fridge. Below are some tried-and-true methods to keep your ghostly confections looking and tasting their best. For stashing these cookies longer – up to a week – freezing can be a fantastic option, as long as you wrap them individually or layer them between sheets of parchment paper to prevent any sticking. Just remember to thaw them at room temperature so the chocolate regains its smooth texture without condensation forming on the surface.
- Room Temperature Storage: Place cookies in a single layer inside an airtight container at room temperature. Keep the container in a cool, dry spot away from direct sunlight to maintain the crunch of the cookie and the sheen of the white chocolate.
- Refrigeration: If your kitchen tends to be warm or humid, store the cookies in the refrigerator. Seal them in an airtight container and allow them to come back to room temperature before serving to avoid any condensation on the chocolate.
- Freezer Storage: Layer cookies between sheets of parchment paper in a freezer-safe container or bag. For best results, freeze for up to one week. Thaw at room temperature to preserve texture and shine.
- Individual Wrapping: Wrap each ghost in plastic wrap or small cellophane bags with a twist tie. This is perfect for gifting or ensuring that a single cookie stays crisp without exposure to air.
CONCLUSION
From a simple pantry raid to a delightfully spooky tableau, these Nutter Butter Ghost Cookies prove that some of the best treats are created with just a handful of ingredients, a dash of creativity, and a spirit of fun. We’ve covered everything you need to know—from gathering the key components (peanut butter cookies, white chocolate, coconut oil, and tiny decorations) to mastering the no-bake dipping technique and setting them to perfection. Along the way, we shared ideas for plating these little specters at your next Halloween gathering, ensuring your table is both hauntingly beautiful and irresistibly delicious. Remember, this recipe is geared toward beginners: no oven skill required, just a microwave and your sense of whimsy. You can print this article and save it for later, whether you’re planning an epic fall bash or looking for last-minute treats that will have everyone talking. Don’t forget to scroll down for the FAQ section, where you’ll find answers to common queries and troubleshooting tips if your chocolate refuses to cooperate.
If you decide to try these ghost cookies, I’d love to hear how they turned out! Leave your comments, questions, or feedback below—whether it’s about flavor variations you invented, a decorating hack that blew everyone away, or any hiccups you encountered along the way. Cooking is all about sharing, experimenting, and learning together, so don’t be shy. Your thoughts just might inspire another home cook to unleash their own creative twist on this spook-tacular dessert!
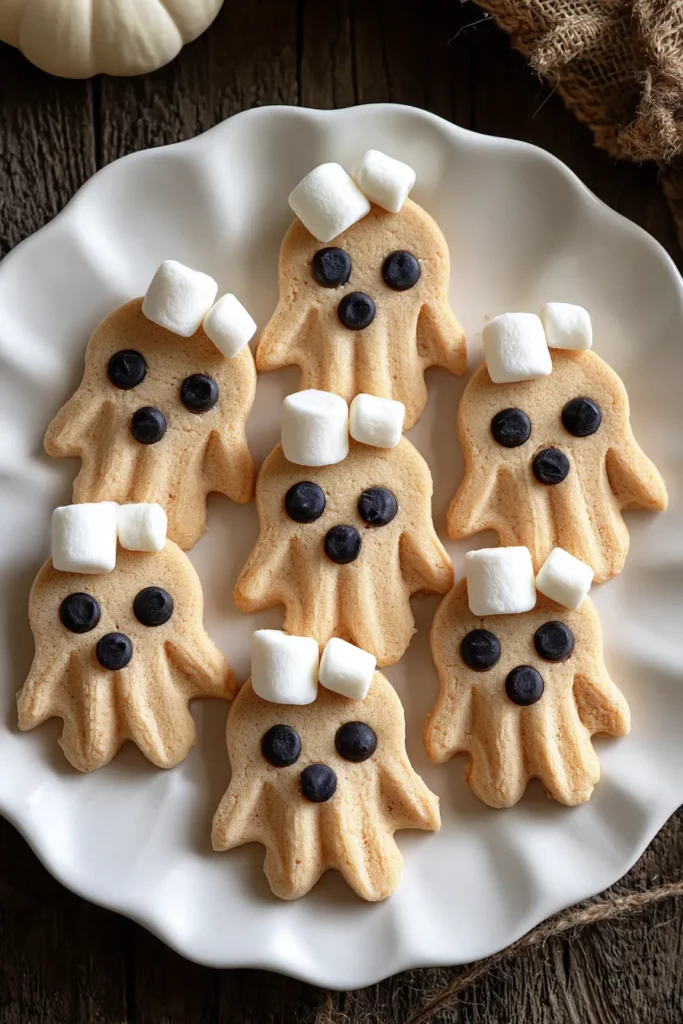

Nutter Butter Ghost Cookies
Description
These adorable ghost-shaped treats combine crunchy Nutter Butter cookies coated in creamy white chocolate, making them a perfect delight for Halloween celebrations. Easy, fun, and deliciously spooky!
Ingredients
Instructions
-
Prepare a baking sheet by lining it with parchment paper. This will prevent the cookies from sticking when cooling.
-
In a microwave-safe bowl, combine the white chocolate chips and coconut oil. Microwave on medium power in 30-second increments, stirring after each, until completely melted and smooth.
-
Take each Nutter Butter cookie and dip it halfway into the melted white chocolate, allowing any excess chocolate to drip back into the bowl.
-
Carefully place the dipped cookie onto the prepared parchment-lined baking sheet.
-
While the white chocolate is still wet, press two mini chocolate chips onto the dipped section for the ghost's eyes.
-
If using mini marshmallows, cut one marshmallow into small pieces and place one at the top of the cookie to give the ghost a "scary" expression, or for additional decoration.
-
Repeat the dipping and decorating process with the remaining cookies.
-
Allow the cookies to set at room temperature or refrigerate them for 10-15 minutes until the chocolate hardens.
-
Once set, carefully remove the cookies from the parchment paper and store them in an airtight container until ready to serve.
Note
- For an extra spooky look, consider using edible black gel to draw mouths or other facial features.
- If you do not have coconut oil, vegetable shortening is a great alternative to ensure smooth melting and a shiny finish.
- These ghost cookies make a delightful and festive treat for Halloween parties or themed events.
- Feel free to get creative with the decorations, adding different candies or sprinkles for unique ghost personalities.

