

There is something truly magical about the combination of dark, rich chocolate and cool, refreshing peppermint during the holidays. This Peppermint Swirl Fudge is my absolute go-to when I want to impress guests or simply treat myself to a nostalgic winter flavor. The contrast between the semi-sweet and white chocolate layers isn't just stunning to look at; it delivers a creamy, buttery bite that melts in your mouth. Whether you are a seasoned baker or just starting out, you are going to love how this festive centerpiece brings warmth and joy to your kitchen.
Key Ingredients
Creating this stunning holiday treat starts with gathering the right components. You need a mix of pantry staples for the fudge base and high-quality chocolate to ensure that silky, melt-in-your-mouth texture. Each ingredient plays a vital role in balancing the sweetness with the rich cocoa and bright peppermint notes, ensuring every square is perfect.
- 2 cups granulated sugar: This provides the essential sweetness and structure for the fudge as it cooks down.
- 2/3 cup evaporated milk: Adds a rich, creamy consistency that regular milk simply cannot achieve in candy making.
- 1/4 cup unsalted butter: Gives the fudge a glossy finish and a smooth, velvety mouthfeel.
- 2 cups semi-sweet chocolate chips: The star of the show, offering a deep chocolate flavor that pairs perfectly with mint.
- 1 cup white chocolate chips: Creates the creamy contrasting layer that makes the marble effect pop.
- 1 teaspoon peppermint extract: Delivers that signature cool holiday flavor that cuts through the richness of the chocolate.
- 1/2 teaspoon vanilla extract: Enhances the overall flavor profile and adds aromatic depth to the white chocolate layer.
- 1/4 teaspoon salt: A crucial addition to balance the sugar and make the chocolate flavors sing.
- 2-3 drops of red food coloring: Essential for creating that festive red swirl that makes this dessert look like a candy cane.
- Crushed peppermint candies for topping (optional): Adds a delightful crunchy texture and a beautiful finishing touch.
How To Make Peppermint Swirl Fudge
Making homemade fudge might seem intimidating if you have never done it before, but I promise this recipe is quite approachable and fun. The process involves creating a cooked sugar base and then dividing it to create those luscious layers of semi-sweet and white chocolate. The real fun begins when you get to play artist with the red food coloring to create that signature swirl. Just remember to have all your ingredients measured and ready to go before you start boiling the sugar mixture, as the steps move quickly once the heat is on!
1. Begin by preparing an 8×8-inch square baking dish. Line it carefully with parchment paper, ensuring you leave some overhang on the sides for easy removal of the fudge later. Lightly grease the parchment paper with cooking spray or butter to prevent sticking.
2. In a medium saucepan set over medium heat, combine the granulated sugar, evaporated milk, and unsalted butter. You need to stir continuously until the mixture comes to a full, rolling boil to prevent scorching.
3. Once the mixture is boiling, let it cook for an exact additional 5 minutes, continuing to stir frequently. This step is critical as it will ensure the sugar dissolves completely and prevents it from burning or becoming grainy.
4. Remove the saucepan from the heat source and immediately stir in the semi-sweet chocolate chips and half of the peppermint extract. Stir vigorously until the chocolate is completely melted and the mixture is glossy and smooth.
5. Pour exactly half of the chocolate mixture into your prepared baking dish, spreading it evenly to form the bottom layer. Set aside the remaining half in the saucepan for the top layer.
6. In a separate bowl, melt the white chocolate chips using a microwave or double boiler until they are perfectly smooth. Add in the remaining peppermint extract, vanilla extract, and salt, then mix until fully combined.
7. Pour the white chocolate mixture directly over the first dark chocolate layer in the baking dish and spread it evenly with a spatula to create a distinct middle layer.
8. Take the remaining semi-sweet chocolate fudge mixture and pour it over the white chocolate layer. Be sure to reserve a small amount (about 1/4 cup) of this mixture to create the decorative swirl.
9. Take that reserved fudge mixture and add the red food coloring to it. Swirl it gently into the top layer using a knife or a skewer to create a beautiful marbled effect.
10. If desired, sprinkle crushed peppermint candies on the top immediately for added texture and flavor before the fudge sets.
11. Allow the fudge to cool at room temperature for about an hour, then move it to the refrigerator for at least 2 hours or until it is completely firm.
12. Once set, remove the fudge from the baking dish by lifting the parchment paper overhang. Cut it into small squares with a sharp knife and serve.
Serving Suggestions
Presenting this Peppermint Swirl Fudge is almost as fun as eating it because it looks so festive on a holiday table. The marbled red finish and the stark contrast between the chocolate layers make it a visual treat. Whether you are hosting a cozy family gathering or a large holiday party, there are several ways to elevate the experience. Here are a few of my favorite ways to serve this treat to wow your guests.
- Create a Holiday Dessert Board: Arrange the fudge squares on a wooden board alongside gingerbread cookies, dried cranberries, and sugared pecans. The mix of textures and colors creates an inviting grazing station, and the rich chocolate fudge acts as the perfect anchor for the lighter snacks.
- Pair with Hot Beverages: Serve a small square of fudge on the saucer next to a steaming mug of coffee or hot cocoa. The heat from the drink will slightly soften the fudge, releasing the peppermint aroma, making for a cozy and sophisticated after-dinner treat.
- Use as an Edible Garnish: If you are serving bowls of vanilla or peppermint stick ice cream, chop a square of fudge into smaller crumbles and sprinkle it over the top. The chewy texture of the cold fudge against the melting ice cream is absolutely divine.
- Festive Party Favors: Place individual squares in mini cupcake liners and arrange them on a tiered cake stand. This makes the fudge easy to grab as a finger food during a party and keeps your serving platter looking neat and elegant throughout the evening.
Tips For Perfect Peppermint Swirl Fudge
I want your fudge to turn out absolutely perfect on the first try, so I have gathered a few specific tips that really make a difference. Fudge can sometimes be a little finicky depending on temperature and timing, but these notes will guide you to success. It is all about patience and using your creativity to make the recipe your own. Don't stress if your swirls aren't perfect; the taste will still be incredible!
- Allow the fudge to come to room temperature before cutting for cleaner edges.
- Experiment with different flavor extracts, such as almond or orange, for a unique twist.
- Store leftover fudge in an airtight container at room temperature for up to one week.
- This fudge can also be wrapped in festive packaging for gift giving during the holiday season.
- For an extra festive touch, dip the finished fudge squares in chocolate and roll them in crushed peppermint.
How To Store It
Proper storage is key to maintaining that creamy, melt-away texture that makes fresh fudge so delicious. You want to avoid the fudge drying out or absorbing other odors from your kitchen. Since this recipe uses dairy and butter, keeping it stable is important, but you also want it ready to eat whenever a craving strikes. Here are the best ways to keep your Peppermint Swirl Fudge tasting fresh for days.
- Room Temperature Storage: For the best texture, store your leftover fudge in an airtight container on the counter. It will stay fresh and soft for up to one week, making it easy to grab a piece whenever you walk by.
- Refrigeration: If your kitchen runs warm or you prefer a firmer bite, you can store the container in the fridge. Just be sure to separate layers with wax paper to prevent them from sticking together.
- Freezing for Later: To keep the fudge longer, wrap individual squares in plastic wrap and place them in a freezer-safe bag. This method preserves the flavor quality for up to three months; just thaw on the counter before eating.
- Gift Tins: When giving as gifts, line a metal tin with parchment paper. This protects the fudge from taking on a metallic taste and keeps the moisture locked in during transport.
Frequently Asked Questions
I know that making candy can sometimes bring up a few questions, especially when it comes to getting the texture just right. Here are some answers to the most common things people ask about this recipe to help you feel confident in the kitchen.
- Q: How should I store the finished fudge and how long will it last?
A: You should store leftover fudge in an airtight container at room temperature. When stored properly, it will last for up to one week.
- Q: How long does the fudge need to set before it is ready to be cut and served?
A: The cooling process requires two steps: first, allow the fudge to cool at room temperature for about an hour. Then, place it in the refrigerator for at least 2 hours or until it is firm.
- Q: What is the best way to achieve the decorative red swirl on top?
A: Reserve about 1/4 cup of the semi-sweet chocolate fudge mixture before pouring the final layer. Add 2-3 drops of red food coloring to this reserved portion, then gently swirl it into the top layer of the fudge using a knife or a skewer to create a marbled effect.
- Q: Why is it necessary to cook the sugar, milk, and butter mixture for an additional 5 minutes after boiling?
A: Cooking the mixture for an additional 5 minutes ensures that the granulated sugar dissolves completely. It is important to stir frequently during this time to prevent the mixture from burning.
- Q: Can I use different flavors instead of peppermint for this recipe?
A: Yes, the notes suggest experimenting with different flavor extracts, such as almond or orange, to give the fudge a unique twist.
- Q: How should I prepare the baking dish to make removing the fudge easier?
A: You should line an 8×8-inch square baking dish with parchment paper, leaving some overhang on the sides for easy lifting later. Additionally, lightly grease the parchment paper with cooking spray or butter.
- Q: Do you have any tips for getting clean edges when cutting the fudge?
A: To achieve cleaner edges when slicing the fudge into squares, allow the fudge to come to room temperature before cutting.
What Makes This Special
This Peppermint Swirl Fudge is a recipe that truly captures the spirit of the holidays in every bite. What makes it so special is the beautiful balance between the semi-sweet chocolate and the creamy white chocolate, all tied together with that nostalgic peppermint crunch. It is one of those treats that looks incredibly impressive with its marbled red finish but is secretly quite simple to pull off at home. I hope you have a blast making this! Don't forget to save this article or print it out so you have it ready for your next baking marathon. If you try it, please leave a comment below and let me know how your swirls turned out or if you have any questions! Happy cooking!
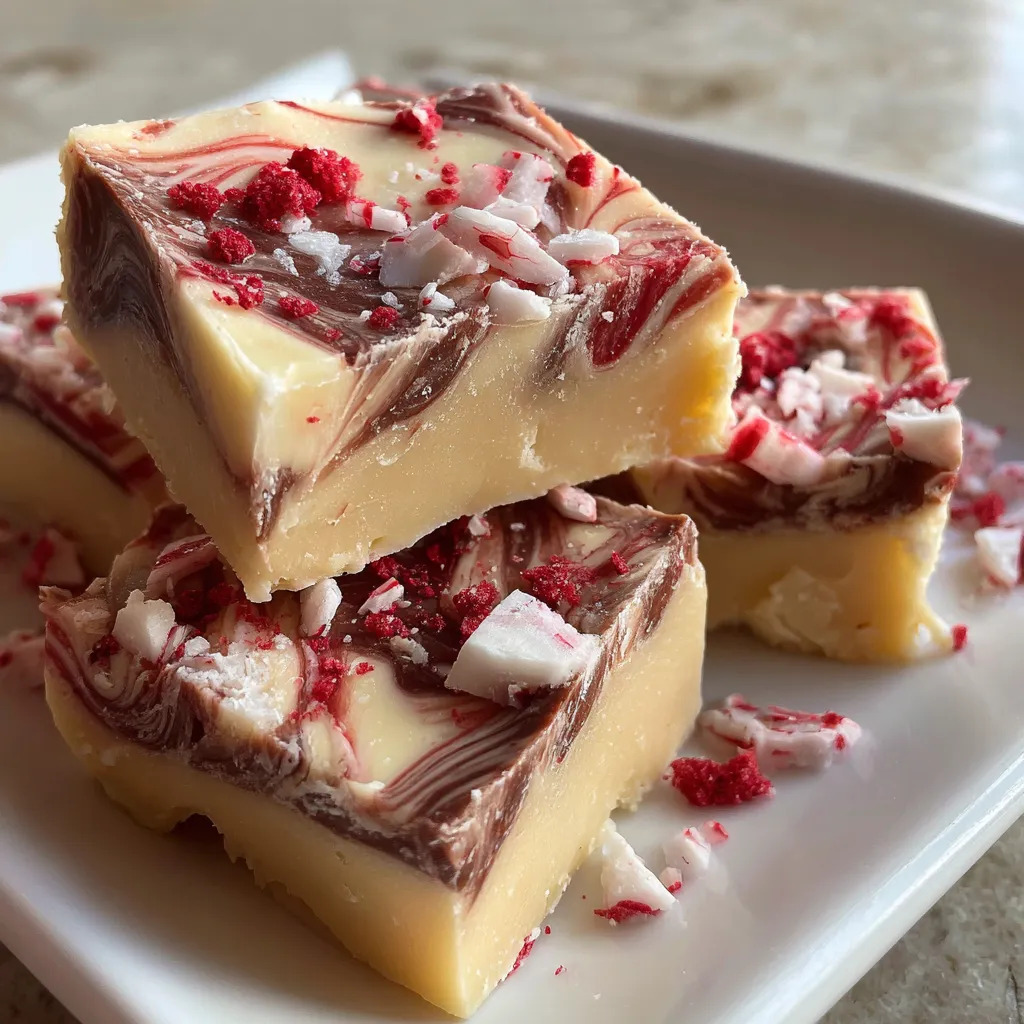

Peppermint Swirl Fudge
Description
Smooth semi-sweet chocolate pairs with cool peppermint extract for a rich, buttery bite. A marbled red finish and crunchy candy topping make every square a festive centerpiece.
Ingredients
Instructions
-
Prepare an 8x8-inch square baking dish by lining it with parchment paper, leaving some overhang for easy removal of the fudge later. Lightly grease the parchment paper with cooking spray or butter.
-
In a medium saucepan over medium heat, combine granulated sugar, evaporated milk, and unsalted butter. Stir continuously until the mixture comes to a rolling boil.
-
Once boiling, let it cook for an additional 5 minutes, continuing to stir frequently. This will ensure the sugar dissolves completely and prevents it from burning.
-
Remove the saucepan from heat and immediately stir in the semi-sweet chocolate chips and half of the peppermint extract. Stir until the chocolate is completely melted and the mixture is smooth.
-
Pour half of the chocolate mixture into the prepared baking dish, spreading it evenly. Set aside the remaining half in the saucepan.
-
In another bowl, melt the white chocolate chips using a microwave or double boiler, until smooth. Add in the remaining peppermint extract, vanilla extract, and salt. Mix until combined.
-
Pour the white chocolate mixture over the first layer in the baking dish and spread it evenly with a spatula.
-
Take the remaining semi-sweet chocolate fudge mixture and pour it over the white chocolate layer. Reserve a small amount (about 1/4 cup) to create the swirl.
-
Take the reserved fudge mixture and add the red food coloring. Swirl it gently into the top layer using a knife or a skewer to create a marbled effect.
-
If desired, sprinkle crushed peppermint candies on the top for added texture and flavor.
-
Allow the fudge to cool at room temperature for about an hour, then refrigerate for at least 2 hours or until firm.
-
Once set, remove the fudge from the baking dish using the parchment paper overhang. Cut it into small squares and serve.
Note
- Allow the fudge to come to room temperature before cutting for cleaner edges.
- Experiment with different flavor extracts, such as almond or orange, for a unique twist.
- Store leftover fudge in an airtight container at room temperature for up to one week.
- This fudge can also be wrapped in festive packaging for gift giving during the holiday season.
- For an extra festive touch, dip the finished fudge squares in chocolate and roll them in crushed peppermint.

