

Pepperoni Pizza Bombs are golden bite-sized pockets filled with gooey mozzarella, tangy sauce, and spicy pepperoni that crisp up to perfection – pizza night just got even more fun. Crisp exteriors give way to molten cheese, bold pepperoni, and savory sauce in each bite. This beginner-friendly, lunch-course snack is perfect for parties or a cozy night in, beckoning you to dive into that irresistible cheese pull.
Key Ingredients
Gathering the right ingredients ensures each bomb delivers the ultimate pizza experience in every bite. Here’s what you’ll need:
- 1 package pizza dough: Provides the pillowy, elastic base that wraps all the fillings in a soft, golden pocket.
- 1 cup shredded mozzarella cheese: Melts into gooey, stretchy ribbons for that ultimate cheese pull in every bite.
- 20 slices pepperoni: Brings spicy, savory flavor and a slight crisp when baked to literal bombastic effect.
- 1/4 cup pizza sauce: Adds tangy tomato depth and moisture to each bite for classic pizza taste.
- 1 tablespoon olive oil: Creates a lightly crisp, flavorful crust when brushed on top before baking.
- 1/2 teaspoon garlic powder: Infuses a subtle garlicky warmth into the dough’s surface.
- 1/2 teaspoon Italian seasoning: Blends dried herbs for that signature pizza flavor boost.
- 1/4 teaspoon salt: Enhances all the flavors and balances the sweetness of the dough.
How To Make Pepperoni Pizza Bombs
Ready to roll, fill, and bake these fun bites? Follow these detailed steps to assemble your Pepperoni Pizza Bombs perfectly. From prepping your dough to that final golden bake, you’ll nail each technique for an even bake, gooey center, and crunchy crust.
1. Preheat the oven to 400°F (200°C) and line a baking sheet with parchment paper. This ensures even heat distribution and easy cleanup.
2. Divide the pizza dough into 12 equal pieces and roll each piece into a smooth ball, working quickly so the dough doesn’t become overworked.
3. Flatten a dough ball into a small disc about 3 inches wide on a lightly floured surface, then spoon about 1 teaspoon of pizza sauce in the center, keeping the edges clean.
4. Top the sauce with 2–3 pepperoni slices and about 1 tablespoon of shredded mozzarella, layering evenly for a balanced flavor in every bomb.
5. Pull the edges of the dough up and pinch them together to seal, forming a tight, smooth ball; this prevents leaks and keeps the filling inside.
6. Place each sealed dough ball seam-side down on the prepared baking sheet, spacing them at least 1 inch apart to allow for expansion.
7. Brush the tops of the dough balls with olive oil, then sprinkle garlic powder, Italian seasoning, and salt evenly for a seasoned, golden crust.
8. Bake for 15–18 minutes or until the bombs are golden brown and cooked through, rotating the sheet halfway if your oven has hot spots.
9. Let the pizza bombs rest for 5 minutes before serving with extra pizza sauce for dipping, allowing the cheese to set slightly for perfect bites.
Serving Suggestions
Now that your Pepperoni Pizza Bombs are freshly baked and irresistible, here are four fun ideas to present them in style:
- Classic Marinara Dip: Serve warm bombs with a bowl of tangy pizza sauce seasoned with a pinch of red pepper flakes for an extra kick.
- Garden-Fresh Salad: Pair with a crisp arugula and cherry tomato salad dressed in lemon vinaigrette to cut through the richness.
- Party Platter: Arrange bombs on a wooden board with varied dipping bowls—ranch, garlic butter, and spicy marinara—to please every palate.
- Lunchbox Treat: Pack cooled bombs in an airtight container with a side of veggie sticks for a fun, portable meal that’s kid-approved.
Tips For Perfect Pepperoni Pizza Bombs
Creating the ultimate pizza bomb is all about timing, texture, and flavor balance. Use these insider tips to take your recipe from great to unforgettable:
- Serve the pizza bombs hot for the best gooey cheese pull, straight from the oven to your plate.
- You can freeze unbaked bombs on the baking sheet, then transfer them to a freezer-safe bag and bake later for fresh results anytime.
- For extra crisp bottoms, sprinkle a little cornmeal on the parchment paper before placing the dough balls–it’s like tiny heat-conducting ball bearings.
- Feel free to add chopped jalapeños or cooked bacon inside for a flavorful twist and extra texture in every bite.
How To Store It
Proper storage keeps your Pepperoni Pizza Bombs tasting just-baked, even days later. Follow these methods to maintain that signature crisp crust and melty center:
- Refrigerate leftovers in an airtight container for up to 3 days; reheat in a 350°F oven for 6–8 minutes.
- Freeze baked bombs by cooling completely, then sealing in a freezer-safe bag for up to 1 month; thaw in the fridge overnight before reheating.
- Store unbaked bombs on a parchment-lined sheet in the freezer until firm, then transfer to a bag; bake from frozen, adding 2–4 minutes to the bake time.
- Avoid microwaving, which can soften the crust; use the oven or an air fryer set to 350°F for best texture revival.
Frequently Asked Questions
Have a burning question about Pepperoni Pizza Bombs? Here are answers to common queries:
- How long does it take to prepare and bake the Pepperoni Pizza Bombs?
Preparing the dough balls, filling them, and seasoning takes about 15–20 minutes. Baking time is 15–18 minutes at 400°F (200°C). Allow an additional 5 minutes of resting time after baking, for about 35–40 minutes total.
- Can I make the pizza bombs ahead of time or freeze them for later?
Yes. After assembling and sealing each dough ball, freeze seam-side down until solid (1–2 hours). Then transfer to a freezer-safe bag. Bake directly from frozen at 400°F (200°C), adding 2–4 extra minutes until golden.
- What can I do to prevent the dough from sticking to my hands and work surface?
Lightly dust your hands and work surface with flour or semolina to prevent sticking. If the dough becomes too tacky, let it rest for 2–3 minutes at room temperature so the gluten relaxes.
- How do I achieve extra-crisp bottoms on the pizza bombs?
Sprinkle a thin layer of cornmeal on the parchment paper before placing the dough balls. Preheating the baking sheet for 5 minutes also enhances bottom crispiness.
- What are some tasty filling variations for the pizza bombs?
Try adding cooked bacon bits, chopped jalapeños, or sautéed mushrooms. Swap pepperoni for sliced salami, crumbled Italian sausage, or even diced bell peppers, keeping fillings to 1–2 tablespoons.
- How should I reheat leftover pizza bombs without making them soggy?
Preheat your oven to 350°F (175°C). Place the leftover bombs on a baking sheet and bake for 6–8 minutes until warmed through and crispy. Avoid the microwave, which will soften the crust.
- What dipping sauces pair best with these pizza bombs?
Traditional warmed pizza sauce is a classic. For variety, try garlic butter (melted butter mixed with minced garlic and parsley), ranch dressing, or a spicy marinara with red pepper flakes.
What Makes This Special
These Pepperoni Pizza Bombs hit all the right notes: crunchy exteriors, molten centers, and that nostalgic pepperoni bite we all crave. They work because you get individual servings of your favorite pizza flavors, sealed in a perfect little dough pocket. Best part? You can print this article, save it, and whip them up whenever pizza night calls. Drop a comment below if you tried them, share your flavor twists, or just brag about that epic cheese pull—you know you want to!
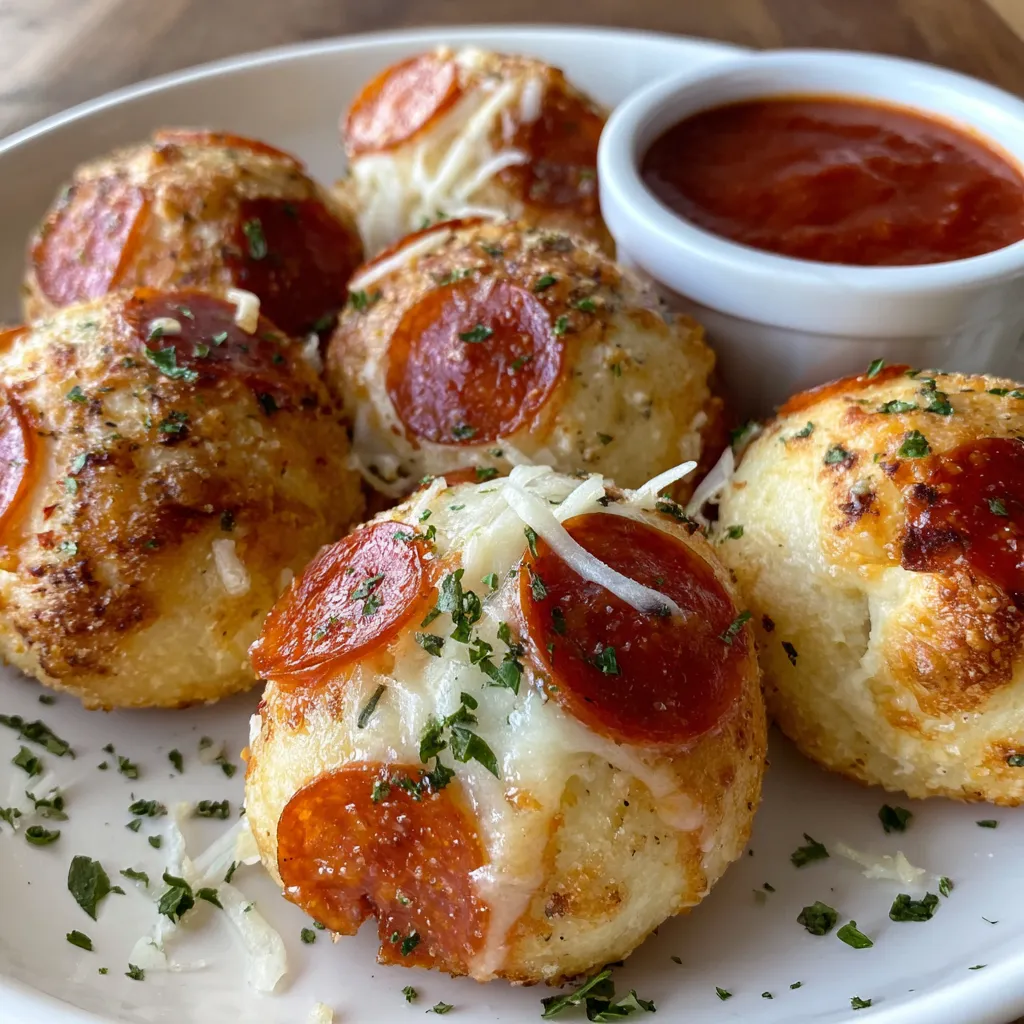

Pepperoni Pizza Bombs
Description
Crisp exteriors give way to molten cheese, spicy pepperoni, and savory sauce as each bite unleashes a burst of classic pizza flavor.
Ingredients
Instructions
-
Preheat the oven to 400°F (200°C) and line a baking sheet with parchment paper.
-
Divide the pizza dough into 12 equal pieces and roll each piece into a ball.
-
Flatten a dough ball into a small disc and spoon about 1 teaspoon of pizza sauce in the center.
-
Top the sauce with a few pepperoni slices and about 1 tablespoon of shredded mozzarella.
-
Pull the edges of the dough up and pinch to seal, forming a tight, smooth ball.
-
Place each sealed dough ball seam-side down on the prepared baking sheet.
-
Brush the tops of the dough balls with olive oil and sprinkle with garlic powder, Italian seasoning, and salt.
-
Bake for 15–18 minutes or until the bombs are golden brown and cooked through.
-
Let the pizza bombs rest for 5 minutes before serving with extra pizza sauce for dipping.
Note
- Serve the pizza bombs hot for the best gooey cheese pull.
- You can freeze unbaked bombs on the baking sheet, then transfer to a bag for later baking.
- For extra crisp bottoms, sprinkle a little cornmeal on the parchment paper.
- Feel free to add chopped jalapenos or cooked bacon inside for a flavor variation.

