

Autumn is the perfect time to treat yourself and your loved ones to a fun, festive dessert that combines the sweetness of ripe fruit with the rich allure of chocolate. These Pumpkin Patch Strawberries Chocolate Covered Strawberries transform ordinary strawberries into delightful pumpkin-themed treats for your autumn festivities! As someone who’s always on the lookout for recipes that wow without demanding hours in the kitchen, I can’t help but get excited by the simplicity and charm of this idea. With just a handful of ingredients and a bit of creative flair, you’ll have a platter of juicy strawberries dressed in smooth semi-sweet chocolate, bright orange “pumpkin” accents, and little green stems that practically giggle “Halloween!” at you. It’s a beginner-friendly dessert that requires no fancy equipment and yet looks like it came from a professional pastry chef’s studio.
I love that these pumpkin-inspired bites invite everyone—kids, parents, party guests—to join in the fun of chocolate dipping. It’s a dessert that doubles as an interactive party activity: line up the strawberries, melt your chocolates and colors, and let each person design their own pumpkin pattern. Beyond being a showstopper, it’s also a treat that checks all the boxes for an autumn gathering: quick 20-minute prep, about 10 minutes of hands-on cooking, and then 45 minutes of chill time before serving. Each batch yields 12 pieces, clocks in around 600 calories total, and is sized just right for sharing at Halloween parties or cozy fall brunches. Trust me, once you taste that hint of sea salt (feel free to sprinkle a pinch!), you’ll believe these are destined to become an annual fall tradition.
KEY INGREDIENTS IN PUMPKIN PATCH STRAWBERRIES CHOCOLATE COVERED STRAWBERRIES
Before we dive into the step-by-step magic, let’s meet our cast of ingredients. Each one plays a vital role in turning a simple strawberry into a festive, bite-sized masterpiece—so choose the best quality you can find and get ready to wow your taste buds.
- Fresh strawberries
Plump, ripe strawberries serve as the juicy base for these treats. Their natural sweetness and firm texture make them ideal for dipping and ensure every bite bursts with fresh berry flavor.
- Semi-sweet chocolate chips
This is the primary chocolate coating, offering just the right balance of sweetness and richness. Melts smoothly around the strawberries, creating a glossy, decadent shell.
- White chocolate chips
Used as the canvas for our pumpkin decoration, this creamy chocolate takes on vibrant color beautifully. Its sweet base contrasts nicely with the semi-sweet layer underneath.
- Orange food coloring
Transforms the melted white chocolate into a cheerful, pumpkin-orange hue. A little goes a long way—just enough to make your strawberries look whimsically festive.
- Green food coloring
Provides the finishing touch by tinting white chocolate into a bright, grassy green. Perfect for piping tiny stems that give each strawberry its authentic pumpkin look.
- Coconut oil
Optional but highly recommended for super-smooth melting of your semi-sweet chocolate. It adds shine and helps the chocolate adhere evenly.
- Candy corns
A classic autumn confection, these colorful kernels add a playful crunch and extra seasonal flair when scattered around each strawberry.
- Parchment paper or silicone baking mat
An essential foundation to let your creations set without sticking. It keeps cleanup easy and preserves that perfect glossy finish on your chocolate.
HOW TO MAKE PUMPKIN PATCH STRAWBERRIES CHOCOLATE COVERED STRAWBERRIES
Preparing these pumpkin-inspired beauties is a blast, especially when everyone gathers around the counter to dip, drizzle, and decorate. In just a few clear steps, you’ll have a tray of show-stopping treats ready to chill and then delight your guests.
1. Wash the strawberries thoroughly under cold running water, gently rubbing each berry to remove any surface debris. Pat them completely dry with a paper towel, making sure no moisture remains—this ensures the chocolate will adhere properly and set with a smooth finish.
2. Line a baking sheet with parchment paper or a silicone baking mat. This non-stick surface is crucial for placing your dipped strawberries to cool and prevents any chocolate mishaps.
3. Combine the semi-sweet chocolate chips and coconut oil (if using) in a microwave-safe bowl. Microwave in 30-second intervals, stirring well between each burst until the mixture is completely melted and silky smooth.
4. Grasp a strawberry by its stem and dip it into the melted semi-sweet chocolate, coating about two-thirds of the fruit. Lift it out and allow any excess chocolate to drip off before setting it on your prepared sheet. Repeat until all strawberries are coated.
5. Slide the tray into the refrigerator for 15–20 minutes so the chocolate shell can firm up nicely.
6. While the first layer sets, melt the white chocolate chips in another microwave-safe bowl, using the same interval heating method. Once smooth, blend in the orange food coloring until the mixture glows with a warm pumpkin tone.
7. Transfer the tinted chocolate to a piping bag or a small zip-top bag with its corner snipped off. Drizzle the orange chocolate over each strawberry, creating vertical lines that resemble pumpkin grooves. Let some drips run down the sides for a realistic touch.
8. Return the strawberries to the fridge for an additional 10–15 minutes to allow the orange drizzle to set firmly.
9. Next, melt a bit of the remaining white chocolate and tint it with green food coloring. Use your piping bag to pipe tiny stem-like shapes at the top of each strawberry, completing that pumpkin illusion.
10. Scatter a few candy corns around the base of each strawberry for decorative flair and a festive crunch. Give everything one last chill in the refrigerator until fully set before serving.
SERVING SUGGESTIONS FOR PUMPKIN PATCH STRAWBERRIES CHOCOLATE COVERED STRAWBERRIES
Nothing brightens a fall table like these playful Pumpkin Patch Strawberries. They pair delightfully with seasonal beverages and can be arranged in creative ways to elevate your autumn spread. Serve them right from the fridge or let them sit at room temperature for a few minutes to soften the chocolate just slightly—either way, they’ll vanish in no time.
- Rustic wooden board display
Arrange the strawberries in neat rows on a wide, flat wooden board. Scatter a few cinnamon sticks and mini gourds around the edges for a charming, countryside vibe.
- Halloween party platter
Place them on a black or orange serving tray and tuck in small decorative skulls, faux leaves, or spider webs. They become the star of any spooky dessert table.
- Hot cocoa companion
Offer them alongside mugs of rich, creamy hot chocolate. The warmth of the drink contrasts with the cool, crisp strawberry and chocolate shell, creating a decadent flavor experience.
- Kids’ decorating activity
Pre-dip some strawberries up to the first chocolate layer and invite little ones to add their own orange drizzle and green stem accents. It’s a fun, hands-on way to involve kids in the kitchen.
HOW TO STORE PUMPKIN PATCH STRAWBERRIES CHOCOLATE COVERED STRAWBERRIES
After all that dipping and drizzling, you’ll want to keep your Pumpkin Patch Strawberries looking fresh, glossy, and ready for snacking. Proper storage makes all the difference in maintaining that satisfying crunch and juicy berry center. Whether you’re prepping in advance for a party or saving leftovers, follow these tips to preserve flavor and presentation.
- Refrigerate on a flat tray
Lay the strawberries on a single layer of parchment paper in a covered container. Keeping them upright and separated prevents the chocolate shells from sticking or smudging.
- Keep humidity low
Place a small sheet of absorbent paper towel in the container to soak up excess moisture. This prevents condensation that can dull the chocolate’s sheen and soften the candy corn accents.
- Avoid stacking
Stacking strawberries can break the delicate chocolate coating. Use multiple shallow containers if needed to ensure each piece has room and stays intact.
- Consume within two days
For optimal freshness and taste, enjoy these treats within 48 hours. Beyond that, the strawberries may release extra moisture and compromise the crisp shell you worked so hard to create.
CONCLUSION
What started as a simple idea—dip a strawberry in chocolate—has blossomed into an autumn delight that feels both whimsical and elegant. These Pumpkin Patch Strawberries Chocolate Covered Strawberries bring together juicy fruit, silky chocolate, and vibrant hues that capture the spirit of fall. Whether you’re hosting a Halloween gathering, surprising your kids after school, or simply craving a festive treat, this recipe delivers on both flavor and fun. With straightforward steps, beginner-friendly techniques, and a total of just 20 minutes of hands-on prep, you’ll find yourself reaching for this colorful dessert again and again as the leaves turn and the air grows crisp. Plus, the interactive dipping process doubles as a party activity that invites everyone, young and old, to unleash a bit of their artistic side.
I hope you’ll print this article and save it for later use—there’s nothing quite like having a go-to seasonal recipe tucked in your recipe box, ready for the next cozy gathering. You’ll find a handy FAQ below for any questions that pop up, but please feel free to leave comments, share your own decorating twists, or ask for help if you run into any challenges while making these pumpkin-themed treats. Your feedback helps me keep the recipes engaging, clear, and even more delicious. Happy dipping, decorating, and devouring! Let me know how your Pumpkin Patch Strawberries turn out. I can’t wait to hear about your chocolatey fall adventures.
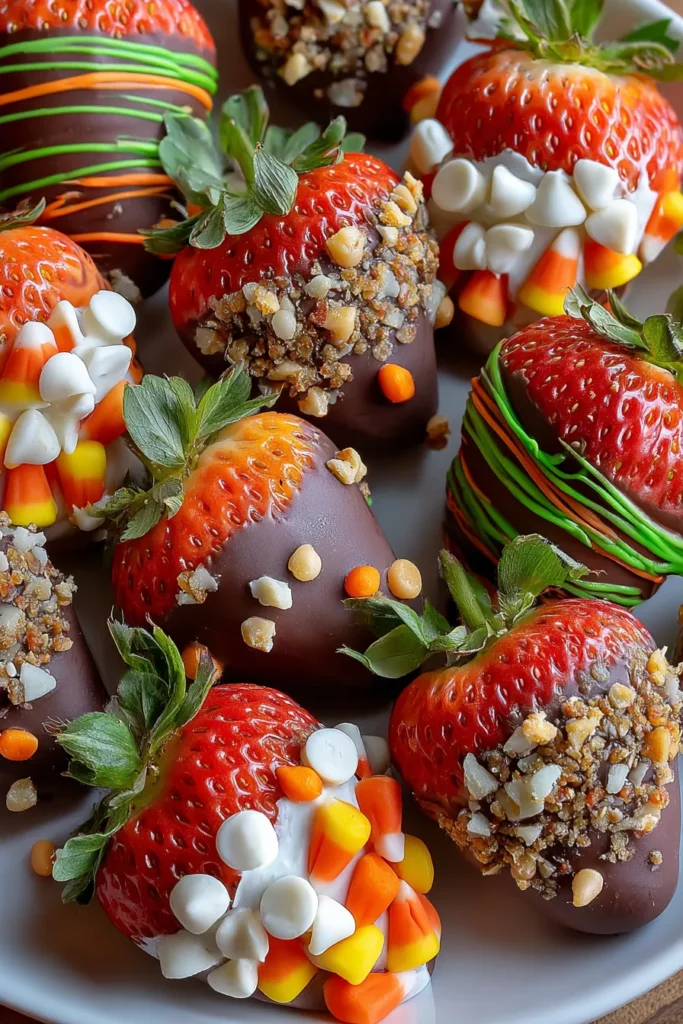

Pumpkin Patch Strawberries Chocolate Covered Strawberries
Description
These Pumpkin Patch Strawberries wrap juicy strawberries in smooth chocolate and vibrant colors for a delightful fall treat that's perfect for any celebration.
Ingredients
Instructions
-
Start by washing the strawberries thoroughly under cold water. Pat them dry gently with a paper towel to ensure they are completely moisture-free, as water can prevent the chocolate from adhering properly.
-
Line a baking sheet with parchment paper or a silicone baking mat. This will be where you will place the dipped strawberries to set.
-
In a microwave-safe bowl, combine the semi-sweet chocolate chips and the coconut oil (if using). Microwave in 30-second intervals, stirring in between, until the chocolate is completely melted and smooth.
-
Hold each strawberry by the stem and dip it into the melted semi-sweet chocolate, covering it about two-thirds of the way. Let any excess chocolate drip off before placing it on the lined baking sheet. Repeat this step with all strawberries.
-
Place the baking sheet in the refrigerator for about 15-20 minutes to allow the chocolate to set.
-
Meanwhile, prepare the pumpkin design. In a separate microwave-safe bowl, melt the white chocolate chips following the same method as before. Once melted, add the orange food coloring to the white chocolate until you reach the desired pumpkin color.
-
Using a piping bag or a small zip-top bag with the corner snipped off, drizzle the orange-tinted white chocolate over the set chocolate-covered strawberries to create a pumpkin pattern. Let the design drip slightly down the sides of the strawberries for a more realistic look.
-
Allow the orange chocolate to set by placing the strawberries back in the refrigerator for another 10-15 minutes.
-
For the finishing touch, melt a small amount of green chocolate (you can use the remaining white chocolate, adding green color to it). Use the piping bag to create small green stems at the top of the strawberries to imitate a pumpkin’s stem.
-
Finally, add a few candy corns around the base of each strawberry for decoration and a festive look. Return the strawberries to the fridge one more time to set everything completely before serving.
Note
- You can experiment with different types of chocolate; milk chocolate or dark chocolate work great too.
- Adding a pinch of sea salt to the melted chocolate can enhance the flavor.
- These Pumpkin Patch Strawberries are an excellent autumn treat for parties or Halloween gatherings.
- Store any leftovers in the refrigerator for up to 2 days, but they are best enjoyed fresh.

