

Get ready to dive into layers of rich red velvet and creamy cheesecake that come together in a dazzling display of flavor and texture. This showstopper dessert, Creamy Red Velvet Cheesecake with a Crunchy Oreo Crust, is designed to wow every guest at your next gathering. From the vibrant ruby hue of the cheesecake to the satisfying snap of crushed Oreo cookies around the edges, every forkful feels like a grand celebration. This heavenly creation strikes the perfect balance between the subtle cocoa undertones of red velvet and the tangy smoothness of cream cheese, all resting on a foundation of buttery, chocolatey Oreo crumbs.
Whether you’re celebrating a milestone, hosting a cozy dinner party, or simply treating yourself, this recipe promises impressive results without the stress. With an intermediate difficulty level, it offers a fun culinary challenge for home bakers ready to step up their game. The process includes a modest 30-minute prep, a 60–70 minute bake in a gentle water bath to keep cracks at bay, and a 4-hour rest that transforms this dessert into a fully set masterpiece. By the end, you’ll have a creamy, luscious cheesecake that echoes the classics but injects a playful twist with the Oreo crunch. Get your apron on and let’s make dessert magic!
This show-stopping dessert relies on a handful of high-quality components to achieve its signature taste and texture. From the buttery base to the velvety filling and the airy whipped topping, each ingredient plays a crucial role in delivering that picture-perfect slice. Below, you’ll find a breakdown of the key players that make this Red Velvet Oreo Cheesecake an unforgettable treat.
KEY INGREDIENTS IN RED VELVET OREO CHEESECAKE
- Oreo cookies
These chocolate sandwich cookies form the backbone of the crust. When finely crushed, they create a crunchy, flavorful base that contrasts beautifully with the smooth cheesecake filling.
- Unsalted butter
Melted and mixed with the Oreo crumbs, it binds the crust together and lends a rich, buttery note that keeps the base firm and sliceable.
- Cream cheese
Softened to room temperature, this is the star of the cheesecake filling. Its creamy texture and tangy flavor deliver that classic cheesecake richness.
- Granulated sugar
Sweetens the filling while helping to create a silky, smooth texture. It dissolves into the cream cheese for a uniform sweetness.
- Sour cream
Adds a subtle tang and extra creaminess, lightening the density of the filling and ensuring a moist, luxurious bite.
- Heavy cream
Elevates the richness and adds extra creaminess, making each mouthful decadently smooth.
- Vanilla extract
Provides aromatic depth and roundness, tying together the sweet and tangy elements of the filling.
- Red food coloring
Delivers that iconic red velvet hue. Adding it gradually ensures an even, vibrant shade without affecting the flavor.
- Cocoa powder
Infuses the batter with subtle chocolate undertones that distinguish red velvet from a plain red cake.
- Large eggs
Act as binders, giving the cheesecake structure while contributing to its dense yet tender consistency.
- Crushed Oreo cookies (for filling)
Sprinkled between layers of batter, these add an extra crunch and visual contrast inside the cake.
- Chilled heavy cream
For the whipped cream topping, it whips up into fluffy peaks that crown the cheesecake with lightness.
- Powdered sugar
Sweetens the whipped cream gently and helps stabilize it for a firm, attractive topping.
- Vanilla extract (topping)
Enhances the whipped cream’s flavor and ties back to the vanilla notes in the cheesecake itself.
HOW TO MAKE RED VELVET OREO CHEESECAKE
Baking this Red Velvet Oreo Cheesecake is all about layering flavors and textures with care. From preparing a solid Oreo crust to whipping up a velvety cheesecake filling and finishing with a cloud of sweet whipped cream, each step sets the stage for a show-stopping dessert. Follow these instructions closely, using bold techniques to ensure perfect results.
1. Preheat your oven to 325°F (163°C). Grease a 9-inch (23cm) springform pan on the sides, then line the bottom with parchment paper to make removal seamless and keep the cheesecake intact.
2. For the crust, crush the Oreo cookies into fine crumbs using a food processor. Transfer to a medium bowl and stir in the melted butter until the mixture holds together when pressed. Press evenly into the bottom of the prepared pan and bake for 10 minutes to set the base.
3. In a large mixing bowl, beat the softened cream cheese on medium speed with an electric mixer until creamy and smooth. Gradually add the granulated sugar, beating until well combined and free of lumps.
4. Add the sour cream, heavy cream, and vanilla extract to the cream cheese mixture. Continue mixing until the batter is smooth and creamy, scraping down the sides as needed.
5. Stir in the red food coloring and cocoa powder, blending until the color is uniform throughout. Add the eggs one at a time, beating on low speed after each addition just until combined—overmixing can introduce too much air and risk cracks.
6. Pour half of the red velvet batter over the baked Oreo crust. Sprinkle the cup of crushed Oreo cookies evenly over this layer. Gently pour the remaining batter on top, smoothing the surface with a spatula.
7. Place the springform pan in a larger baking dish. Pour hot water into the outer dish until it reaches about halfway up the sides of the pan. This water bath ensures gentle, even baking and prevents the cheesecake from cracking.
8. Bake for 60–70 minutes, or until the center is mostly set but still slightly jiggly. Turn off the oven and leave the door ajar, letting the cheesecake cool gradually inside for 1 hour.
9. Remove the cheesecake from the oven and transfer it to the refrigerator. Chill for at least 4 hours or preferably overnight to allow it to set completely and develop deeper flavors.
10. For the whipped cream topping, beat the cold heavy cream on high speed until it thickens. Add the powdered sugar and vanilla extract, then continue beating until stiff peaks form.
11. Carefully remove the fully chilled cheesecake from the springform pan and place it on a serving platter. Pipe or spread the whipped cream over the top in a decorative pattern.
12. Garnish with additional crushed or whole Oreo cookies if desired before serving, adding a final touch of chocolatey flair.
SERVING SUGGESTIONS FOR RED VELVET OREO CHEESECAKE
When it’s time to present your masterpiece, thoughtful serving choices can elevate both the taste and the visual impact. This cheesecake shines on its own, but pairing it with complementary flavors and textures brings the experience to a new level. Whether you’re hosting a casual get-together or an elegant soirée, these serving suggestions will help you plate each slice with style.
- Serve each slice with a drizzle of warm raspberry coulis on the plate. The bright acidity of the berries cuts through the richness of the cheesecake and adds a jewel-toned contrast.
- Accompany the dessert with fresh mixed berries—strawberries, blueberries, and raspberries lightly macerated in a hint of sugar. Their natural sweetness and juiciness balance the denser, creamy layers.
- Offer a side of espresso or strong coffee. The bitter, aromatic notes of the coffee enhance the chocolate and tangy cream cheese, making every forkful sing.
- Garnish individual plates with a sprig of fresh mint and a light dusting of cocoa powder. The mint’s cool freshness and the cocoa’s subtle bitterness add layers of interest.
HOW TO STORE RED VELVET OREO CHEESECAKE
Proper storage ensures your Red Velvet Oreo Cheesecake stays as delightful as the moment it came out of the oven. Since this dessert is rich and creamy, it benefits from gentle handling and the right temperature. These best practices will help maintain its flavor, texture, and moisture for days to come.
- Refrigerate in an airtight container: Cover the entire cheesecake or individual slices with plastic wrap or place them in a sealable container. This prevents exposure to air, which can dry out the surface and absorb fridge odors.
- Use wax or parchment paper between layers: If you’ll be stacking slices, place a sheet of wax paper between them. This keeps the whipped cream topping intact and prevents sticking.
- Freeze for long-term storage: Wrap the cheesecake tightly in two layers of plastic wrap and a layer of foil. Freeze for up to 2 months. To serve, thaw in the refrigerator overnight to preserve texture.
- Avoid room-temperature storage: Cream cheese desserts should remain chilled. Leaving this cheesecake out for more than 2 hours can compromise its structure and safety, especially in warm conditions.
CONCLUSION
This Creamy Red Velvet Cheesecake with a Crunchy Oreo Crust has everything you need for a memorable dessert: a buttery, chocolatey foundation; a rich, tangy filling with that signature red velvet color; and a light, fluffy whipped cream topping. The 30-minute prep time, 1-hour bake in a soothing water bath, and at least 4-hour chill transform simple ingredients into a showstopper that wows every time. With an intermediate difficulty level, it’s perfect for home bakers who want to challenge themselves and impress their family and friends. Feel free to print this article and save it for future celebrations or spontaneous dessert cravings. You’ll also find a handy FAQ below to answer any extra questions you might have about techniques or troubleshooting.
We’d love to hear about your cheesecake journey! Drop a comment if you try this recipe, share any tweaks you made, or ask for tips if you encounter any hurdles. Whether you’ve mastered the perfect crumbly crust or topped your slices with an artistic swirl of whipped cream, your feedback helps other home cooks feel confident in their baking adventures. Questions, suggestions, or delightful anecdotes about how this dessert brightened your gathering—bring them on! Your insights turn this recipe from a single post into a vibrant conversation among baking enthusiasts.
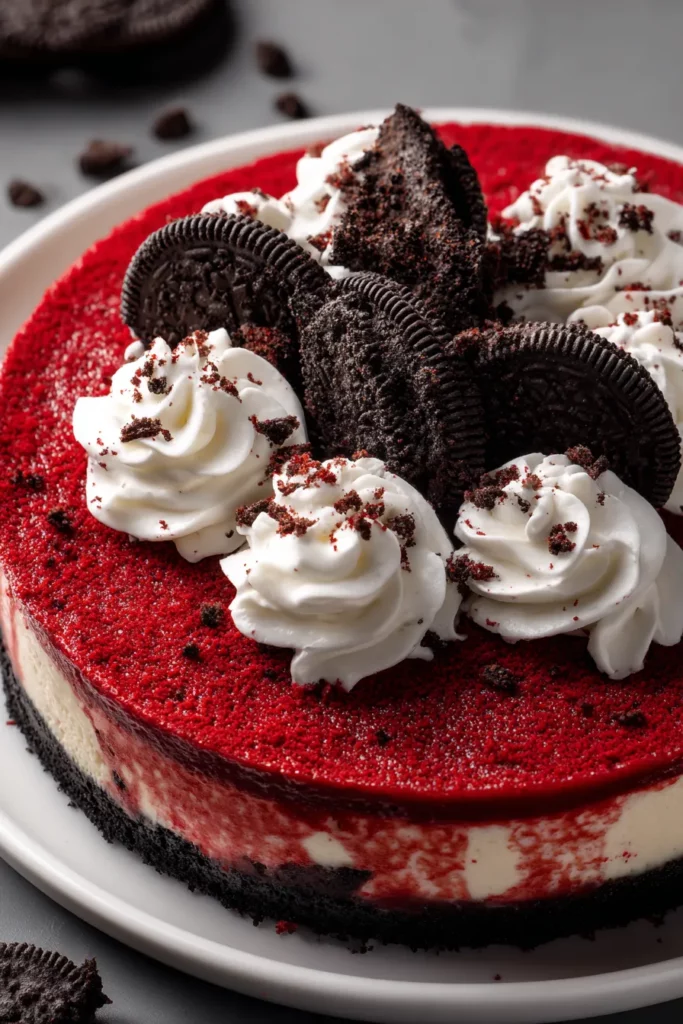

Red Velvet Oreo Cheesecake
Description
Experience the rich flavors of red velvet and cream cheese, perfectly balanced with a crunchy Oreo crust. This cheesecake is the ultimate dessert for any occasion.
Ingredients
Instructions
-
Preheat your oven to 325°F (163°C). Grease a 9-inch (23cm) springform pan and line the bottom with parchment paper.
-
For the crust, crush the 24 Oreo cookies into fine crumbs using a food processor. In a medium bowl, mix these crumbs with melted butter until well combined. Press the mixture evenly into the bottom of the prepared springform pan. Bake the crust for 10 minutes.
-
For the red velvet cheesecake, in a large mixing bowl, beat the softened cream cheese with an electric mixer on medium speed until creamy and smooth. Gradually add the granulated sugar and beat until well combined.
-
Add the sour cream, heavy cream, and vanilla extract to the cream cheese mixture. Mix until smooth and creamy.
-
Add the red food coloring and cocoa powder, mixing until the color is evenly distributed. Add the eggs one at a time, beating on low speed after each addition until just blended.
-
Pour half of the red velvet cheesecake batter over the baked Oreo crust. Sprinkle the 1 cup of crushed Oreo cookies over this layer. Gently pour the remaining cheesecake batter on top of the Oreo layer, smoothing out the top with a spatula.
-
Place the springform pan in a larger baking dish and pour hot water into the dish until it reaches halfway up the sides of the pan to create a water bath. This helps to prevent cracks in the cheesecake as it bakes.
-
Bake the cheesecake for 60-70 minutes, or until the center is set but still slightly jiggly. Turn off the oven and leave the oven door slightly ajar. Allow the cheesecake to cool in the oven for 1 hour.
-
Remove the cheesecake from the oven and refrigerate for at least 4 hours, or overnight, to set completely.
-
For the whipped cream topping, in a medium bowl, beat the cold heavy cream with an electric mixer on high speed until it starts to thicken. Add the powdered sugar and vanilla extract, and continue to beat until stiff peaks form.
-
Once the cheesecake is fully chilled, remove it from the pan and place it on a serving platter. Pipe or spread the whipped cream over the top of the cheesecake.
-
Garnish the cheesecake with additional crushed or whole Oreo cookies if desired before serving.
Note
- To ensure even coloring, gradually add red food coloring until you reach the desired shade.
- The water bath helps maintain a consistent baking temperature and prevents cracking.
- Avoid overmixing the batter once the eggs are added to prevent too much air from incorporating, which can cause cracks.
- Refrigerating the cheesecake overnight helps to enhance its flavor.

