

From the first bite, this Soft and Chewy Honey Oat Sourdough Bread feels like a warm embrace straight out of your oven. The crumb is tender yet chewy, studded with little pockets of sweet honey goodness, and sprinkled with hearty oats that add a subtle nuttiness and satisfying texture. Every slice tells a story of patient rises and leisurely folds, turning simple ingredients into a loaf that’s as much about the journey as the destination. As a beginner-friendly recipe, it offers both an introduction to sourdough baking and a chance to fall in love with homemade bread all over again. With just thirty minutes of hands-on prep, a leisurely four-to-six-hour rise, and a gentle bake, you’ll soon be slicing into something far more delightful than anything store-bought.
This loaf strikes the perfect balance between a tangy sourdough backbone and the gentle sweetness of honey, making it incredibly versatile. Slather it with butter for breakfast, pile it high with fresh greens and turkey for lunch, or serve it beside a steaming bowl of soup for dinner. The rolled oats both inside and on top give it a rustic, wholesome look, while also contributing to its moist, tender crumb. Whether you’re baking a single round or tucking it into a loaf pan for neat slices, this recipe transforms your kitchen into a cozy haven. Gathering around the counter, sharing stories as the dough rises, and then celebrating the golden-brown result—it all adds up to more than just bread. It becomes a memory you’ll want to bake again and again.
KEY INGREDIENTS IN SOFT AND CHEWY HONEY OAT SOURDOUGH BREAD
Every component in this recipe plays a key role in crafting a loaf that’s soft, chewy, and bursting with wholesome flavor. From the natural lift of your sourdough starter to the gentle sweetness of honey, each ingredient contributes to texture, taste, and aroma.
- Ripe sourdough starter
The star of natural fermentation, your sourdough starter delivers lift, structure, and that signature tangy flavor. A mature, bubbly starter ensures a strong rise and complex flavor development.
- Warm water
Hydrates the flour and activates both the wild yeast in your starter and the optional instant yeast. Using water at about 110°F/43°C gives the perfect environment for fermentation without shocking the yeast.
- Honey
Adds a gentle sweetness that balances sour notes and enhances browning during baking. Honey also helps retain moisture, keeping crumbs tender and soft for days.
- All-purpose flour
The foundation of your dough—providing gluten structure for chewiness and a reliable canvas for fermentation. It’s versatile and widely available, making this recipe truly beginner-friendly.
- Rolled oats
Contribute a hearty texture and nutty flavor, plus a rustic look. They help retain moisture, giving each bite a pleasing chew and a subtle hint of whole-grain goodness.
- Salt
Essential for flavor enhancement and fermentation control. Salt tightens gluten strands for structure and slows down yeast activity to develop a richer, more balanced loaf.
- Instant yeast (optional)
Speeds up the rise when time is tight, offering a more predictable fermentation. It’s perfect if you’d like your bread to double faster or if your starter is on the sluggish side.
- Additional oats for topping
Sprinkled on the loaf’s surface, these oats add visual appeal, an extra layer of texture, and a hint of rustic charm when baked to golden perfection.
HOW TO MAKE SOFT AND CHEWY HONEY OAT SOURDOUGH BREAD
Baking this honey oat sourdough bread is a satisfying blend of simple techniques and patient fermentation. Below is a detailed, step-by-step guide to help you transform your ingredients into a beautiful, golden loaf.
1. In a large mixing bowl, combine the warm water, honey, and the ripe sourdough starter. Stir gently with a wooden spoon or spatula until the honey has dissolved and the mixture is smooth, ensuring the starter is fully suspended in the liquid for even fermentation.
2. Slowly add in the all-purpose flour and rolled oats, sprinkling them in gradually as you stir. Mix until the dough comes together and no dry flour remains on the sides of the bowl. You can switch to your hands when the mixture becomes too stiff to stir comfortably.
3. Add the salt and instant yeast (if using). Turn the dough out onto a lightly floured surface or keep it in the bowl. Knead using the heel of your hand, folding and pushing the dough until it becomes smooth and elastic, about 10 minutes. This kneading stage builds gluten strength for a chewy texture.
4. Place the kneaded dough into a lightly greased bowl, turning once to coat. Cover with a damp kitchen towel or plastic wrap and let it rise in a warm place until doubled in size, approximately 4 to 6 hours depending on room temperature.
5. Once the dough has risen, gently deflate it by pressing down with your fingertips. Transfer it to a lightly floured surface and shape it into a round or oval loaf, tucking edges underneath to create surface tension.
6. Place the shaped loaf onto a parchment-lined baking sheet or into a lightly greased loaf pan. Cover loosely and allow it to rise again for about 1 to 2 hours, or until it puffs up noticeably.
7. Preheat your oven to 375°F (190°C) during the last 30 minutes of the second rise, ensuring it’s evenly hot when you’re ready to bake.
8. For an added texture and visual appeal, brush the top of the loaf with water and sprinkle additional oats evenly over the surface, gently pressing them into the dough.
9. Bake in the preheated oven for 30 to 35 minutes, or until the loaf is golden brown and sounds hollow when tapped on the bottom.
10. Remove from the oven and let cool on a wire rack before slicing. This resting period helps set the crumb and makes slicing neater, so you can fully enjoy the soft, chewy texture of your honey oat sourdough bread!
SERVING SUGGESTIONS FOR SOFT AND CHEWY HONEY OAT SOURDOUGH BREAD
When it comes to presenting this honey oat sourdough bread, the possibilities are delightfully endless. Whether you’re savoring a quiet morning by yourself or gathering loved ones for a brunch feast, the robust flavor and tender crumb of this loaf shine in every scenario. Its slightly sweet profile makes it a perfect backdrop for both sweet and savory toppings. The oat-studded crust adds rustic appeal, so every slice feels artisanal. Here are some favorite ways to showcase your homemade masterpiece and elevate every bite, making your table feel even more inviting.
- Hearty Breakfast Toast: Lightly toast a thick slice until the edges turn golden. Spread with room-temperature butter so it melts into every crevice, then drizzle with extra honey or top with a thin layer of cream cheese. Add fresh berries for a pop of color and freshness.
- Gourmet Sandwich: Use two slices to build a flavorful sandwich. Layer with thinly sliced turkey or smoked ham, crisp lettuce, ripe tomato, and tangy Dijon mustard or herbed aioli. The chewy texture holds up beautifully against hearty fillings without becoming soggy.
- Sweet & Savory Open-Face: Spread a generous layer of ricotta or goat cheese on a slice, then top with cooked apples or pears tossed in cinnamon and a touch of brown sugar. Finish with a sprinkle of toasted pecans for crunch and drizzle of honey for shine.
- Soup or Stew Companion: Serve thick slices alongside a warm bowl of stew, chili, or pureed vegetable soup. The slight sweetness and chewy oats make it ideal for dipping, while the sturdy crumb soaks up broth without disintegrating.
HOW TO STORE SOFT AND CHEWY HONEY OAT SOURDOUGH BREAD
Proper storage is essential to preserve the fresh, tender crumb and prevent your honey oat sourdough bread from drying out or going stale. Fortunately, this recipe gives you several handy options to keep your loaf tasting just-baked for days or weeks. Whether you’re planning to enjoy it within a couple of days or stash some slices for later, these storage techniques will help you maintain that delightful chew and flavor balance across every slice.
- Room-Temperature Storage
Wrap the cooled loaf loosely in a clean kitchen towel or place it in a paper bag to allow slight airflow, preventing excess moisture that can lead to sogginess. Keep it on the counter away from direct sunlight. The bread will stay soft and chewy for up to three days.
- Freezing Whole Loaf
After completely cooling, wrap the loaf tightly in plastic wrap, then again in aluminum foil to prevent freezer burn. Label with the date and freeze for up to three months. Thaw on the counter or in the fridge overnight, then refresh in a warm oven for a few minutes to restore crust crispness.
- Freezing Slices
Slice the loaf before freezing to make individual portions easily accessible. Layer slices between pieces of parchment paper in a freezer-safe bag, removing as much air as possible. Pop frozen slices directly into a toaster or toaster oven whenever you want a quick, fresh-tasting bite.
- Refrigeration (Short-Term)
Although refrigeration can accelerate staling, wrapping the loaf tightly in plastic wrap and placing it in an airtight container minimizes moisture loss. Use this method only if your kitchen is extremely humid or if you plan to consume the loaf within a day or two.
CONCLUSION
Throughout this article, we’ve journeyed from combining simple pantry staples—sourdough starter, honey, oats, flour, and a pinch of yeast—to baking a loaf that fills your home with warmth and flavor. We explored how each ingredient contributes to the soft, chewy texture and wholesome taste, walked through the step-by-step process of mixing, kneading, rising, shaping, and baking, and shared ways to serve and store your Honey Oat Sourdough Bread for maximum enjoyment. Beginners and seasoned bakers alike can appreciate how even a small amount of hands-on time transforms into hours of fermentation magic, culminating in a slice of homemade comfort that’s perfect for breakfast, lunch, dinner, or a simple snack.
Feel free to print and save this article so you can revisit the recipe whenever you crave that tender crumb, hint of honey sweetness, and the nutty chew of oats. Keep an eye out below for our FAQ section, where we’ll tackle common questions and troubleshooting tips. If you bake this loaf, I’d love to hear about your experience: Did you try adding toasted oats? How did you enjoy your first slice? Drop your questions, comments, or feedback below—whether you need help with a particular step or just want to share how this bread brightened your day. Happy baking!
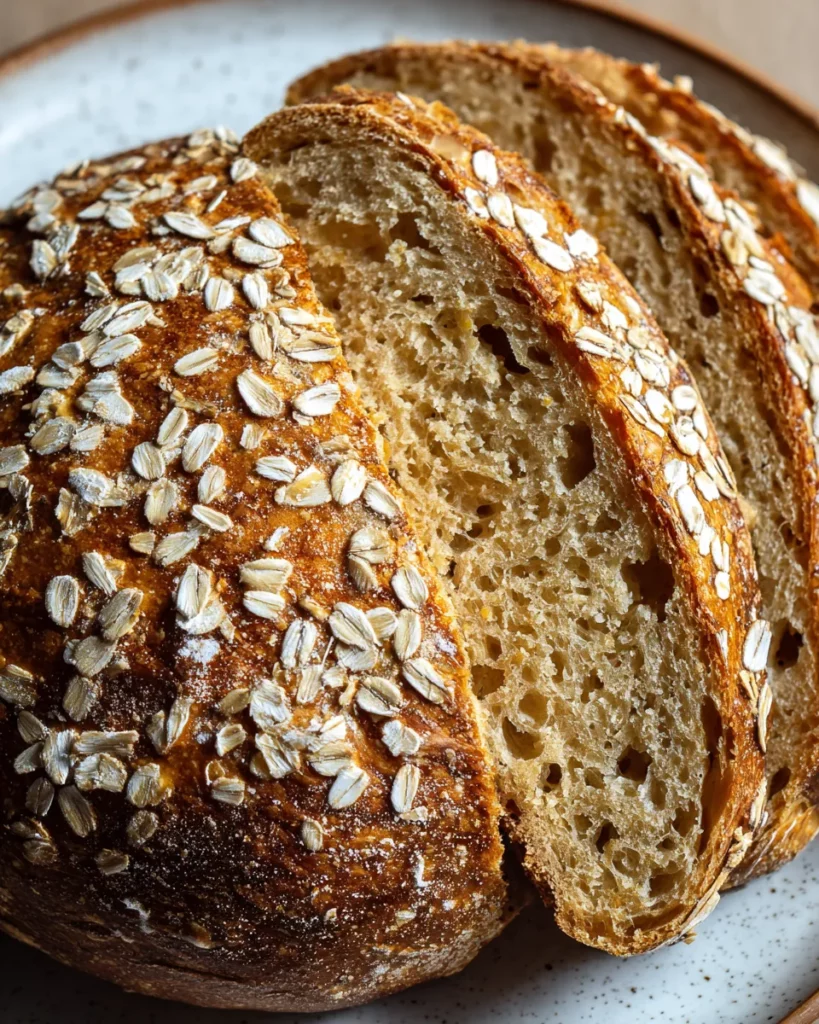

Soft and Chewy Honey Oat Sourdough Bread
Description
With a soft, chewy texture and a hint of sweetness from honey, this bread is perfect for toast or sandwiches. The rolled oats add a heartiness that elevates every bite. Freshly baked, it's a delight for all the senses!
Ingredients
Instructions
-
In a large mixing bowl, combine the warm water, honey, and the ripe sourdough starter. Stir gently until well blended.
-
Slowly add in the all-purpose flour and rolled oats. Mix until the dough comes together and no dry flour remains. You can use a wooden spoon or your hands for this.
-
Add the salt and instant yeast (if using) to the mixture. Knead the dough in the bowl or on a lightly floured surface until it becomes smooth and elastic, about 10 minutes.
-
Place the kneaded dough into a lightly greased bowl. Cover it with a damp kitchen towel or plastic wrap and let it rise in a warm place until doubled in size, approximately 4 to 6 hours depending on the temperature.
-
Once the dough has risen, gently deflate it and transfer it to a lightly floured surface. Shape the dough into a round or oval loaf, depending on your preference.
-
Place the shaped loaf onto a baking sheet lined with parchment paper or into a lightly greased loaf pan. Allow it to rise again for about 1 to 2 hours, or until it puffs up noticeably.
-
Preheat your oven to 375°F (190°C) during the last 30 minutes of the second rise.
-
For an added texture and visual appeal, brush the top of the loaf with water and sprinkle additional oats over the surface before baking.
-
Bake in the preheated oven for 30 to 35 minutes, or until the loaf is golden brown and sounds hollow when tapped on the bottom.
-
Remove from the oven and let cool on a wire rack before slicing. Enjoy the soft and chewy texture of your honey oat sourdough bread!
Note
- This bread can be stored at room temperature for a few days, or wrapped tightly and frozen for up to three months.
- For a more intense oat flavor, you can toast the rolled oats lightly before adding them to the dough.
- You can experiment with adding spices like cinnamon or cardamom for a unique twist.

