

If you ever crave a symphony of crunchy textures and tangy sweetness, Sweet and Sour Chicken is your answer! This vibrant dish combines crispy chicken, colorful bell peppers, and juicy pineapple in a perfectly balanced sweet and sour sauce that excites every palate. Each bite delivers a playful dance between a golden, crunchy exterior and tender, succulent chicken within, all coated in a bright, glossy glaze. The interplay of sweetness from sugar and pineapple juice, tempered by the gentle bite of rice vinegar and soy sauce, creates an unforgettable flavor harmony that feels like a cozy comfort food hug. Whether you’re an aspiring home cook looking to impress friends or simply hunting for a satisfying midweek meal, this recipe checks all the boxes: ease, flavor, and that delightful “wow” factor.
While Sweet and Sour Chicken is celebrated in Asian cuisine and often spotted on takeout menus, making it at home transforms it into a kitchen triumph you can customize. With about 30 minutes of hands-on prep and 30 minutes of cooking—plus a brief 10-minute rest—you’ll have a restaurant-worthy meal in under an hour. This intermediate-level recipe invites you to master techniques like dredging, deep-frying, and whisking together a homemade sauce that outshines any bottle. I still remember the first time I tried this—my kitchen smelled like sunshine, and the kids couldn’t stop hovering by the stove. It’s perfect as a Quick Dinner Idea or even a fun weekend project. Ready to roll up your sleeves and savor some serious comfort food magic?
KEY INGREDIENTS IN SWEET AND SOUR CHICKEN
Before diving into the step-by-step process, let’s break down the star players that make this sweet and sour sensation come to life. From crisp batters to vibrant veggies, each ingredient has an essential role in building layers of flavor, texture, and color.
- Boneless, skinless chicken breast – Tender, lean protein that soaks up the crispy coating and sauce, providing a juicy bite at the heart of every piece.
- All-purpose flour – The first layer in the dredging process, creating a dry base that helps the egg wash adhere and keeps the exterior light yet sturdy.
- Cornstarch – Blends with flour to deliver extra crispiness; its high starch content absorbs minimal oil, yielding that coveted crunch.
- Large eggs – Acts as a binding agent in the classic dredge technique, ensuring the dry coating clings perfectly to each chicken chunk.
- Salt and pepper – Simple seasonings that enhance the chicken’s natural flavor and balance the sweetness of the sauce.
- Vegetable oil – A neutral frying medium with a high smoke point, perfect for achieving an even, golden-brown crust.
- Red bell pepper – Adds vibrant color, sweet notes, and a slight crunch that contrasts beautifully with tender chicken.
- Green bell pepper – Brings earthy undertones and fresh crispness for a harmonious veggie medley.
- Large onion – Softens to release a mellow sweetness and tender bite, rounding out the vegetable trio.
- Pineapple chunks – Bursts of tropical sweetness that cut through the tangy sauce, creating delightful flavor pops.
- Ketchup – Forms the flavorful base of the sauce, contributing bright tomato notes and rich color.
- Rice vinegar – Provides a clean, mild acidity that balances sweet elements without overwhelming heat.
- Sugar – Sweetens the sauce to a luscious finish, enhancing both fruit and tomato essences.
- Pineapple juice – Infuses extra fruitiness from the reserved juice, reinforcing the tropical profile.
- Soy sauce – Lends subtle umami depth and a hint of saltiness for balanced seasoning.
- Corn starch – Works double duty in the sauce as a thickening agent, creating a smooth, glossy finish.
- Water – Used to dissolve the cornstarch into a slurry, ensuring a perfectly thickened and lump-free sauce.
HOW TO MAKE SWEET AND SOUR CHICKEN
Now that you’ve gathered all your ingredients, it’s time to transform them into a mouthwatering dish. This recipe combines classic dredging and frying techniques with a homemade sauce that comes together in minutes. Ready your skillet, preheat your oil, and let’s bring this comforting favorite to life.
1. In a large bowl, whisk together the flour, cornstarch, salt, and pepper until evenly combined. Using a three-step dredging method, dip each chicken piece first into the dry mixture, then into the beaten eggs, and finally back into the flour–cornstarch blend. This double-coating ensures an extra-crispy exterior that stays crunchy even under a saucy glaze.
2. Pour about 2 inches of vegetable oil into a heavy skillet or deep pan and heat it over medium-high until it shimmers. Working in batches to avoid crowding, fry the chicken chunks for 5–7 minutes each until they’re deeply golden and cooked through. Use tongs to turn pieces gently and transfer them to paper towels to drain excess oil.
3. In a small saucepan over medium heat, whisk together ketchup, rice vinegar, sugar, the reserved pineapple juice, and soy sauce. Stir continuously as the mixture warms and begins to simmer, melding tangy, sweet, and savory notes into a cohesive sauce.
4. In a separate bowl, combine cornstarch and water to form a smooth slurry. Add this to the simmering sauce, stirring constantly until it thickens into a lustrous glaze. Once you achieve your desired consistency, remove the pan from heat.
5. Heat a splash of oil in a large skillet or wok over medium-high heat. Stir-fry the red and green bell peppers and onion for 3–5 minutes until they’re just tender but still vibrant.
6. Return the crispy chicken and pineapple chunks to the skillet. Pour the thickened sweet and sour sauce over everything, then gently toss to coat each piece evenly in that glossy, flavorful glaze.
7. Continue cooking for another 2 minutes, allowing the sauce to cling and the chicken to heat through. This final step ensures all flavors are married perfectly.
8. Serve your Sweet and Sour Chicken hot over steamed rice or noodles, garnishing with extra pineapple or a sprinkle of sesame seeds if you like. Enjoy right away for maximum crispiness!
SERVING SUGGESTIONS FOR SWEET AND SOUR CHICKEN
A perfectly plated Sweet and Sour Chicken is more than just a meal—it’s a feast for the eyes and the palate. When serving, consider not only taste but also presentation and complementary flavors to elevate your dining experience. Whether you’re feeding a family of four or hosting a small gathering, these suggestions will help you bring out the best in every component of this dish.
- Steamed Jasmine Rice: Fluffy, aromatic jasmine rice is a classic companion. Scoop fresh rice onto each plate, creating a soft bed for the saucy chicken. The subtle floral notes of jasmine rice provide the perfect neutral canvas for the bold sweet and sour flavors.
- Noodle Nest: Swap rice for tender egg or rice noodles tossed lightly in sesame oil and scallions. Pile the saucy chicken on top for a delightful textural contrast and an elegant presentation that feels restaurant-worthy.
- Fresh Garnishes: Sprinkle thinly sliced green onions, toasted sesame seeds, or finely chopped cilantro over the dish for pops of color and an added layer of freshness. A few lime wedges on the side add a citrusy brightness that cuts through the richness.
- Colorful Vegetable Medley: Complement the main dish with simple sides like steamed broccoli, snap peas, or sautéed bok choy. Their crispness and verdant hues make for a balanced, visually appealing plate that’s as nutritious as it is delicious.
HOW TO STORE SWEET AND SOUR CHICKEN
Sweet and Sour Chicken is ideal for meal prep and leftovers, thanks to its robust sauce and versatile ingredients. Proper storage ensures you retain those vibrant flavors and maintain the chicken’s texture as much as possible. Follow these tips to keep every serving tasting fresh and delicious, even days after cooking.
- Refrigeration: Once cooled to room temperature, transfer the chicken and sauce into an airtight container. Store in the refrigerator for up to two days. Keep the veggies and chicken together so they continue to soak up the sauce, but know the coating may soften slightly.
- Freezing: For longer storage, freeze the chicken on a baking sheet in a single layer until solid, then transfer to a freezer-safe bag or container, separating the sauce. Frozen portions can last up to one month. Thaw overnight in the fridge before reheating.
- Sauce Separation: If you prefer maximum crispiness, store the chicken pieces separately from the sauce. Reheat chicken in a 350°F oven for 8–10 minutes, then stir into warmed sauce just before serving to re-crisp the exterior.
- Reheating Method: Gently reheat in a skillet over medium-low heat, adding a splash of water or broth to loosen the sauce. Cover briefly to steam the veggies and chicken through without overcooking, then uncover to allow any excess moisture to evaporate, preserving a nice texture.
CONCLUSION
As we wrap up our culinary journey, it’s clear that Sweet and Sour Chicken stands out as a true crowd-pleaser and a testament to the magic of homemade sauce. From the satisfying crunch of double-dredged chicken to the vibrant crunch of bell peppers and the juicy bursts of pineapple, every element works in harmony to deliver comfort food with an Asian-inspired twist. This intermediate-level recipe fits beautifully into any kitchen routine, whether you’re aiming for a hearty weekend project or a Quick Dinner Idea on a busy weeknight. With about an hour from start to finish—including prep, cooking, and a brief rest—you’ll find joy in mastering techniques like dredging, deep-frying, and sauce-thickening. Don’t forget to customize the sweetness and tanginess by adjusting sugar and vinegar ratios or adding extra veggies for color and nutrition. You can print and save this article for future reference, and keep it at hand whenever a craving for vibrant Asian Cuisine hits. Below, you’ll find a handy FAQ section to address common questions and troubleshooting tips.
I’d love to hear how your Sweet and Sour Chicken turns out! If you have any questions, feedback, or personal twists you’d like to share, please leave a comment. Whether you’re curious about substituting ingredients, adjusting cooking times, or exploring new serving ideas, I’m here to help. Your kitchen adventures keep this recipe alive, so let me know how I can support your next flavorful creation. Happy cooking!
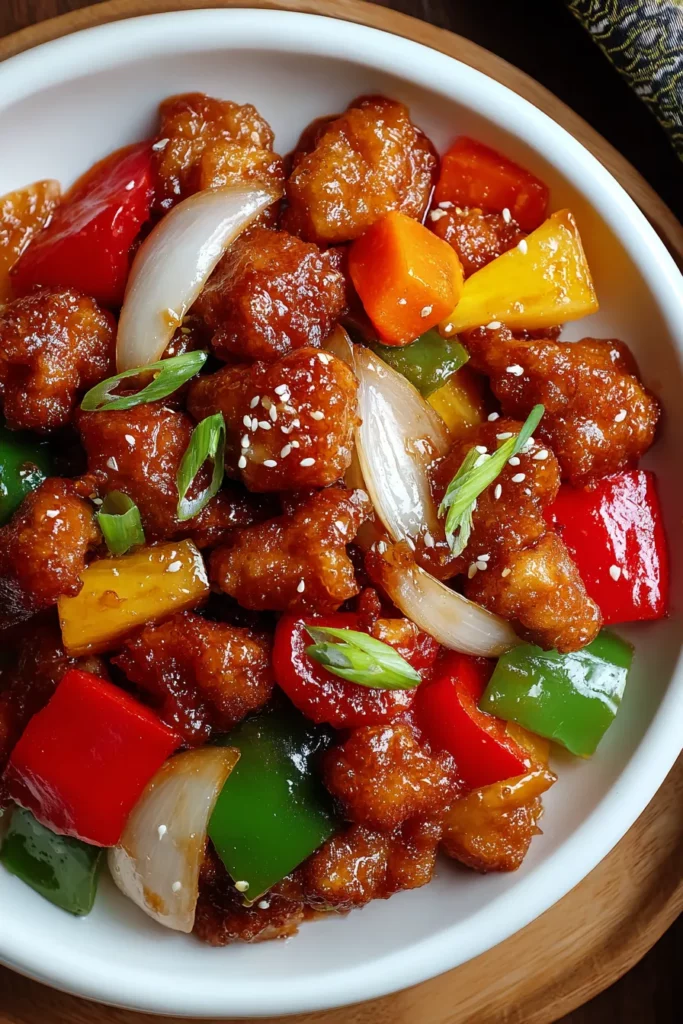

Sweet and Sour Chicken
Description
This vibrant dish combines crispy chicken, colorful bell peppers, and juicy pineapple in a perfectly balanced sweet and sour sauce that excites every palate.
Ingredients
Instructions
-
In a bowl, mix flour, cornstarch, salt, and pepper. Dip each chicken piece first in the flour mixture, then in the beaten eggs, and then again in the flour mixture to coat well.
-
Heat about 2 inches of vegetable oil in a large skillet over medium-high heat. Once the oil is hot, fry the chicken pieces in batches until golden brown and cooked through (about 5-7 minutes per batch). Drain on paper towels.
-
In a small saucepan, whisk together ketchup, rice vinegar, sugar, reserved pineapple juice, and soy sauce. Heat the mixture over medium heat until it begins to simmer.
-
In a small bowl, mix cornstarch with water until smooth. Add this slurry to the simmering sauce, stirring constantly until thickened. Remove from heat.
-
In a large skillet or wok over medium-high heat, add a small amount of vegetable oil. Stir-fry the red and green bell peppers and onion until just tender, about 3-5 minutes.
-
Add the cooked chicken and pineapple chunks to the skillet. Pour the sweet and sour sauce over the chicken and vegetables, tossing to coat everything evenly.
-
Cook for another 2 minutes until everything is heated through and well coated with sauce.
-
Serve hot over steamed rice or noodles.
Note
- For a healthier version, consider baking the chicken instead of frying.
- Adjust the level of sweetness and sourness by changing the sugar and vinegar ratio to your liking.
- You can add other vegetables like carrots or snap peas for extra nutrition and color.
- The dish can be prepared in advance and kept in the refrigerator for up to two days.
- This recipe can easily be doubled to serve more people or for leftovers.

