

When two beloved treats come together, magic is bound to happen—and that’s exactly the kind of joyful alchemy you get with Brown Butter Brookies. These decadent squares layer a rich, chewy cookie base with a fudgy brownie topping, all infused by the irresistible, nutty depth of brown butter. Each bite dances between the caramelized warmth of browned butter, the gentle sweetness of light brown sugar, and the decadent pockets of semisweet chocolate that melt into molten bliss. It’s like having the best of both worlds in a single, glorious dessert jewel.
Beyond just flavor, there’s an experience here: the crackle of the top, the fudgy middle, the slightly chewy edge that clings to the pan—each texture plays its part in this performance. And let’s be honest, watching the butter bubble and turn that gorgeous amber color is a mini show in itself. If you’ve ever wanted to feel like a pastry pro in your own kitchen, mastering the art of browning butter is a delightful step. So grab your spatula, don your favorite apron, and prepare to catch compliments faster than these brookies can disappear from the platter.
KEY INGREDIENTS IN BROWN BUTTER BROOKIES
Every superstar recipe starts with standout ingredients, and Brown Butter Brookies are no exception. Here’s a closer look at the cast members that come together to create this irresistible dessert:
- Unsalted Butter
Browning butter deepens its flavor, bringing out a toasty, nutty complexity that elevates both the cookie and brownie layers into something uniquely indulgent.
- Light Brown Sugar
Its molasses-rich sweetness keeps the brookies chewy and moist, adding extra depth to each bite.
- Granulated Sugar
Balances sweetness and texture, contributing to a tender crumb in the cookie base and glossy sheen atop the brownie layer.
- Large Eggs
Provide structure and moisture, helping the brookies hold their shape while staying lusciously soft.
- Pure Vanilla Extract
Unites all flavors with its warm, floral aroma, enhancing the chocolate and brown butter nuances.
- All-Purpose Flour
Forms the backbone of both layers, delivering just enough gluten to create that satisfying chew without turning tough.
- Baking Soda
Gives the cookie layer a touch of lift, ensuring a light, tender bite.
- Salt
Accentuates sweetness and balances flavors, making the chocolate and butter notes sing.
- Semisweet Chocolate Chips
Melt into gooey pockets in the cookie layer, adding bursts of chocolate throughout.
- Unsweetened Cocoa Powder
Offers rich, bittersweet chocolate intensity to the brownie layer, keeping it deeply chocolatey without extra sweetness.
- Semisweet Chocolate Chunks
Larger pieces that create molten pockets in the brownie topping, giving textural contrast and extra chocolate goodness.
HOW TO MAKE BROWN BUTTER BROOKIES
Ready to dive into the step-by-step process? This recipe unfolds in two harmonious layers: a buttery cookie base followed by a fudgy brownie topping. Below you’ll find detailed guidance for each phase—no shortcuts, just delicious results.
1. Preheat and Prep
Preheat your oven to 350°F (175°C). Line a 9×13 inch baking pan with parchment paper, leaving a slight overhang for easy removal later.
2. Brown the Butter
In a medium saucepan over medium heat, melt the unsalted butter. Stir frequently until the butter foams, then transitions into an amber color with a nutty aroma. Watch carefully—the process happens quickly at the end. Remove from heat and allow it to cool slightly.
3. Cookie Layer Mixing
In a large bowl, combine the light brown sugar and granulated sugar with the browned butter until fully homogeneous. Beat in the eggs one at a time, ensuring each is incorporated before adding the next. Stir in the vanilla extract.
4. Dry Ingredients for Cookies
In a separate bowl, whisk the all-purpose flour, baking soda, and salt. Gradually incorporate these dry ingredients into the wet mixture, mixing until just combined. Gently fold in the semisweet chocolate chips. Using a spatula, press the dough evenly into the prepared pan.
5. Prepare Cocoa Mixture
In another bowl, whisk together the all-purpose flour, unsweetened cocoa powder, baking soda, and salt. Set aside this dry chocolate mix.
6. Brownie Layer Wet Ingredients
In a medium bowl, stir together the melted butter, light brown sugar, granulated sugar, egg, and vanilla extract until smooth and glossy.
7. Combine Brownie Batter
Slowly add the cocoa-flour mixture to the wet ingredients, mixing until you achieve a uniform batter. Fold in the semisweet chocolate chunks for delightful, melty bursts.
8. Layer and Smooth
Pour the brownie batter over the cookie layer. Use the back of a spoon to spread evenly, ensuring full coverage for a unified brookie slab.
9. Bake and Cool
Bake for 30–35 minutes, or until a toothpick inserted in the center emerges with a few moist crumbs attached. Remove from the oven, place on a wire rack, and let cool completely in the pan before lifting out and slicing.
SERVING SUGGESTIONS FOR BROWN BUTTER BROOKIES
Serving Brookies is where your creativity can really shine! Whether you’re treating yourself after a long day or aiming to dazzle guests at a gathering, presentation and pairing can transform these squares into an unforgettable experience. You’ll want to let each brookie reach room temperature so the layers have time to set; this also lets the flavors mellow and blend beautifully. If you’re looking for a playful twist, consider topping each square with a swirl of whipped cream, a dusting of confectioners’ sugar, or even a sprinkle of flaky sea salt—each addition highlighting the brookie’s rich profile in its own way. Now, let’s explore some tried-and-true serving ideas to make your brookie moment shine.
- Warm with Ice Cream
Serve a slightly warmed brookie square alongside a scoop of vanilla ice cream. The contrast of hot and cold creates a luxurious dessert mash-up, with melting ice cream seeping into every crack.
- Drizzled with Caramel Sauce
Elevate the nutty brown butter notes by drizzling homemade or store-bought caramel sauce over each slice. Just a ribbon of golden sweetness adds a professional touch.
- Layered Dessert Parfait
Crumble cooled brookies into a glass and layer with whipped cream or mousse for an elegant parfait. Alternate textures and colors to make it visually stunning.
- Party Platter Presentation
Arrange neat squares on a decorative platter with small serving tongs and mini dessert forks. Garnish with fresh berries or mint sprigs for a pop of color that invites guests to dig in.
HOW TO STORE BROWN BUTTER BROOKIES
Proper storage ensures your brookies stay as delightful on day three as they were on day one. The combination of buttery cookie and fudgy brownie can become chewy or dry if left exposed, so a little care goes a long way. Whether you’re stashing leftovers for sweet pick-me-ups or sending treats home with friends, these methods will keep your brookies at peak freshness and flavor. Be sure to let them cool completely before storing, as steam can create unwanted moisture and sogginess.
- Airtight Container at Room Temperature
Place cooled brookies in a single layer or separated by parchment paper in an airtight container. Store at room temperature for up to 5 days—they remain soft and chewy without drying out.
- Refrigeration for Extended Freshness
For storage beyond a few days, refrigerate in an airtight container. Chilling firms up the chocolate layers and extends shelf life to one week. Bring to room temperature before serving for the best texture.
- Freezing Individual Squares
Wrap each fully cooled brookie in plastic wrap, then tuck into a sealed freezer bag or container. Freeze up to 3 months. Thaw overnight in the fridge or at room temperature for a no-fuss treat.
- Reheat for Fresh-Baked Warmth
To revitalize day-old brookies, microwave a single square for 10–15 seconds or warm in a 300°F oven for 5–7 minutes. The layers renew their gooey allure and release that brown butter aroma once more.
CONCLUSION
We’ve journeyed through every step of crafting these extraordinary Brown Butter Brookies—from achieving that perfectly browned, nutty butter to layering a tender cookie base beneath a lavish brownie top. Each technique and ingredient works in harmony to deliver a dessert that’s part cookie, part brownie, and all delight. You now have the know-how to whip up these treats for parties, cozy nights in, or as a thoughtful homemade gift. Feel free to print this article and keep it in your recipe binder for quick reference, and remember there’s an FAQ section waiting below to answer any extra questions you might have.
I can’t wait to hear how your brookies turn out! Whether you tweak the chocolate ratio, experiment with dark chunks, or add sea salt flakes on top, your feedback matters. If you hit any snags or simply want to share a photo of your gooey masterpiece, drop a comment. Your experiences, tips, and questions help build our community of home bakers—so don’t be shy. Here’s to many more adventures in the kitchen, and to enjoying every buttery, chocolatey bite of these Brown Butter Brookies!
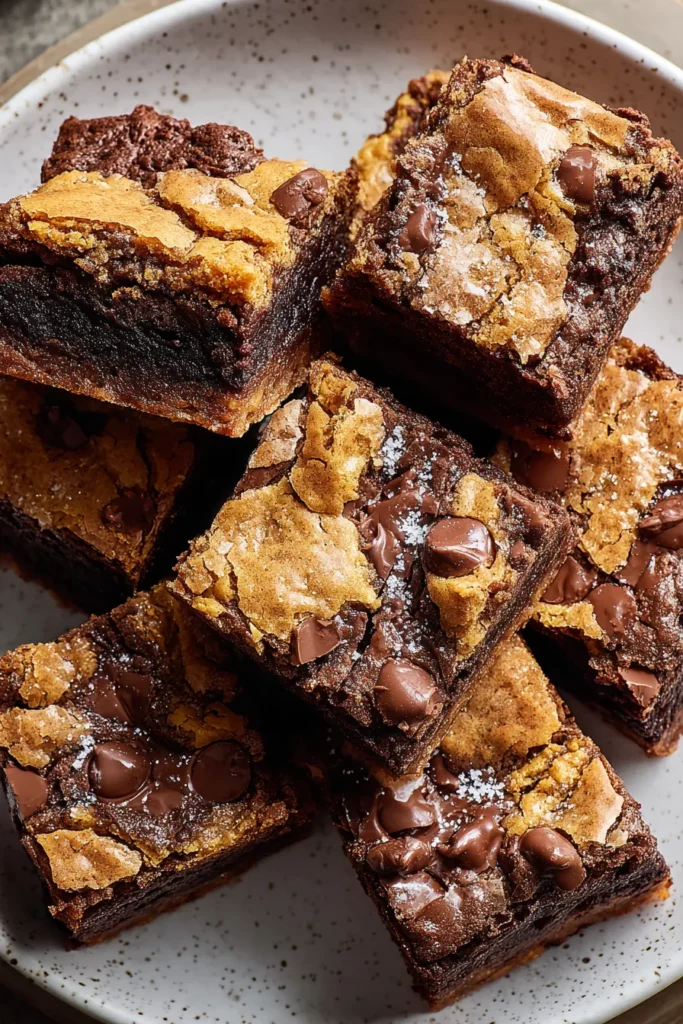

Brown Butter Brookies
Description
These Brown Butter Brookies combine the warm nutty flavor of browned butter with a luscious brownie layer and a soft cookie base, making every bite a heavenly experience.
Ingredients
Instructions
-
Preheat the oven to 350°F (175°C) and line a 9x13 inch baking pan with parchment paper.
-
To brown the butter, melt the 1 cup of butter in a medium saucepan over medium heat. Continue cooking and stirring frequently until the butter begins to foam, then eventually turns a rich amber color, and has a nutty aroma. Remove from heat and let it cool slightly.
-
In a large bowl, combine the brown sugar and granulated sugar with the browned butter until well combined. Then mix in the eggs one at a time, followed by the vanilla extract.
-
In another bowl, whisk together the 2 cups of flour, baking soda, and 1/2 teaspoon salt. Gradually add the dry ingredients to the wet ingredients and mix until just combined. Stir in the chocolate chips. Spread the cookie dough evenly into the prepared baking pan using a spatula.
-
For the brownie layer, in a separate bowl, whisk together the 1 cup flour, cocoa powder, 1/4 teaspoon baking soda, and 1/4 teaspoon salt.
-
In a medium bowl, mix together the melted butter, brown sugar, granulated sugar, egg, and vanilla extract. Slowly add the cocoa mixture to this wet mixture and mix until combined and smooth. Fold in the chocolate chunks.
-
Pour the brownie batter over the cookie layer in the baking pan and spread evenly with the back of a spoon.
-
Bake in the preheated oven for 30-35 minutes, or until a toothpick inserted into the center comes out mostly clean with just a few moist crumbs.
-
Remove the brookies from the oven, let them cool completely in the pan on a wire rack before slicing them into squares to serve.
Note
- Brown butter adds a deep, nutty flavor that enhances the overall taste of brookies.
- For an extra chocolaty experience, try using dark chocolate chunks in the brownie layer.
- These brookies are perfect for sharing at parties and gatherings, or as a heartfelt homemade gift.
- You can store leftover brookies in an airtight container at room temperature for up to a week.

