

The holiday season is the perfect excuse to roll up your sleeves, tie on that festive apron, and dive into some seriously fun baking. Christmas Pinwheel Cookies are a delightful twist on classic sugar cookies, featuring an eye-catching spiral of vanilla and chocolate dough dotted with cheerful red and green sprinkles. With every slice of that vibrant log, you reveal a stunning swirl that instantly lifts the mood, making these cookies a standout at any holiday gathering. They’re sweet but not overly rich, with a tender crumb that practically melts in your mouth. Each bite brings together the buttery vanilla notes and the deep, cocoa-rich swirl, creating a taste sensation that feels both comforting and celebratory.
What really makes these cookies sparkle—beyond their festive look—is the process of crafting them. The deliberate steps of chilling, layering, and rolling might require a bit more time and patience compared to a drop cookie, but the payoff is huge. There’s something almost meditative about gently pressing the dough into neat rectangles, carefully stacking them, and coaxing them into a tight, even log. Plus, decorating the edges with red and green sprinkles adds a playful touch that’s impossible to resist. Whether you’re baking solo with a cup of cocoa in hand or turning the kitchen into a festive playground with family and friends, these pinwheel cookies are a joyful experience from start to finish.
KEY INGREDIENTS IN CHRISTMAS PINWHEEL COOKIES
Before we dive into the step-by-step magic of shaping and rolling, let’s talk about the essentials that make these cookies so irresistibly delicious. Each ingredient plays a starring role, from building the perfect structure to infusing every bite with rich flavor and festive flair.
- All-purpose flour
The foundational element that provides structure and stability. It forms the dough’s backbone, giving the cookies their tender yet firm texture.
- Baking powder
A gentle leavening agent that helps the cookies rise just enough to stay light and fluffy without losing their iconic swirl shape.
- Salt
Subtly enhances all the sweet flavors, balancing the richness of the butter and sugar and preventing the dough from tasting flat.
- Unsalted butter
Offers a creamy, rich base that keeps the cookies tender and moist. Creaming it with sugar also incorporates air for a lighter bite.
- Granulated sugar
Adds straightforward sweetness and helps create a delicate, slightly crisp edge when baked.
- Brown sugar
Contributes a hint of caramel complexity and a touch of extra chewiness to the dough.
- Vanilla extract
Infuses the plain dough with warm, fragrant notes that complement the cocoa swirl perfectly.
- Almond extract
Introduces a subtle, nutty undertone for an extra layer of holiday charm and depth.
- Egg
Acts as a binder, enriching the dough with moisture and helping to hold the swirl pattern together as it bakes.
- Unsweetened cocoa powder
Transforms half of the dough into a rich, chocolatey layer, creating that beloved pinwheel contrast.
- Red and green sprinkles
Provide the finishing festive touch, adding color, texture, and a bit of playful crunch to each cookie’s edge.
HOW TO MAKE CHRISTMAS PINWHEEL COOKIES
Baking these pinwheel beauties is all about precision, patience, and a little holiday cheer. We’ll walk through each step in detail so your swirl comes out tight and your cookies bake up perfectly every time.
1. In a medium bowl, whisk together the flour, baking powder, and salt until evenly combined. This ensures your leavening agent and salt are dispersed throughout the flour, preventing any pockets of unmixed ingredients. Set this dry mixture aside for later.
2. In a large mixing bowl, cream together the softened butter, granulated sugar, and brown sugar using an electric mixer on medium speed. Aim for about 3–4 minutes, or until the mixture turns pale and fluffy. This process incorporates air, giving your cookies a lighter texture.
3. Add the vanilla extract, almond extract, and egg to the butter-sugar mixture. Mix on low to medium speed just until everything is well combined, scraping down the bowl to ensure even distribution. The dough should look smooth and glossy.
4. Gradually add the dry ingredients to the wet mixture, mixing on low speed until just incorporated. Be careful not to overmix; you want a tender dough, not a tough one.
5. Divide the dough in half. Transfer one portion back into the mixing bowl and blend in the cocoa powder until the dough turns a uniform chocolate color and feels smooth.
6. Place the plain dough onto a sheet of plastic wrap. Use your hands or a rolling pin to shape it into a flat rectangle about ½ inch thick. Wrap it tightly and refrigerate for at least 30 minutes.
7. Repeat the process with the chocolate dough—shape it into a similar rectangle, wrap it snugly in plastic wrap, and chill for 30 minutes.
8. Once both doughs are chilled, remove them from the fridge. Unwrap the plain dough and lay it on a clean, lightly floured surface. Place the chocolate dough rectangle directly on top. Peel off the plastic wrap from both layers.
9. Starting from one edge, roll the combined dough into a tight log, using the plastic wrap to help guide it if needed. Apply gentle, even pressure so the layers stay snug against each other. Aim for a uniform thickness throughout.
10. Rewrap the log in plastic wrap and refrigerate for another hour until it’s firm enough to slice cleanly.
11. Preheat your oven to 350°F (175°C) and line baking sheets with parchment paper.
12. Remove the dough log from the refrigerator and, using a sharp knife, slice it into ¼-inch-thick rounds. For extra festivity, dip each cookie’s edge in the red and green sprinkles before placing them on the sheet.
13. Bake in the preheated oven for 10–12 minutes, or until the edges just begin to turn golden. Keep a close eye—overbaking can dull that lovely swirl.
14. Let the cookies cool on the baking sheets for a few minutes so they set, then transfer them to wire racks to cool completely.
SERVING SUGGESTIONS FOR CHRISTMAS PINWHEEL COOKIES
Once those pinwheels are cooled and sparkling with festive sprinkles, it’s time to think about presentation. These cookies are not only delicious but also adorable on any holiday dessert spread. Whether you’re hosting a cookie exchange, gifting them to neighbors, or simply elevating your family’s holiday snack table, here are some playful ideas to show them off.
- Serve on a decorated platter lined with evergreen sprigs or holly leaves to create a lush, seasonal backdrop—great for buffet tables or dessert bars.
- Pair with a steaming mug of hot cocoa or spiced chai for a comforting contrast. The creamy beverage balances the buttery cookie perfectly.
- Package in gift boxes or cellophane bags tied with festive ribbon. Nestle each layer with parchment paper and include a handwritten holiday note for a personal touch.
- Arrange on a tiered stand alongside other bite-size treats like peppermint bark and gingerbread men. The height and variety will make your dessert table truly eye-catching.
HOW TO STORE CHRISTMAS PINWHEEL COOKIES
Keeping your pinwheel cookies fresh and flavorful is key—especially if you’re baking ahead for holiday events or want to enjoy them all week long. Proper storage not only preserves their texture but also helps those vibrant colors stay bright.
Store cooled cookies in an airtight container at room temperature. Layer with parchment or wax paper to prevent sticking and maintain the crisp edges.
If you plan to enjoy them over several days, press a piece of sandwich bread on top of the cookies inside the container. The bread will absorb any excess moisture, keeping the cookies tender but not soggy.
For longer storage, freeze the cookie log before slicing. Wrap it tightly in plastic and foil, then freeze for up to 3 months. When you’re ready, thaw the log in the refrigerator before slicing and baking.
Alternatively, once baked, let the cookies cool completely, then lay them in a single layer on a baking sheet and freeze until solid. Transfer to a freezer-safe bag with parchment between layers, and thaw at room temperature when needed.
CONCLUSION
From vibrant spirals of vanilla and chocolate dough to the playful pop of red and green sprinkles, these Christmas Pinwheel Cookies add a splash of holiday joy to your baking roster. We’ve covered everything: the crucial roles of each ingredient, detailed step-by-step instructions to roll and chill your dough perfectly, and plenty of tips for serving, storing, and gifting. Whether you’re an intermediate baker looking to expand your holiday repertoire or you simply want to create a cheerful seasonal treat, this recipe delivers both style and flavor. With roughly 1 hour of hands-on prep and 1 hour 30 minutes of chilling and resting time, you’ll end up with about 24 cookies that each clock in around 150 calories—ideal for snacking alongside a warm cup of cocoa or sharing with friends at your next gathering.
Feel free to print this article or save it to your favorite recipe collection for easy reference during the busy holiday season. You’ll even find a handy FAQ section below to tackle any questions that pop up as you bake. Don’t hesitate to leave a comment or reach out if you have feedback, questions, or stories about how these cookies turned out for you. I’d love to hear how your kitchen festivities unfold and am here to help with any troubleshooting or creative variations you dream up. Happy baking, and may your holidays be as sweet and swirly as these charming pinwheel cookies!
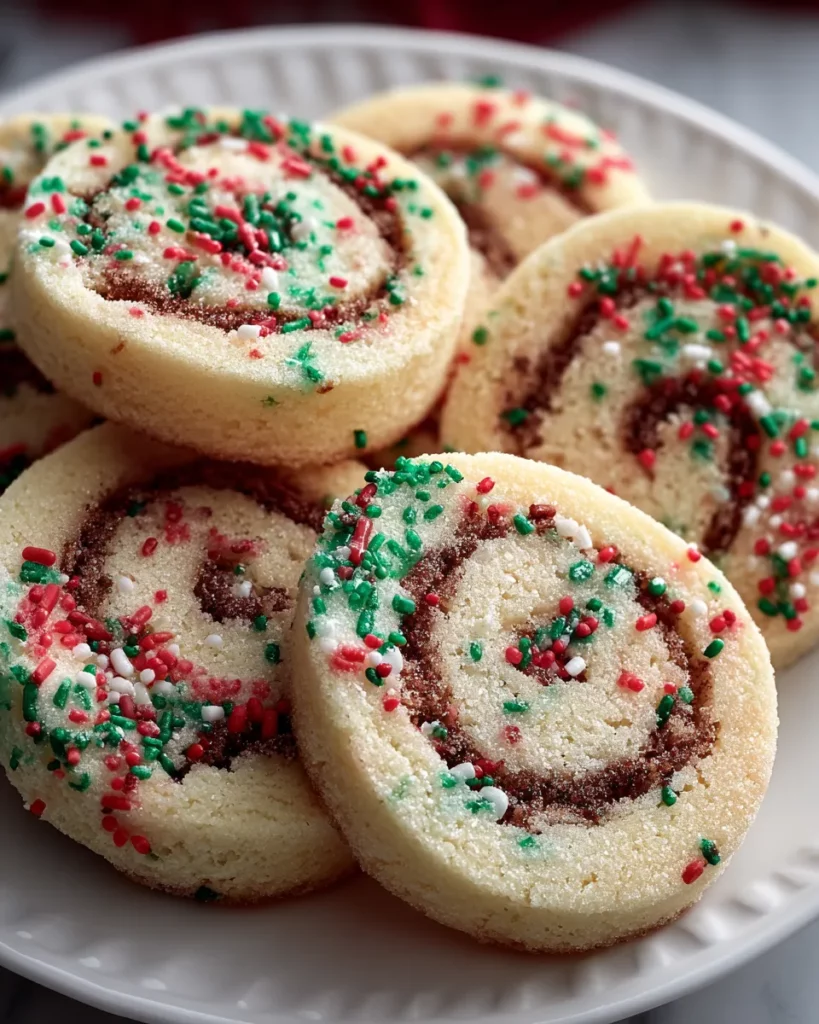

Christmas Pinwheel Cookies
Description
Celebrate the season with these delightful Christmas Pinwheel Cookies, featuring a luscious blend of buttery cookie layers, rich cocoa, and vibrant sprinkles that bring smiles with every bite.
Ingredients
Instructions
-
In a medium bowl, whisk together the flour, baking powder, and salt. Set aside.
-
In a large mixing bowl, cream together the softened butter, granulated sugar, and brown sugar using an electric mixer on medium speed until light and fluffy, about 3-4 minutes.
-
Add the vanilla extract, almond extract, and egg to the butter-sugar mixture, and mix until well combined.
-
Gradually add the dry ingredients to the wet ingredients, mixing on low speed until just incorporated. Do not overmix.
-
Divide the dough in half. In one half, mix in the cocoa powder until fully combined to create the chocolate dough.
-
Take the plain dough and shape it into a flat rectangle, about 1/2 inch thick, on a sheet of plastic wrap. Wrap tightly and refrigerate for at least 30 minutes.
-
Repeat the same process with the chocolate dough, shaping it into a rectangle and refrigerating it for 30 minutes as well.
-
Once the doughs are chilled, remove them from the refrigerator. Lay the plain dough on a clean surface and place the chocolate dough on top of it. Carefully peel off the plastic wrap.
-
Starting from one edge, roll the combined dough tightly into a log, using the extra plastic wrap to help guide it if necessary. Make sure the roll is tight and even.
-
After rolling, wrap the log in the plastic wrap again and refrigerate for another hour until firm.
-
Preheat your oven to 350°F (175°C) and line baking sheets with parchment paper.
-
Remove the dough log from the refrigerator and slice it into 1/4 inch thick rounds. Dip the edges of each cookie in the sprinkles, if desired.
-
Bake the cookies in the preheated oven for 10-12 minutes, or until the edges are lightly golden.
-
Allow the cookies to cool on the baking sheets for a few minutes before transferring them to wire racks to cool completely.
Note
- These cookies can be stored in an airtight container for up to a week.
- Experiment with different colors of sprinkles for various occasions or themes.
- For an extra festive touch, consider adding peppermint extract to the dough.
- These cookies also make a delightful gift when packaged in decorative boxes.

